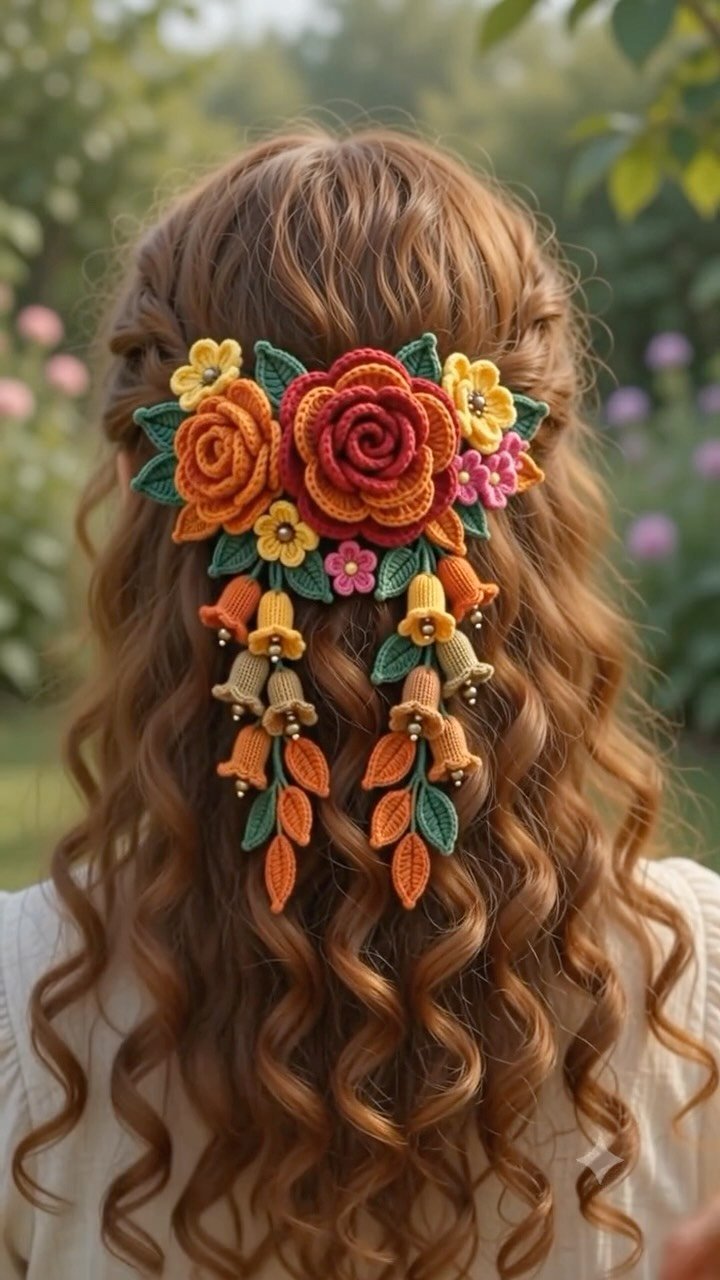
Crochet Hairpiece with Textured Roses and Bellflowers
Crochet Hairpiece Featuring Textured Roses and Bellflowers
In this tutorial, you’ll learn how to create a stunning crochet hairpiece adorned with textured roses and delicate bellflowers. This project provides an enjoyable blend of artisan techniques and creative flair, embodying the enchanting essence of autumn. By crafting each flower and assembling them into a gorgeous hairpiece, you’ll create an accessory that’s both charming and stylish for any occasion. Let’s dive in!
Project Plan
This crochet hairpiece consists of several key components, which we will assemble in the following order:
- Textured Roses: These will serve as the primary decorative element of your hairpiece.
- Bellflowers: Smaller flowers that enhance detail and elegance, complementing the roses.
- Base Foundation: A supportive structure where the flowers will be attached, ensuring they stay secure.
- Optional Hardware: Such as hair clips or a headband for easy attachment.
We will begin by crocheting the roses and bellflowers before moving on to assembling all components onto the base. This step-by-step guide ensures a beautifully finished piece that captures the spirit of the season.
Materials and Tool Selection
Materials Needed
- Yarn: Select a medium-weight yarn (worsted weight recommended) for durability and texture. Ideal colors include deep reds, oranges, and greens for a seasonal palette.
- Crochet Hook: A size H (5.0 mm) hook is ideal for working with medium-weight yarn. Adjust hook size as necessary based on your chosen yarn.
- Scissors: For cutting your yarn.
- Yarn Needle: To weave in ends once you complete the project.
- Optional: Hair clips or a headband for securing the finished hairpiece.
Considerations
The type of yarn you choose will affect the texture and drape of your hairpiece. Natural fibers like cotton or wool will yield different finishes compared to synthetic blends, so consider the final look you wish to achieve.
Always make a gauge swatch to determine your stitch tension for a consistent result throughout the project. This small practice piece will help avoid fit issues down the line.
Terminology and Techniques
Common Abbreviations
- ch: chain
- sc: single crochet
- dc: double crochet
- sl st: slip stitch
- st(s): stitch(es)
Technique Breakdown
Creating a Foundation Chain
- Action: Make a slip knot and then chain the desired number of stitches (e.g., 10 ch for a flower base).
- Check: You should have a straight chain of the intended length.
Single Crochet (sc)
- Action: Insert the hook into the stitch of the foundation chain. Yarn over and pull up a loop (2 loops on the hook). Yarn over again and pull through both loops.
- Check: The sc stitch should create a stable, tight finish.
Double Crochet (dc)
- Action: Yarn over and insert the hook into the chosen stitch. Yarn over and pull up a loop (3 loops on the hook). Yarn over and pull through the first two loops, then yarn over and pull through the remaining two loops.
- Check: The finished stitch should be taller than a single crochet.
Slip Stitch (sl st)
- Action: Insert the hook into the stitch. Yarn over and pull through both the stitch and the loop on your hook.
- Check: Use this technique for neatly joining rounds without adding height.
Measurements and Preparation
Before starting your project, measure the desired width of the hairpiece, especially in the area where you plan to place flowers.
Gauge Swatch
- Swatch Size: Crochet a 4-inch x 4-inch square using the stitches you plan to use for your hairpiece.
- Assess: Measure your swatch to determine how many stitches fit within that area, which will become your gauge.
- Adjusting for Fit: If your swatch does not match the intended size, adjust your hook size accordingly.
Detailed Working Method
Stage 1: Crocheting the Textured Roses
- Foundation: Chain 60 (or desired length of your rose).
- Petal Creation: Start in the second chain from the hook.
- Round 1: Work 5 dc in the same stitch for the first petal, then sl st into the next stitch.
- Repeat the pattern: Continue around, ensuring you create 6 petals in total. Finish with a sl st.
- Stopping Condition: Ensure you have 6 evenly formed petals.
- Shape the Rose: Gather the petals gently at the base and secure with a yarn thread.
Stage 2: Crocheting the Bellflowers
- Foundation: Chain 30.
- Petal Creation: Use the same petal pattern but work only 4 dc per petal, creating a total of 5 petals.
- Stopping Condition: Ensure that you have a unified finish with your 5 petals.
Stage 3: Assembling the Hairpiece
- Base Creation: Use a firm crochet method to create a circular base using single crochet. For example, chain 10, join with a slip stitch, and then crochet in a spiral.
- Attaching Elements:
- Position your roses evenly spaced on the base and secure with a sl st. Weave ends through the base for added strength.
- Attach bellflowers as accents, also using the sl st method.
- Tension Check: Ensure that all flowers are secure but not overly tight.
Assembly and Finishing
Before fastening off the flowers, check their alignment to prevent distortion. Use the yarn needle to weave in all loose ends to the back of the base, ensuring a neat finish. If adding clips or headbands, sew them securely to the underside of your completed hairpiece.
Troubleshooting
| Symptom | Likely Cause | Practical Correction |
|——————-|———————|——————————————-|
| Flowers droop | Too few stitches | Add additional foundation stitches or adjust hook tension. |
| Inconsistent shape| Incorrect tension | Adjust your hook size or yarn tension to achieve uniformity. |
| Fraying ends | Ends not secured | Weave in loose ends more securely or double knot for strength. |
Variations, Care, and FAQs
- Can I use different colors? Absolutely! Feel free to experiment with colors that match your outfit or mood.
- How do I care for my hairpiece? Hand wash gently in cool water and lay flat to dry. Avoid heavy agitation to preserve the shape.
- Can this be attached to a headband? Yes, simply sew the completed crochet piece directly onto a headband for a stylish accessory.
- What if my flowers look uneven? Adjust your tension while crocheting. You can also block your finished piece for a more uniform appearance.
Completion Checklist
- [ ] Check the fit of flowers.
- [ ] Secure all yarn ends properly.
- [ ] Ensure that flowers and base align uniformly.
- [ ] Choose an appropriate attachment method for your chosen hardware.
With these detailed steps, you’re now ready to create your own crochet hairpiece that captures the beauty of autumn. Enjoy the process and happy crocheting!