Crochet Animal Face Coasters: Cute Cat, Bunny & Bear Coasters
If you love crochet projects that are quick, useful, and full of personality, these adorable animal face coasters are a perfect project to add to your handmade collection.
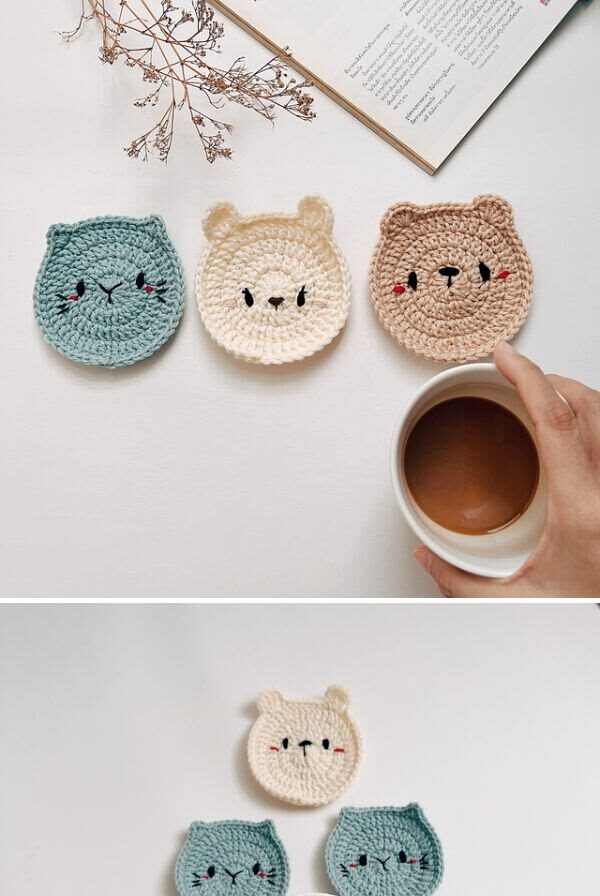
The design is wonderfully simple: a flat crochet base is worked in the round, the upper edge is shaped to create two small animal ears, and the final character comes to life with a few embroidered facial details. With the same basic construction, you can create a sleepy cat, a sweet bunny, a teddy bear, or many other animal-inspired faces simply by changing the ear shape, colors, and embroidery.
The photographed set uses soft pastel colors including dusty blue, warm cream, and light brown. Small black facial details and tiny pink cheeks give each coaster its own expression while keeping the overall design clean and minimal.

Why These Crochet Animal Coasters Are So Cute
What makes these coasters especially appealing is how much character can be created from a very simple crochet shape.
The body is essentially a flat circular crochet piece. There is no complicated three-dimensional amigurumi construction, no stuffing, and no separate body that needs to be assembled.
The animal identity comes mainly from three details:
- The shape of the ears.
- The color of the crochet base.
- The embroidered face.
This makes the project particularly flexible. One basic coaster construction can become several different animals without completely learning a new pattern each time.
Similar animal-face coaster patterns commonly use a flat circular base and simple facial embroidery, while the ears can be formed directly during the final round or added as separate pieces. :contentReference[oaicite:1]{index=1}
What You Will Make
The finished project is a flat animal-shaped coaster suitable for cups, mugs, glasses, and small decorative objects.
The basic shape consists of:
- A round crochet base.
- A slightly shaped upper edge.
- Two animal ears.
- A simple embroidered face.
- Optional pink or colored cheeks.
The coaster should remain completely flat across the center so a mug can sit comfortably without wobbling. This is why the facial embroidery should remain relatively low and flat rather than using bulky 3D pieces.
Materials You Will Need
This is a small project, so it is also a great way to use leftover yarn from other crochet projects.
- Worsted or medium-weight cotton yarn for the main color
- Small amounts of black yarn or embroidery thread
- Small amount of pink yarn for the cheeks
- Crochet hook appropriate for your yarn
- Tapestry needle
- Scissors
- Stitch marker, optional
Cotton is particularly suitable for coasters because it creates a stable fabric and is commonly used for crochet projects that need to tolerate moisture and regular handling. Published animal coaster patterns also commonly recommend medium-weight cotton yarn. :contentReference[oaicite:2]{index=2}
Choosing the Yarn
For a design similar to the photograph, choose soft but clearly contrasting colors.
Good combinations include:
- Dusty blue + black + pink
- Warm ivory + black + soft pink
- Light beige + dark brown + pink
- Sage green + black + blush pink
- Dusty rose + cream + dark brown
If you are making a complete set, keeping the same yarn weight and hook size for every coaster will make the finished collection look much more coordinated.
Choosing the Hook Size
Use the hook recommended for your yarn as a starting point. For medium-weight cotton, a hook around 3.5–4 mm is commonly suitable, although the correct size depends on the yarn and your tension.
Your goal is a firm, flat fabric. You do not want the coaster to become so loose that the cup sinks into the stitches, but you also do not want the fabric to become stiff and difficult to shape.
Before You Start: Understand the Construction
The easiest way to understand this project is to think of it as a normal round coaster that gets two special corners or ear sections near the end.
You are not crocheting a stuffed animal. The entire piece stays flat.
The construction can therefore be divided into three stages:
- Step 1: Crochet the circular base.
- Step 2: Shape the ears and finish the outer edge.
- Step 3: Embroider the animal face and complete the coaster.
This three-stage construction is also consistent with published cat and bear coaster tutorials, where the circular base is worked first, the ears are created near the end, and the face is embroidered afterward. :contentReference[oaicite:3]{index=3}
Step 1: Crochet the Circular Base

Start by making a magic ring or another adjustable center suitable for working in the round.
Work the first round into the center and continue adding evenly distributed increases so the piece grows into a flat circle.
A simple single-crochet construction can be built using the familiar increase principle: each new round contains more stitches between increases.
For example, a common flat single-crochet circle follows this type of progression:
- Round 1: 6 single crochet into the center.
- Round 2: Increase in every stitch.
- Round 3: One single crochet, then an increase, repeated around.
- Round 4: Two single crochet, then an increase, repeated around.
- Continue the same principle as the circle grows.
This is a construction framework rather than a claim that these exact rounds reproduce an unidentified original designer’s pattern. Different yarn weights and stitches change the final diameter, so measuring the actual piece is more useful than blindly following a stitch count.
Keep the Circle Flat
This is one of the most important checks during the project.
Place your work on a flat surface after each round.
If the circle begins to form a bowl, you probably need more increases. If the outer edge becomes wavy or ruffled, you may have too many increases or your tension may be too loose.
The finished coaster needs to remain flat because the cup will sit directly on its surface.
How Large Should the Base Be?
A practical animal coaster is usually around the size needed for an ordinary mug or glass. Many published animal-face coaster patterns use a finished diameter around 4–5 inches, although the exact size varies with yarn, hook, and tension. :contentReference[oaicite:4]{index=4}
Instead of treating that measurement as mandatory, use it as a starting point.
Place your favorite mug over the crochet circle while it is still unfinished. The base should extend beyond the bottom of the mug enough to function as a coaster while leaving room for the animal ears at the top.
Why Cotton Works So Well for Coasters
Cotton is a popular choice for this type of project because it provides a relatively stable fabric and is suitable for an item that may occasionally become damp from a cold or hot drink.
It also gives embroidered facial details a clean surface to sit on.
For the closest appearance to the photographed coasters, choose a smooth yarn rather than a highly fuzzy yarn. Smooth fibers make the stitches and embroidered eyes easier to see.
Step 2: Shape the Ears and Finish the Outer Edge

Once the circular base reaches the desired diameter, the project changes from a simple circle into an animal face.
The ears are created along the upper edge.
The exact ear construction should depend on the animal you are making because cat, bunny, and bear ears have different silhouettes.
Cat Ears
Cat ears should have a more pointed triangular appearance. They can be created with taller stitches concentrated into a small section of the final round, with shorter stitches between the ears.
This creates the characteristic pointed top seen on a cat-face coaster.
Published cat coaster patterns use exactly this general principle: the final round changes stitch heights to create the two ears rather than making the coaster into a stuffed object. :contentReference[oaicite:5]{index=5}
Bear Ears
Bear ears should be smaller and rounder. Instead of creating a sharp peak, use a compact cluster of taller stitches or a small rounded ear shape.
The ears should remain relatively flat so that the coaster still works properly underneath a mug.
Bunny Ears
Bunny ears are generally taller and more elongated than bear ears. You can extend the ear vertically while keeping the base attached to the top edge of the circular face.
If the ears become too long, they may curl or interfere with the mug, so keep the overall silhouette balanced.
Two Ways to Create the Ears
There are two reliable approaches for making the ears.
Method A: Crochet the Ears Directly Into the Final Round
This method is particularly clean because the ears become part of the outer edge.
You work shorter stitches around the lower part of the face, then use a taller stitch combination in the selected stitches to rise upward and create the first ear. After anchoring it back to the edge, continue across the top before repeating the process for the second ear.
This gives the coaster a seamless animal silhouette.
Method B: Make Separate Ears
Alternatively, make two small ear pieces separately and sew them onto the top of the circular base.
This method is particularly useful if you want to make different animal styles from the same circular base.
Separate ears also make it easier to experiment with the shape before permanently attaching them.
Both approaches appear in published animal coaster patterns, so either can be structurally sound. :contentReference[oaicite:6]{index=6}
Make Sure the Two Ears Match
Symmetry is extremely important for this design.
Before fastening off, compare the two ears:
- Are they approximately the same height?
- Are they the same distance from the center?
- Do they have similar widths?
- Does the face still lie flat?
Small handmade differences are completely normal, but large differences can make the animal expression look unbalanced.
Finishing the Outer Edge
Once the ears are complete, finish the remaining outer edge neatly.
A simple single-crochet or slip-stitch finish can help stabilize the perimeter and give the coaster a cleaner outline.
Pay special attention to the transitions between the ears and the circular face. These areas should not pull tightly.
Step 3: Embroider the Animal Face

This is the stage where the simple crochet shape becomes a recognizable animal.
Use black yarn or embroidery thread for the main facial details. A small amount of pink yarn can be used for the cheeks.
Position the Eyes First
Start with the eyes because their position determines the entire expression.
Mark the approximate center of the face first. Then place the two eyes at equal distances from that center point.
Keep the eyes relatively small. The reference design uses minimal facial details rather than large plastic safety eyes.
Add the Nose
The nose should sit between and slightly below the eyes.
For the bear and bunny-inspired versions, a small dark triangular or rounded nose works well. For the cat, a tiny central nose combined with a small mouth or whiskers can create the feline expression.
Add the Mouth
A very small vertical or curved line underneath the nose is enough.
Avoid making the mouth too large. The charm of these coasters comes from their simple, minimal faces.
Add the Cheeks
Use a tiny amount of pink yarn to create the blush marks on both sides of the face.
The cheeks should remain subtle. Two or three small stitches are often enough to create the effect.
How to Keep the Embroidery Flat
This is particularly important for a coaster.
Do not create thick knots or large raised embroidery underneath the area where the cup will sit.
Carry the yarn discreetly through the back of nearby stitches between facial details. Secure the ends carefully and trim only after you are confident that the embroidery will not loosen.
Published bear coaster instructions similarly recommend keeping the facial embroidery light so that the cup remains stable on the coaster. :contentReference[oaicite:7]{index=7}
Creating the Different Animals
The beauty of this project is that you can use the same basic base for several animals.
Blue Cat
Use a dusty blue or muted teal yarn. Create pointed ears, small dark eyes, a tiny nose, and several short whisker lines. Small pink cheeks complete the look.
Cream Bunny
Use warm cream yarn. Make the ears slightly taller and softer than the bear’s ears. Keep the facial expression gentle with small dark eyes, a tiny nose, and subtle blush.
Brown Bear
Use light caramel or beige yarn. Make the ears rounded and relatively small. A darker nose and tiny pink cheeks give the bear the same friendly expression as the reference.
Making a Matching Set
One of the best things about this project is that it naturally lends itself to sets.
You could make:
- Two blue cat coasters.
- Two cream bunny coasters.
- Two beige bear coasters.
- One of each animal for a mixed collection.
Keeping the same face proportions while changing only the ear shape and color will make the entire collection look professionally coordinated.
How to Make the Coaster Larger
If you want the coaster to accommodate a larger mug, continue the circular base for another increase round before creating the ears.
The important thing is to maintain the flat-circle increase structure.
Do not simply add random stitches around the outside because this can create waves or distort the shape.
How to Make a Smaller Coaster
For espresso cups, small glasses, or decorative mini coasters, stop the circular base earlier.
Then shape the ears proportionally.
If the base becomes smaller, the ears should also become smaller; otherwise the animal may look top-heavy.
How to Prevent Curling
Curling can happen when the tension is too tight or when the number of increases is not appropriate for the stitch being used.
If your coaster starts curling upward:
- Check whether you need additional increases.
- Try a slightly larger hook.
- Relax your tension.
- Lay the piece flat after every round.
If the edge becomes wavy:
- Check for accidental extra increases.
- Make sure you are not working multiple stitches into the wrong space.
- Check your stitch count.
Blocking the Finished Coaster
Blocking is optional, but it can make a noticeable difference.
Lightly dampen the finished coaster and gently shape it on a flat surface. Pay particular attention to the circular body and the two ears.
Allow it to dry completely before removing it from the blocking surface.
Do not stretch the piece aggressively. You want to correct small irregularities, not change the proportions of the animal.
Common Mistakes to Avoid
Making the Base Too Loose
Very loose crochet can make the coaster lose its shape and can make embroidered facial details look uneven.
Making the Base Too Tight
Extremely tight stitches can cause the coaster to curl and make the final round difficult to work.
Uneven Ear Placement
Always identify the center of the coaster before placing the ears. This gives you a reliable reference for both sides.
Oversized Facial Features
Large eyes or a large nose can completely change the delicate appearance of the original style. Keep the embroidery small and balanced.
Too Much Embroidery
Remember that this is still a functional coaster. Thick knots and heavy raised embroidery can make the cup sit unevenly.
How to Make the Face Look Professional
Before permanently embroidering anything, use a removable stitch marker or a small piece of thread to mark the center of the face.
Then position both eyes relative to that center.
Take a step back and look at the coaster before adding the nose. Once the eyes look balanced, add the nose directly between them.
Finally, add the cheeks at equal heights.
This simple measuring process makes a surprisingly large difference.
Care Instructions
Because these coasters are intended for everyday use, they should be easy to maintain.
Follow the washing instructions for your specific yarn. Cotton crochet coasters can generally tolerate gentle washing, but always check the yarn label first.
Lay the coaster flat to dry and reshape the ears if necessary.
Avoid high heat unless the yarn manufacturer specifically recommends it.
Fun Ways to Use These Animal Coasters
These little crochet faces are perfect for more than protecting a table.
- Kitchen coffee corner
- Home office desk
- Children’s tea table
- Reading corner
- Breakfast table
- Handmade housewarming gifts
- Birthday gifts
- Small craft-market items
They can also be packaged as a coordinated set of four or six different animals.
Gift Idea: Create a Complete Animal Set
A particularly cute handmade gift would be a set containing several animals in coordinated pastel colors.
For example:
- Blue cat
- Cream bunny
- Beige bear
- Soft pink bunny
- Sage-green cat
- Warm brown bear
The recipient gets a useful set while each coaster still has its own personality.
Can Beginners Make These Coasters?
Yes, especially if you already know how to make a magic ring, single crochet, increases, slip stitches, and basic embroidery.
The individual pieces are small and the construction is repetitive. Published animal-face coaster patterns are commonly presented at beginner or beginner-intermediate level. :contentReference[oaicite:8]{index=8}
The most important beginner skill is keeping the circular base flat and counting the increases correctly. Once the base is working properly, the ears and face are much easier.
Quick Construction Checklist
Save this short version if you want to remember the project later:
- Choose the animal and yarn color.
- Make a magic ring.
- Work the first round into the center.
- Continue increasing evenly to create a flat circle.
- Measure the diameter against your mug.
- Shape the two ears during the final round or attach separate ears.
- Finish the outer edge neatly.
- Mark the face center.
- Embroider the eyes.
- Add the nose and mouth.
- Add small pink cheeks if desired.
- Secure and weave in all yarn ends.
- Lightly block the coaster if necessary.
- Let it dry completely and enjoy your finished animal coaster.
Final Thoughts
These crochet animal face coasters are a wonderful example of how a very simple crochet construction can become something full of personality.
The project starts with nothing more complicated than a flat circular crochet base. With two carefully shaped ears and a few embroidered stitches, that circle suddenly becomes a cat, bunny, bear, or another cute animal.
The biggest advantage is that you do not need a completely different construction for every animal. Once you understand how the circular base works, you can experiment with different ears, colors, eyes, noses, whiskers, and expressions.
For the closest result to the pictured collection, keep the crochet fabric relatively dense, use soft pastel colors, keep the facial embroidery small, and make sure every coaster remains completely flat underneath the mug.
Make one for yourself, then create a complete little family of animal faces for your coffee table. The project is small enough to finish quickly, easy to customize, and practical enough to use every day.