Crochet Car Center Console Organizer: A Stylish Green Crochet Storage Cover
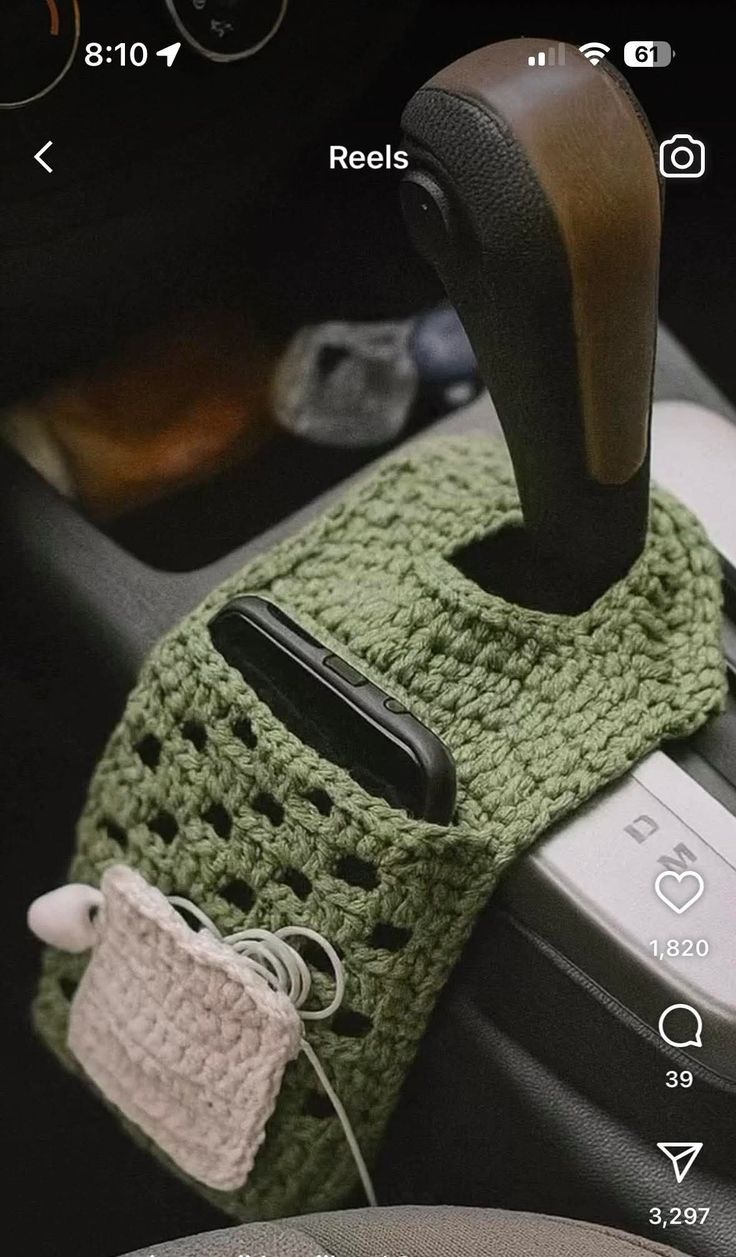
If you love handmade accessories that are both beautiful and genuinely useful, this crochet car center console organizer is a project worth trying. Designed in a soft olive-green yarn, this handmade car accessory combines a fitted crochet cover with an opening around the gear shifter and a practical front pocket for small everyday items.
The finished design is especially interesting because it is not simply a flat crochet rectangle placed inside the car. The main panel is shaped around the center console, the opening around the gear lever is finished so it sits neatly around the shifter, and a separate small pocket provides convenient storage for things such as earbuds, charging cables, cards, or a phone.
What Makes This Crochet Car Organizer Different?
Many crochet car accessories are simple covers that are made separately and then placed over an existing surface. This design goes a step further by combining three useful elements:
- A fitted crochet panel covering the console area.
- A shaped opening around the gear shifter.
- A small front pocket for everyday accessories.
The openwork crochet texture gives the piece a lightweight appearance while the denser sections around the edges help define the shape.
The result is a handmade organizer that adds a soft textile element to an otherwise hard plastic or leather car interior.
Important: Measure Your Car Before Crocheting
This is the most important part of the entire project.
A car center console is not a universal shape. Different vehicles have different console widths, lengths, curves, gear-shifter positions, cup holders, buttons, storage compartments, and control panels.
Existing crochet console-cover patterns also emphasize measuring the actual console because the finished piece needs to be fitted to the specific vehicle rather than relying on one universal measurement. :contentReference[oaicite:1]{index=1}
Therefore, do not copy a fixed number of stitches from another vehicle and expect the same result. Measure your own console and let those measurements determine the crochet dimensions.
Measurements You Should Take
Before picking up your hook, take a flexible measuring tape and record the following measurements.
1. Console Width
Measure the width of the area that the crochet organizer needs to cover. Measure from one side of the console to the other at the point where the organizer will sit.
2. Console Length
Measure the length of the section you want to cover. Decide whether the crochet piece should cover only the area immediately around the gear shifter or extend farther toward the armrest.
3. Gear-Shifter Position
Measure the distance from the front edge of the console to the center of the gear-shifter opening.
Also measure from the left and right edges of the console to the shifter. These measurements determine where the opening needs to be positioned.
4. Gear-Shifter Opening
Measure the approximate width of the base of the gear shifter where the crochet fabric needs to pass around it.
Do not make this opening extremely tight. The crochet fabric needs enough room to sit around the shifter without pulling when the lever moves.
5. Pocket Size
Decide what you want to store in the front pocket.
If you mainly want a place for earbuds and charging cables, a small pocket is enough. If you want to store a phone, make the pocket wider and deeper.
Materials
The original-looking design is worked in an olive or sage-green yarn. A medium-weight yarn is a practical choice because it gives enough structure without making the organizer excessively thick.
- Medium-weight yarn in olive or sage green
- A crochet hook suitable for your chosen yarn
- A tapestry needle
- Scissors
- Flexible measuring tape
- Stitch markers
- Optional contrasting cream yarn for the front pocket
If you want the finished project to resemble the photographed design closely, use one dominant olive-green yarn for the main organizer and a soft cream or natural shade for the small front pocket.
Choosing the Right Yarn
For a car organizer, yarn choice matters more than it might for a decorative crochet piece. The finished project needs to tolerate regular handling, movement, and occasional friction.
Cotton or cotton-blend yarn can provide a relatively stable fabric with clearly defined stitches. Acrylic yarn is another practical option because it is widely available and can provide a little stretch.
Avoid very delicate novelty yarns for the main structure. They can make the openwork difficult to control and may not hold the shape of the organizer as neatly.
Choosing the Crochet Hook
Start with the hook size recommended for your yarn, then make a small test swatch.
For this particular type of organizer, you generally want a fabric that is:
- Flexible enough to follow the console shape.
- Firm enough not to collapse immediately.
- Open enough to resemble the airy texture of the photographed design.
- Dense enough around the edges to remain stable.
If your swatch is extremely loose and floppy, try a smaller hook. If it is rigid and difficult to bend around the console, try a slightly larger hook.
Understanding the Construction
Before starting, it helps to understand how the organizer is assembled.
The project can be divided into three main construction stages:
- Create the main olive-green crochet panel.
- Shape the panel around the console and create the gear-shifter opening.
- Add the small front pocket and finish the edges.
This construction is similar in principle to other fitted crochet console covers, where the top section is crocheted first and the side depth is then developed to fit the physical console. :contentReference[oaicite:2]{index=2}
Step 1: Crochet the Main Openwork Panel

Begin with the main panel. The photographed design uses an openwork texture made from repeating spaces and crochet stitches rather than a completely solid fabric.
The exact stitch sequence can be adapted to your preferred openwork stitch, but the important visual feature is the repeated pattern of small openings running across the panel.
Start With the Measured Width
Create your foundation chain based on the measured width of the section you want to cover. Do not decide the foundation-chain length only from the appearance of the reference image.
Crochet a small sample first and measure how many stitches correspond to a known length. Then use your gauge to estimate the foundation length required for your car.
Build the Openwork Rows
Work the main body using your selected openwork repeat. Keep the edges more controlled than the center if possible, because the edges will eventually be shaped and attached around the console.
The finished fabric should resemble the reference image: rows of olive-green crochet with small regular openings and a relatively dense border.
Keep the Rows Straight
Count your stitches at the end of each row. Openwork patterns can make it easy to accidentally skip an extra stitch or work into the wrong space.
If the number of stitches changes unexpectedly, the panel may gradually become wider or narrower. This becomes a serious problem when you try to fit the finished panel around the console.
How Large Should the Main Panel Be?
The main panel should be slightly larger than the flat surface it needs to cover if the design is intended to wrap over the edges.
Do not make the panel excessively large. Too much extra fabric can bunch around the gear shifter and create an untidy finish.
A good approach is to stop periodically and place the crochet piece directly over the console while the car is stationary.
Compare the crochet dimensions with the real surface instead of trying to estimate everything from a photograph.
Step 2: Shape the Console Area and Gear-Shifter Opening
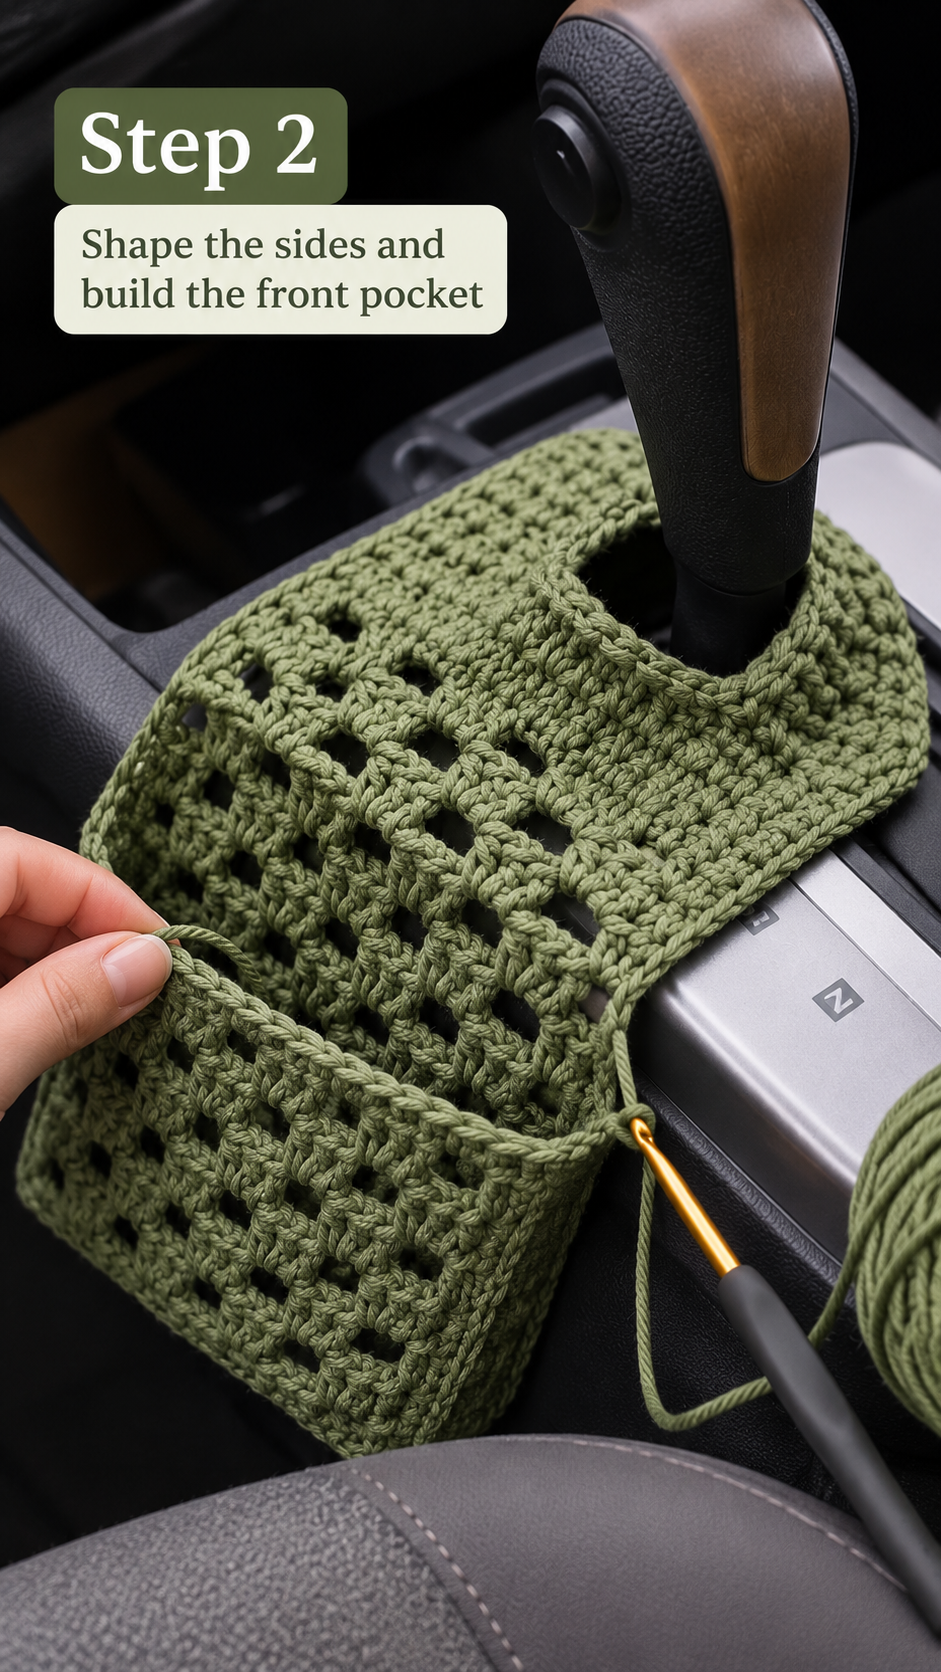
This is the most important shaping stage. The main crochet panel now needs to stop behaving like a flat rectangle and begin following the physical structure of the car console.
Mark the Gear-Shifter Location
Place the panel on the console and use stitch markers to mark the approximate area where the gear shifter passes through.
The position must be based on your own console measurements. Do not simply place the opening in the center unless the gear shifter is actually centered on your vehicle.
Create the Opening
When you reach the marked section, the crochet work needs to create an opening large enough for the base of the shifter to pass through.
One practical method is to stop working stitches across the marked opening and use chains to bridge the space, then work into those chain spaces on the following round or row.
Another method is to create the main panel first and later shape the opening with a separate round around the hole.
The best method depends on the exact geometry of your car console.
Finish Around the Opening
Once the opening is the correct size, work a neat border around it. This gives the edge additional stability and makes the opening look intentional rather than like a gap in the middle of the crochet.
A round of single crochet is a practical choice for stabilizing an open edge. Keep the stitches even and avoid pulling the yarn tightly around curves.
Test the Opening Before Continuing
This is essential.
Place the crochet piece over the stationary console and check that the gear shifter moves freely through the opening.
The crochet should never interfere with the movement of the selector. If the opening is too tight, enlarge it before continuing.
Creating the Side Depth
The finished organizer is not completely flat. Some sections need to drop down around the sides of the console.
To create this depth, continue crocheting along the relevant edges rather than continuing to expand the entire piece outward.
This is a common construction principle in fitted console covers: first establish the top dimensions, then work downward from the edges so the cover develops enough depth to wrap around the console. :contentReference[oaicite:3]{index=3}
Why This Matters
If you simply make one very large rectangle, the organizer may slide around the console. Creating side depth gives the crochet more contact with the console and helps the organizer stay positioned.
Do Not Force a Universal Fit
Crochet is flexible, but that does not mean one exact measurement will fit every vehicle.
Published console-cover patterns show how different dimensions are used for different vehicles. For example, one established free pattern specifies a particular console size and uses an elastic-based construction to create a snug fit, while other patterns are designed around different console dimensions. :contentReference[oaicite:4]{index=4}
Therefore, treat the measurements in this article as a construction method rather than a universal finished size.
How to Keep the Organizer Secure
The reference design is shaped to sit around the console, but depending on your vehicle, you may want an additional securing method.
Possible options include:
- A narrow elastic hidden underneath the console.
- A crochet cord threaded through selected edge spaces.
- A snug lower edge that grips the sides naturally.
Elastic and cords are both used in existing crochet console-cover designs as ways to help the finished cover stay securely positioned. :contentReference[oaicite:5]{index=5}
If you add elastic, it should be used only where it cannot interfere with any vehicle controls or moving mechanisms.
Step 3: Add the Small Front Pocket

The small front pocket is one of the most useful details in this design. In the finished reference image, the pocket provides a separate place for small objects while the larger green organizer remains attached to the console.
The pocket can be made separately as a small rectangle and then sewn onto the front of the organizer.
Make the Pocket Panel
Start with a foundation chain corresponding to the desired pocket width.
Work rows back and forth until the pocket reaches the desired height. A dense stitch such as single crochet is particularly practical because it creates a stable pocket fabric.
For the photographed design, a light cream yarn creates a clear contrast against the olive-green organizer.
Measure the Pocket Against the Item
Before attaching it, place the object you want to store inside the pocket.
If the pocket is intended for earbuds and cables, it does not need to be very deep. If it is intended for a smartphone, increase the width and height accordingly.
Leave enough room at the top for the item to be removed easily.
Attach the Pocket
Position the pocket on the front section of the green organizer.
Use stitch markers to hold the two lower corners and side edges in place. Then sew along the bottom and side edges using matching yarn.
Leave the top edge completely open.
When sewing, take your needle through several crochet stitches rather than only catching the surface loops. This creates a stronger connection and helps prevent the pocket from pulling away when something is placed inside.
Finishing the Edges
A clean border makes a huge difference to the final appearance.
Go around exposed edges with a neat finishing round. Single crochet is an easy option because it gives the edge more structure and helps control the shape.
Pay special attention to:
- The outer edge of the organizer.
- The edge around the gear-shifter opening.
- The upper edge of the front pocket.
- Any exposed corners.
Checking the Finished Fit
Before weaving in all your final yarn ends, place the organizer on the car console one last time.
Check the following:
- The organizer sits flat.
- The gear shifter passes freely through its opening.
- The opening does not pull excessively when the shifter moves.
- The side edges remain in position.
- The front pocket is accessible.
- The pocket does not obstruct any controls.
Very Important Car-Safety Considerations
Because this is a car accessory, fit and safety matter more than they would for an ordinary crochet organizer.
The finished piece should never interfere with the gear selector, parking brake, emergency controls, cup-holder mechanisms, buttons, switches, pedals, airbags, ventilation controls, or any moving part of the vehicle.
Keep loose yarn ends securely woven into the crochet fabric. Do not allow cords or elastic to hang near pedals or other moving controls.
The organizer should also not obstruct the driver’s access to the gear selector.
Test the finished accessory while the vehicle is stationary before using it normally.
How to Make the Openwork Texture More Similar to the Photograph
The reference design has a repeating open texture with small rectangular or diamond-like spaces. The easiest way to recreate this visual character is to choose an openwork repeat that alternates solid crochet sections with chain spaces.
Keep the repeat consistent across the main body. Then use denser stitches around the borders to create contrast.
This gives you the same general visual balance as the reference: airy in the center, more structured around the perimeter.
How to Adapt the Design to a Different Car
This is where the project becomes especially useful. You do not have to own the same vehicle as the person who made the original-looking piece.
Simply adapt the dimensions.
For a Wider Console
Increase the number of foundation stitches in the main panel and maintain the same openwork repeat.
For a Longer Console
Add additional rows before beginning the shaping around the gear shifter.
For a Different Gear-Shifter Position
Move the opening according to your measurements. The opening does not need to be centered if the shifter is not centered on your console.
For a Deeper Console
Add additional rows to the side sections so the crochet extends farther down the sides.
Making the Front Pocket Larger
If you want the organizer to hold a smartphone, sunglasses, charging cable, or other larger items, simply enlarge the separate pocket before attaching it.
A useful approach is to measure the actual object first, then add a small amount of ease. The pocket should hold the object securely without making it difficult to remove.
Ideas for Additional Pockets
Once you understand the basic construction, you can expand the organizer.
- A narrow pocket for charging cables.
- A small pocket for coins or cards.
- A wider phone pocket.
- A slim sunglasses pocket.
- A small hook-and-loop closure pocket.
However, avoid adding so many pockets that the organizer becomes bulky or interferes with the driver’s access to the console.
Color Variations
The olive-green version has a natural, understated appearance that works particularly well with dark car interiors.
Olive and Cream
Keep the main organizer olive green and use cream for the pocket, exactly as in the photographed design.
Forest Green and Beige
A darker forest green combined with warm beige creates a deeper contrast.
Black and Sage
Use black for the main panel and sage green for the pocket if you want a more modern look.
Brown and Cream
Chocolate brown with a natural cream pocket can work beautifully with tan or brown car interiors.
How to Make the Organizer More Durable
If the organizer will be used every day, a few small construction decisions can make it last longer.
- Use a yarn with good abrasion resistance.
- Keep the side seams securely reinforced.
- Reinforce the gear-shifter opening with a clean border.
- Do not overload the front pocket.
- Weave yarn tails through several stitches.
- Check the attachment points periodically.
Common Problems and How to Fix Them
The Organizer Slides Around
The dimensions may be too loose. Reduce the finished width slightly or add a carefully positioned elastic or cord underneath where it is safe to do so.
The Gear-Shifter Opening Is Too Tight
Do not force the shifter through it. Enlarge the opening and reinforce the new edge with a neat border.
The Main Panel Is Curling
Check your tension and hook size. A very tight foundation combined with loose later rows can distort the fabric.
The Openwork Looks Uneven
Count your repeat regularly. Openwork stitches depend heavily on consistent skipped stitches and chain spaces.
The Pocket Sags
The pocket may be too large or too loosely crocheted. Try a denser stitch, reinforce the top edge, or reduce the pocket dimensions.
The Organizer Looks Too Bulky
Reduce the yarn thickness or use a slightly smaller hook. Also avoid adding unnecessary layers underneath the main panel.
Cleaning and Care
Car interiors collect dust quickly, so choose a yarn that is practical to clean.
Always follow the washing instructions for your specific yarn. If the organizer contains elastic, sewn attachments, or a lining, hand washing and gentle drying may be preferable.
Reshape the organizer while damp if necessary and allow it to dry completely before placing it back in the car.
Can Beginners Make This Crochet Car Organizer?
A confident beginner can approach the project if they already understand basic crochet rows, chain spaces, simple shaping, sewing crochet pieces together, and working a border.
The challenging part is not a complicated stitch. The real challenge is measuring the car accurately and translating those measurements into a crochet shape.
For that reason, it is better to take your time with the fitting stage rather than rushing to finish the crochet quickly.
A Practical Step-by-Step Summary
If you want the entire construction reduced to a simple workflow, follow this order:
- Measure the center console.
- Measure the gear-shifter position.
- Measure the required opening around the shifter.
- Decide how large the front pocket should be.
- Choose your yarn and hook.
- Make a small gauge swatch.
- Start the main olive-green panel.
- Continue the openwork repeat until the panel reaches the required dimensions.
- Mark the position of the gear-shifter opening.
- Shape the opening and reinforce its edge.
- Continue shaping the sides so the crochet follows the console.
- Test the fit on the stationary vehicle.
- Make the separate front pocket.
- Sew the pocket onto the front of the organizer.
- Finish all exposed edges.
- Secure all yarn ends.
- Test the organizer again to ensure nothing interferes with vehicle controls.
Final Thoughts
This crochet car center console organizer is a great example of how crochet can be adapted to everyday life. Instead of making another purely decorative project, you are creating something designed around a real object with a specific function.
The olive-green openwork gives the main piece a handmade but modern appearance, while the shaped gear-shifter opening allows the organizer to follow the unusual geometry of a car console. The small contrasting front pocket then adds a practical storage area without making the whole design bulky.
The most important part of recreating this design successfully is not memorizing a fixed stitch count. It is understanding the construction: measure the console, create the main panel, shape the opening around the gear shifter, build the side depth, add the pocket, and test the finished piece in the actual vehicle.
Once you understand that process, the same idea can be adapted to many different cars and console shapes. You can also change the yarn colors, pocket dimensions, stitch texture, and finishing details to create a completely personalized car accessory.