Crochet Granny Square Envelope Pouch: A Beautiful Green Handmade Sleeve
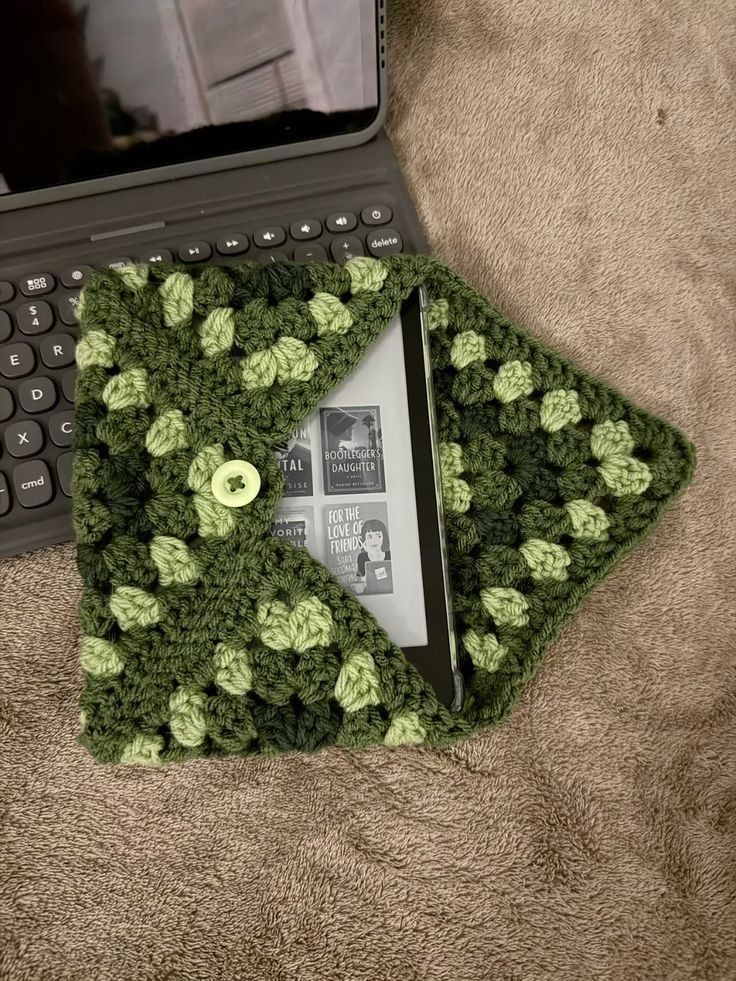
There is something wonderfully satisfying about turning a simple crochet square into something completely useful. This beautiful green granny square envelope pouch is a perfect example. What begins as a flat square of textured crochet becomes a practical little sleeve with a roomy pocket, folded sides, a pointed flap, and a simple button closure.
The design shown here combines deep forest green with lighter sage-green accents, creating a rich botanical color palette that feels cozy, handmade, and timeless. The finished pouch can be used as an e-reader sleeve, book pouch, tablet cover, stationery case, crochet notions pouch, or a small everyday organizer.
Why This Crochet Granny Square Pouch Is So Special
The most interesting part of this project is not only the crochet texture. It is the construction. Instead of crocheting a separate front panel, back panel, flap, and side pieces, the main body starts as one square crochet motif.
Once the square reaches the required size, three of its corners are folded toward the center. The lower and side sections become the pocket, while the remaining corner becomes the envelope-style flap. The two side edges are then secured together, leaving the top flap free to open and close.
This type of single-square construction is a well-established way to turn a granny square into a pouch. The number of rounds can be increased or reduced to change the finished size, making the basic idea suitable for everything from small accessories to larger book or e-reader sleeves.
What You Will Make
The finished project is a soft square crochet sleeve with an envelope-style closure. The pictured version uses a dark green background with scattered lighter green textured sections and a pale green button.
- One large granny-square crochet piece
- A folded envelope-style pocket
- A pointed triangular flap
- Two secured side seams
- A decorative button closure
- A soft textured green color palette
The exact finished size should be determined by the item you want to place inside the pouch. This is especially important when making the design for an e-reader or tablet because crochet fabric can stretch slightly and the folding process changes the usable interior dimensions.
Materials You Will Need
You do not need a large collection of supplies for this project. The most important thing is choosing yarn that gives the square enough structure to hold its shape while remaining soft enough to fold comfortably.
- Medium-weight or DK yarn in deep forest green
- A lighter sage or pale green yarn for the contrasting details
- A crochet hook suitable for your yarn
- A tapestry or yarn needle
- Scissors
- One medium or large four-hole button
- Stitch marker, optional
Choosing the Yarn
Cotton or a cotton-blend yarn is a particularly useful choice for a pouch because it tends to hold its shape well and gives the stitches a clean appearance. A smooth acrylic yarn can also work if you prefer a softer finished sleeve.
Avoid extremely loose or slippery yarn if you want the pouch to keep a defined envelope shape. Very bulky yarn can also make the folded corners unnecessarily thick.
Choosing the Hook
Start with the hook size recommended for your yarn, then make a small test section. The goal is a fabric that is flexible enough to fold but firm enough that an e-reader or book does not immediately pull the granny-square openings apart.
If your stitches are very loose, try a slightly smaller hook. If your fabric feels stiff and difficult to fold, try a slightly larger hook.
Understanding the Construction Before You Start
This is the most important part of the project. The finished pouch does not come together by sewing several rectangular pieces together. Instead, you create one square and transform it through folding.
Think of the completed square as having four corners:
- The bottom corner becomes part of the pouch pocket.
- The left corner folds inward.
- The right corner folds inward.
- The remaining top corner becomes the envelope flap.
After the three pocket-forming corners are positioned correctly, only the two side edges need to be secured. The flap remains free so that the pouch can open.
This folding method is also why sizing the square correctly is more important than simply following a fixed number of rounds.
Step 1: Crochet the First Granny Square

Start by creating the center of your granny square and work outward in rounds. A traditional granny-square structure grows by placing increase groups in the four corner spaces. The corners are what allow the square to become larger while keeping its four-sided shape.
For a classic granny-square foundation, each corner is formed with an increase group separated by a chain space. Between the corners, work the regular granny clusters. As each new round is added, another cluster appears along each side of the square.
Basic Granny-Square Construction
If you are comfortable with a traditional granny square, use your preferred classic granny-square method. A common construction begins with a magic ring and works groups of double crochet stitches around the center. Each corner receives a larger increase section, while the spaces between corners receive the regular granny clusters.
Continue working rounds until the square reaches the size needed for your pouch. The important point is that the piece remains square and that the four corners stay clearly defined.
How to Recreate the Green Color Effect
The pictured design has two dominant green tones: a deep olive/forest green as the main color and a lighter sage green that appears in small raised-looking sections throughout the square.
To achieve a similar visual effect, keep the dark green as the structural background and introduce the lighter green in selected granny clusters or textured accent sections.
You do not need to place every light-green accent in exactly the same position. In fact, a slightly irregular distribution gives the handmade design its character.
The key is to keep the majority of the square dark green. This allows the lighter green details to stand out without taking over the entire design.
Keep the Square Truly Square
Stop occasionally and lay your work completely flat. Check that the four sides have similar lengths and that the corners are not pulling inward.
If one corner looks noticeably smaller than the others, check your corner increases before continuing. A small mistake becomes much more obvious when the square is folded into an envelope.
How Large Should the Granny Square Be?
Do not choose the final size only by counting rounds. Different yarn weights, hook sizes, stitch tension, and decorative stitches can produce very different dimensions from the same number of rounds.
Instead, use the item you want the pouch to hold as your measuring reference.
For an E-Reader or Small Tablet
Place the finished device on top of the square while the crochet piece is still flat. The square needs enough fabric to wrap around the device and create the pocket and flap.
Remember that the finished pouch will not provide the same usable width as the complete flat square. Part of the square becomes the folded sides and flap.
Make the square slightly larger than the device rather than trying to force an exact match. Crochet fabric needs a little ease so the device can slide in and out comfortably.
Before Folding: Check the Fit
This simple test can save you from having to undo several rounds later.
- Place the completed square flat on a table.
- Place the device or book near the center.
- Fold the bottom corner upward.
- Fold the left corner inward.
- Fold the right corner inward.
- Bring the remaining corner downward as the flap.
- Check whether the device fits without stretching the crochet aggressively.
Do this test before sewing the sides permanently. If the pocket is too tight, add another round to the granny square. If it is excessively large, you may prefer to stop before adding another round.
Step 2: Fold the Square Into the Envelope Pouch
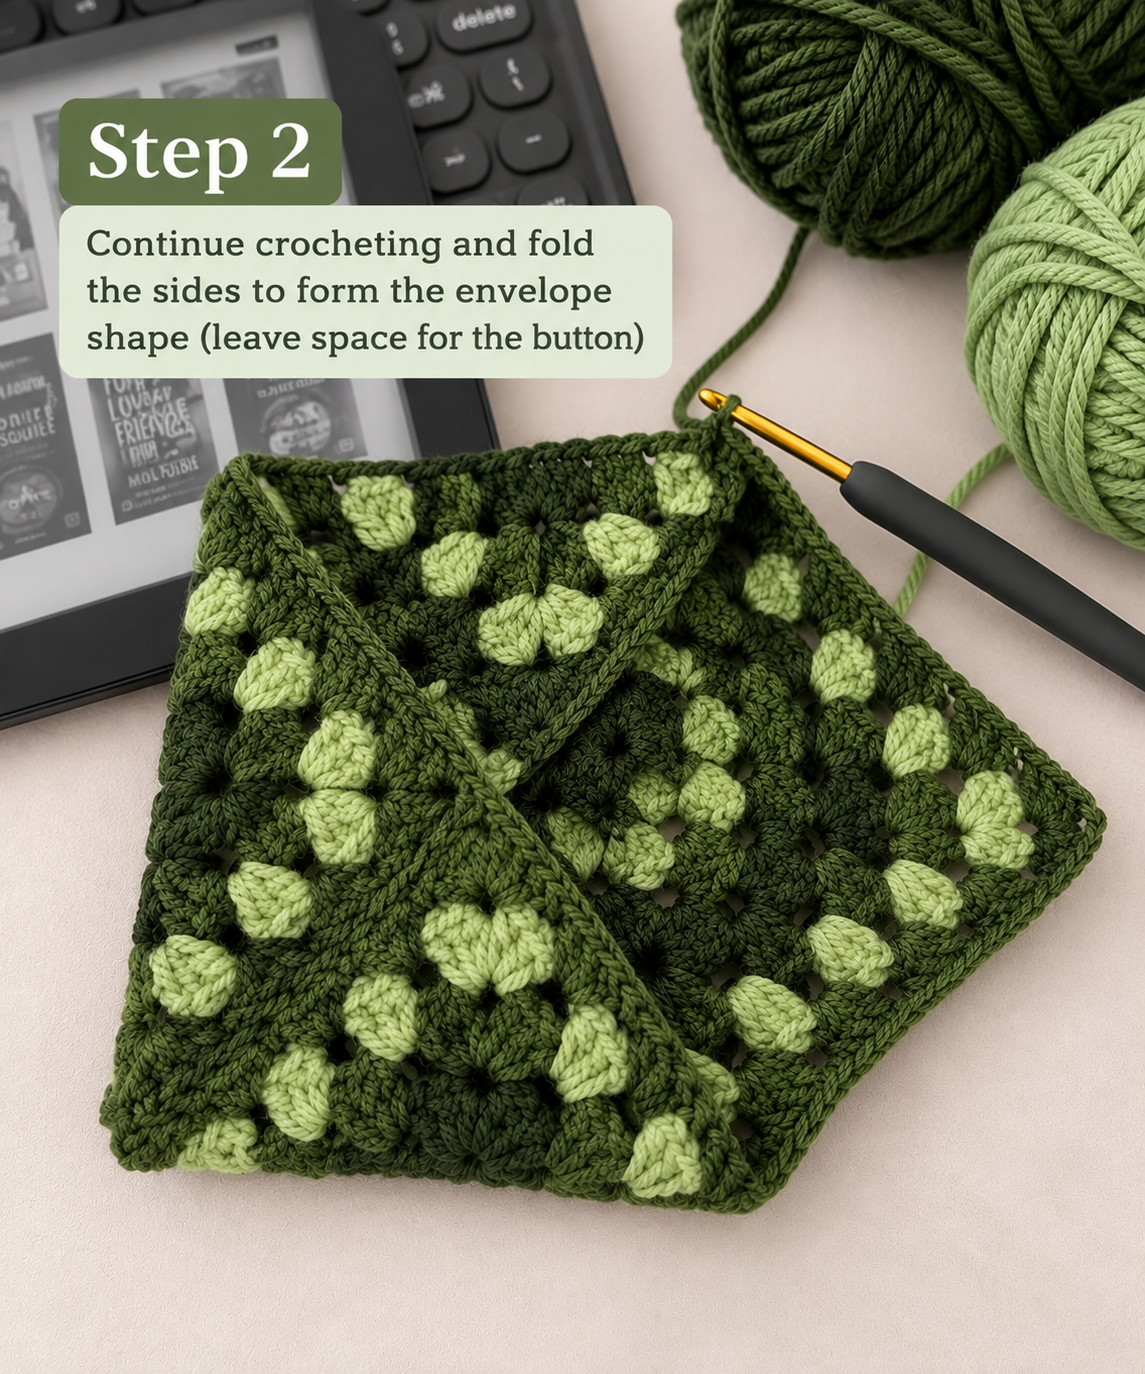
Once the square has reached the correct size, it is time to create the actual pouch. This is where the flat granny square becomes the envelope shape seen in the finished design.
1. Place the Square Correctly
Lay the square flat with the side you want to see on the outside facing upward. Rotate the square so that one corner points toward you and another points away from you.
The exact orientation is not important as long as you remain consistent while folding.
2. Fold the Bottom Corner Upward
Bring the bottom corner toward the center of the square. This folded section becomes the main lower part of the pocket.
Do not fold it so far that the future opening becomes too small. The fold should create a deep enough pocket to support the item you intend to carry.
3. Fold the Left Corner Toward the Center
Bring the left corner inward over the lower folded section. The diagonal edge should create one side of the pouch.
Keep the fold smooth and make sure the granny-square pattern is not twisted. The edge should lie naturally against the lower section.
4. Fold the Right Corner Inward
Repeat the same process on the right side. Try to make the left and right folds symmetrical.
At this point, the three folded corners should form a pocket while the fourth corner remains free. That free corner will become the pointed envelope flap.
5. Check the Pocket Before Sewing
Insert the e-reader, book, tablet, or other item you intend to carry. Check both side edges carefully.
The item should sit comfortably inside the pocket without forcing the folded crochet apart. If the side seams are pulled outward, the square may need another round or the folds may need to be adjusted.
Securing the Two Side Seams
Once the folding looks correct, remove the item from the pouch. This is important because you do not want to accidentally sew through the device or make the pouch permanently tighter than intended.
Use a tapestry needle and a matching dark-green yarn. Work along the two diagonal side edges created by the folded corners.
Stitch through the corresponding crochet stitches of the overlapping layers. Keep your stitches secure but avoid pulling the yarn so tightly that the edge puckers.
The goal is to create two clean side seams while leaving the upper flap completely unattached.
A Good Way to Keep Both Sides Even
Secure the first side temporarily with stitch markers or small clips. Then repeat the same positioning on the opposite side before sewing.
Compare both diagonal seams visually before making the final knots. Symmetry is especially noticeable on an envelope-style pouch.
Step 3: Add the Button and Finish the Pouch
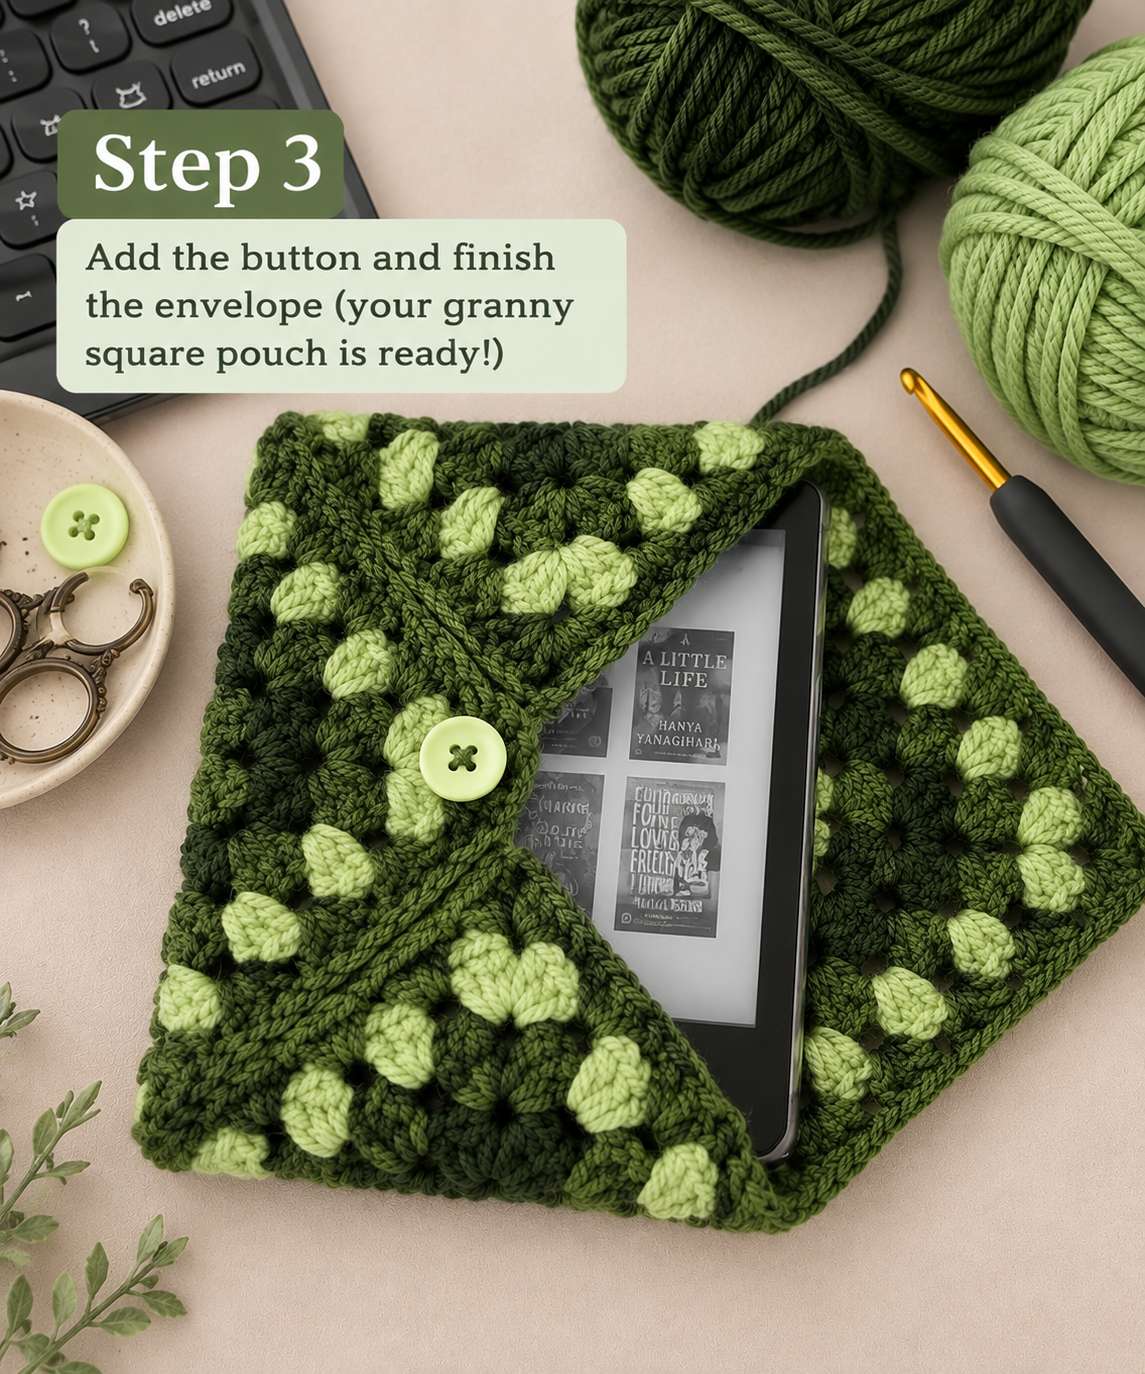
The final stage gives the pouch its recognizable envelope appearance. The remaining free corner folds downward over the opening and is secured with a button.
Position the Button Before Sewing
Do not sew the button in place immediately. First, put the item inside the pouch and close the flap naturally.
Bring the flap down without stretching it. Mark the point where the button should sit so that the flap closes comfortably and stays flat.
This is more reliable than measuring the button position from the outside edge because the final position depends on the thickness of your crochet fabric and the amount of ease in the pouch.
Creating the Button Loop
The closure can be made with a simple crochet chain loop attached to the flap. The number of chains depends on the size of your button.
Make the loop slightly smaller than the widest part of the button so it grips the button securely, but make sure it can still be stretched over the button without distorting the flap.
Test the loop several times before fastening it permanently.
Sewing on the Button
Once the loop position is confirmed, sew the pale green button securely onto the front section of the pouch.
Choose a dense section of crochet rather than an open chain space. Pass the needle through several nearby crochet stitches so the button is supported by the fabric rather than hanging from a single stitch.
Make several secure passes through the button holes, tie the yarn firmly on the inside, and weave the remaining tail through the crochet fabric.
Final Finishing
Before calling the project finished, inspect the entire pouch.
- Check both side seams.
- Make sure the flap folds naturally.
- Test the button closure several times.
- Weave in every loose yarn end.
- Trim only the excess yarn after the ends are securely woven.
- Check that the inside contains no long loose strands.
If the square looks slightly uneven, gently reshape it with your hands. A light blocking process can also help straighten the edges before final assembly.
How the Pouch Works
The clever part of this project is that the finished pocket is created from the original square itself. There is no need for a separate rectangular lining piece to create the basic shape.
The three folded corners form the body, while the fourth corner remains available as a closure flap. This is one of the reasons granny-square pouches are so adaptable: changing the size of the original square changes the eventual pouch size as well.
How to Make a Larger Version
If you want to turn this project into a larger book or tablet sleeve, simply continue the granny-square construction for additional rounds before folding.
The important rule is not to copy a fixed number of rounds blindly. Instead, measure your square against the item you want to carry.
A larger square will create a larger pocket, but it will also create a longer flap and deeper folded sections. Test the folding before committing to the final seams.
How to Make a Smaller Version
For a smaller pouch, stop the granny square earlier. This works especially well for:
- Earbuds
- Charging cables
- Small stationery
- Makeup essentials
- Coins
- Cards
- Crochet hooks and stitch markers
- Small sewing supplies
The same folding principle can be used regardless of the final size.
Color Ideas for This Design
The original pictured color combination is particularly attractive because the dark green gives the pouch a strong background while the lighter green details create visual movement.
You can keep the same design idea while changing the palette.
Forest Garden
Deep forest green, sage green, moss, and a soft cream button create a natural botanical look.
Autumn Leaves
Replace the lighter green with mustard, rust, warm beige, or burnt orange while keeping the dark base.
Soft Cottage
Try sage green, cream, dusty pink, and a natural wooden button for a softer cottage-inspired version.
Winter Evergreen
Combine dark pine green with pale icy green and a cream or wooden button for a winter accessory.
How to Keep the Granny Square Shape Neat
The finished appearance depends heavily on tension. If your corner increases are too tight, the square may begin to curl. If your chains are excessively loose, the corners can become large and floppy.
Keep your tension as consistent as possible throughout every round. When changing colors, avoid pulling the new yarn too tightly because this can distort the surrounding stitches.
Common Problems and How to Fix Them
The Square Is Not Square
Check your four corner increases. Every round needs consistent increases in all four corners. Missing or adding an increase in one corner can make the finished piece lean to one side.
The Pouch Is Too Tight
Do not force the item into the pouch. Check whether the original square needs another round. Also check whether the side folds are overlapping too far toward the center.
The Flap Does Not Reach the Button
First test the fold again. If the square is large enough but the flap is positioned incorrectly, adjust the folds before sewing. If the square itself is too small, add another round before assembly.
The Button Pulls the Crochet
The button may be attached to an area that is too open. Move it to a denser section of stitches and reinforce the back with several passes of yarn.
The Side Seams Look Uneven
Open the folds and compare the two sides before sewing. It is much easier to correct the position while the square is still flat than after the seams have been permanently secured.
Optional Lining for Extra Protection
If you are making this pouch specifically for an e-reader or tablet, you can add a soft fabric lining. This is optional, but it can make the pouch feel more finished and can reduce the size of the openings between granny-square clusters.
The lining should be fitted after the crochet square has been completed and before the final folding and permanent assembly.
Keep the lining slightly smaller than the crochet piece so that it does not prevent the square from folding naturally.
If you add thick padding, remember that it will reduce the interior space. A pouch that fits perfectly without padding may become too tight once a thick lining or batting is inserted.
Can You Use This as a Tablet or E-Reader Sleeve?
Yes. The envelope construction is especially suitable for small books and e-readers because the flap gives easy access to the opening.
However, crochet should be considered a soft fabric covering rather than a hard protective case. Granny-square openings can allow dust or small objects to pass through, and crochet alone is not designed to provide the same protection as a padded commercial case.
For everyday carrying inside a larger bag, adding a soft lining is a useful option.
Creative Ways to Use Your Granny Square Envelope Pouch
This project does not have to be limited to electronics. Once you understand the construction, you can make different sizes for different purposes.
- Book sleeve: Make the square large enough for your favorite paperback.
- E-reader case: Add a soft lining for extra comfort.
- Tablet pouch: Increase the number of granny-square rounds.
- Makeup pouch: Use a smaller square and washable yarn.
- Travel pouch: Store passports, cards, or small documents.
- Craft pouch: Keep hooks, stitch markers, scissors, and small notions together.
- Gift pouch: Use it as reusable handmade gift packaging.
- Small project bag: Create a larger version for portable crochet supplies.
Tips for a More Professional Finish
- Keep your tension consistent. Consistent tension makes the square easier to fold and gives the finished pouch a cleaner shape.
- Block the square if necessary. Straight edges make the envelope construction much easier.
- Match the side folds. The two diagonal seams should sit at approximately the same height.
- Do not rush the button placement. Always test the flap with the pouch filled before sewing the button permanently.
- Use a strong sewing connection. Reinforce the button through several crochet stitches.
- Hide your yarn tails carefully. Weave them through several stitches on the inside of the pouch.
A Simple Construction Checklist
If you want to make another version later, the entire project can be remembered as this simple sequence:
- Choose the item the pouch needs to hold.
- Choose your yarn and hook.
- Make one granny square from the center outward.
- Keep the four corners evenly increased.
- Continue until the square is large enough.
- Lay the square flat and test the folding.
- Fold the bottom corner upward.
- Fold the left and right corners inward.
- Leave the fourth corner free as the flap.
- Secure the two side edges.
- Create a button loop.
- Position and sew the button.
- Weave in all remaining ends.
- Test the pouch with the intended item inside.
Frequently Asked Questions
Is this pouch made from one granny square?
Yes. The envelope-style construction shown here is based on one main square that is folded to create the pocket and flap. This is one of the classic ways to turn a granny square into a practical pouch.
Do I need to make two granny squares?
No. The construction described here uses one large square. This is different from pouch designs that use two separate squares joined around three sides.
Can I make the pouch bigger?
Yes. Add more granny-square rounds before folding. Always test the size against the item you want to carry rather than relying only on the number of rounds.
Can I make it smaller?
Yes. Stop the granny square earlier and use the same folding method. Smaller versions work well as coin purses, earbud pouches, card holders, or small notions bags.
What yarn is best?
Cotton and cotton-blend yarns are excellent choices when you want a defined, structured pouch. Medium-weight yarn can also work well when paired with a suitable hook.
Can I use different colors?
Absolutely. The dark-green and sage-green combination gives this particular design its botanical character, but the same construction works beautifully with many color combinations.
Does the pouch need a lining?
No. A lining is optional. It can be useful when the pouch is intended for an electronic device or when you want a more polished interior.
Can beginners make this project?
The construction is approachable if you already understand basic granny-square crochet, joining, sewing, and simple button closures. The most important part for beginners is taking time to check the folding and sizing before sewing the sides permanently.
Final Thoughts
This green granny square envelope pouch is a beautiful example of how a relatively simple crochet shape can become something genuinely useful.
The combination of deep forest green, lighter sage accents, textured granny-square stitches, and the pale button gives the finished piece a cozy handmade personality. At the same time, the envelope construction keeps the project practical and easy to adapt.
The most important lesson is to think about the project as a transformation: first create the square, then measure it, fold it, secure the two sides, and finally add the closure. Once you understand that construction, you can repeat the same idea in many different sizes and color palettes.
Whether you make yours as an e-reader sleeve, book cover, travel pouch, craft organizer, or simply a beautiful handmade accessory, this is the kind of crochet project that combines creativity with everyday usefulness.