Crochet Beret for Women: A Beautiful Textured Pink & Raspberry Hat
A beautiful crochet beret can be much more than a warm winter accessory. With the right combination of shape, texture, color, and finishing details, a handmade beret can become a stylish statement piece that adds personality to a simple outfit.
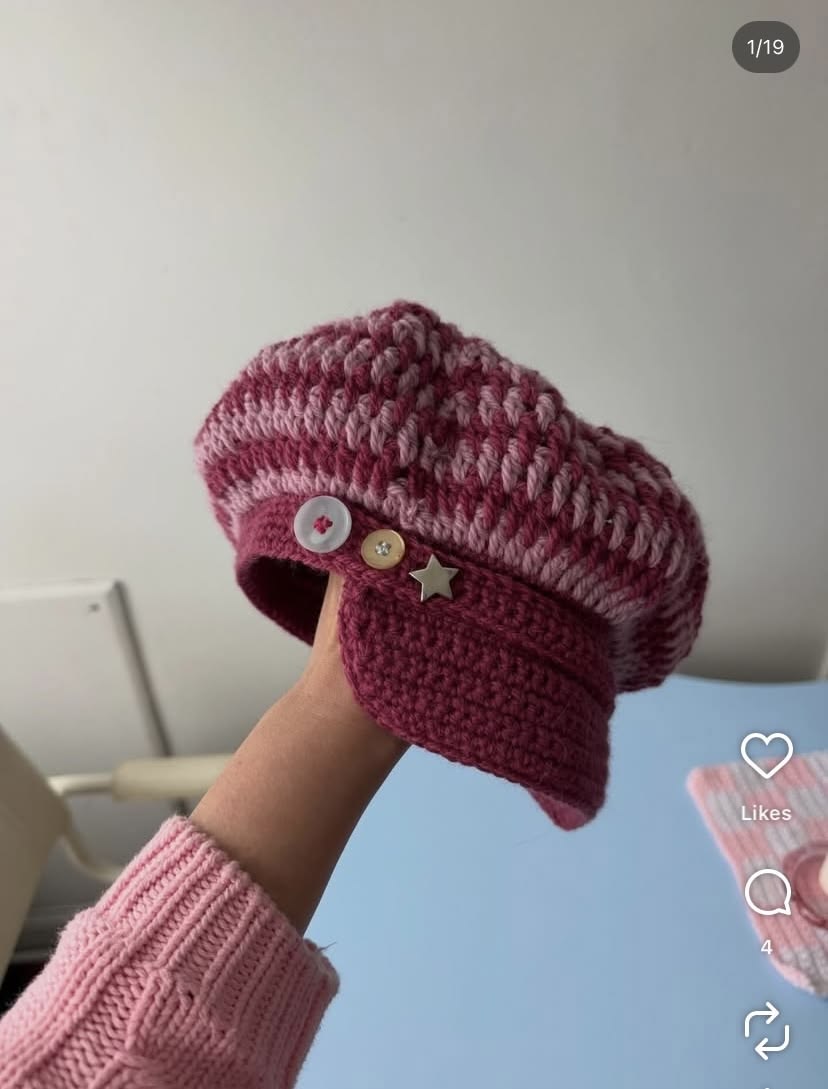
This crochet beret for women combines a softly rounded crown with a comfortable fitted band and a beautiful two-tone pink and raspberry color palette. The textured surface gives the hat a rich handmade appearance, while the decorative buttons and small star accent add a playful finishing touch.
The design shown here has the relaxed silhouette that makes a beret different from an ordinary fitted beanie. The crown has enough room to create the characteristic beret shape, while the lower band becomes narrower and more structured so the hat can sit comfortably around the head.
What Makes This Crochet Beret Special?
The most attractive feature of this beret is the balance between its soft crown and structured lower edge.
Instead of creating a simple round hat that follows the shape of the head closely, the crown is allowed to become wider before the shaping brings the fabric back toward the headband.
This gives the finished piece its relaxed, slightly slouchy appearance.
The color combination also plays an important role. The darker raspberry tone creates definition around the lower portion of the hat, while the lighter pink sections add softness and dimension to the textured crown.
Finally, the buttons and star-shaped embellishment turn an otherwise simple crochet hat into a distinctive accessory.
Before You Start: The Most Important Thing Is the Fit
If you are making this beret for yourself or another woman, do not start by choosing a stitch count and hoping it will fit.
Start by measuring the head.
Measure around the widest part of the head, generally passing the tape around the forehead and above the ears. Crochet hats normally need some negative ease, meaning the finished circumference is slightly smaller than the actual head circumference so the fabric can stretch and stay in place. :contentReference[oaicite:2]{index=2}
For a typical adult woman’s head, measurements around 53–58 cm are a useful starting range, but the actual measurement of the person you are making the hat for is always more reliable than an average size chart. :contentReference[oaicite:3]{index=3}
A Simple Fit Formula
For a moderately stretchy crochet fabric, start with approximately 2.5–5 cm of negative ease.
For example, if the head measures 56 cm, a finished circumference around 52–54 cm can be a reasonable starting target, depending on your yarn, stitch pattern, and tension. More negative ease makes the hat tighter; less negative ease makes it looser. :contentReference[oaicite:4]{index=4}
Do not treat this as an unchangeable number. The fabric itself matters. Ribbing stretches differently from dense single crochet, and different yarn fibers behave differently.
Materials You Will Need
- DK or light worsted-weight yarn
- Main color: raspberry, burgundy, berry, or deep pink
- Second color: soft pink or dusty rose
- Appropriate crochet hook for your yarn
- A slightly smaller hook for a tighter ribbed band if necessary
- Yarn needle
- Scissors
- Stitch marker
- Measuring tape
- Optional decorative buttons
- Optional small star charm or crochet star
A medium-weight yarn with good stitch definition is particularly useful for this design because the texture needs to remain visible across the crown.
Choosing the Yarn
The yarn you choose will affect both the appearance and the fit of the finished beret.
For a warm winter beret, wool or a wool blend can provide warmth and elasticity. Acrylic is a practical alternative when you want easy care and consistent color. Cotton or cotton blends can produce a cleaner, lighter beret, although they may have less natural elasticity.
If you want the hat to resemble the sample closely, choose two colors that have enough contrast to make the textured rows visible but still belong to the same color family.
Suggested Color Pairings
- Raspberry + dusty pink
- Berry + blush
- Burgundy + soft rose
- Plum + lavender pink
- Wine + pale mauve
- Cherry pink + baby pink
Gauge: Do Not Skip This Step
Gauge is one of the most important parts of making a wearable crochet hat.
Two people can use the same yarn and hook and still produce different sizes because their crochet tension is different.
Make a small swatch using the stitch texture you intend to use for the crown. Measure both stitch width and row height.
If your fabric is too tight, try a larger hook. If it is too loose, try a smaller hook.
Do not change the hook simply because a particular size of hook appears in another tutorial. The yarn and your personal tension determine the final gauge.
The Construction of This Beret
The design can be understood in four main sections:
- Top center and expanding crown
- Wide textured beret body
- Shaped lower edge and ribbed band
- Buttons and decorative finishing
This top-down approach is particularly useful because you can measure the crown as you work and adjust the size before you get too far into the project.
Top-down crochet hats commonly begin with a center ring and increase outward until the crown reaches the desired diameter, then continue with fewer or no increases before shaping the lower portion. :contentReference[oaicite:5]{index=5}
Step 1: Crochet the Top of the Beret

Begin at the center of the beret with a magic ring.
The first rounds establish the center of the crown. As you work outward, increases are distributed around the round so the fabric expands into a relatively flat circle.
The goal during this stage is not yet to create the final beret shape. You are building the wide crown that will later become the characteristic soft top of the hat.
Step 1A: Start the Magic Ring
Make a secure magic ring and work your first round of stitches into the ring.
Keep the center tight enough that there is no visible hole.
If you dislike the magic-ring technique, you can use a short starting chain joined into a ring, but make sure the center is secure.
Step 1B: Build the First Circular Rounds
Continue working in joined rounds or your preferred in-the-round method, increasing evenly so that the crown grows smoothly.
The exact number of increase rounds should be determined by the diameter you need rather than blindly following a stitch count from a different yarn.
This is especially important when making the hat for women with different head sizes.
How to Know When to Stop Increasing
Lay the crochet crown flat and measure across the widest point.
A useful sizing method is to take your desired finished circumference and divide it by approximately 3.14 to estimate the crown diameter. This is a standard way to translate a target hat circumference into the diameter of a flat circular crown. :contentReference[oaicite:6]{index=6}
For example, if your target finished circumference is approximately 53 cm:
53 ÷ 3.14 ≈ 16.9 cm
That gives you a useful starting point for the crown diameter before moving into the body of the beret.
Because a beret has extra fullness compared with a fitted beanie, the final shape also depends on how much fabric you allow to extend beyond the crown before shaping the band.
Creating the Textured Crown
Once the crown has reached the required width, continue working the body while maintaining the texture shown in the sample.
The pictured design has a pronounced vertical and diagonal texture created by the way the stitches are worked and by the alternating pink shades.
If you want a similar appearance without making the project unnecessarily complicated, you can alternate two colors while maintaining the same basic stitch structure.
Working With Two Colors
Work one or more rounds in the darker raspberry shade, then change to the lighter pink for the next section.
Carrying yarn between rounds should be done carefully. If the unused color is visible from the outside, it can distract from the clean appearance of the beret.
For a cleaner finish, fasten off when appropriate or carry the yarn neatly on the inside of the hat.
Do Not Make the Crown Completely Flat
This is an important difference between a beret and a basic circular crochet hat.
A perfectly flat circle is useful during the crown stage, but the finished beret needs controlled fullness.
Once the crown reaches the desired diameter, reduce or stop the increases and allow the fabric to develop the body of the beret.
If you continue increasing for too long, the hat may become overly ruffled. If you stop too early, the hat may become too small and look more like a beanie.
Checking the Shape as You Work
Every few rounds, place the developing beret on a flat surface.
Ask yourself:
- Is the crown expanding smoothly?
- Is it still reasonably flat?
- Is the fabric beginning to develop the desired fullness?
- Is the diameter appropriate for the intended head size?
- Is the texture consistent?
Checking now can save a lot of unraveling later.
Step 2: Add the Ribbed Band

The ribbed band is one of the most important parts of the design because it controls how the beret sits on the head.
A beautiful crown will not feel comfortable if the band is too loose or too tight.
Ribbing is useful because it can provide more stretch and recovery than a dense, non-ribbed edge. Front-post and back-post ribbing is one common way to create a textured, elastic band in crochet. :contentReference[oaicite:7]{index=7}
Choosing the Ribbing Technique
For this design, you can use a textured ribbed construction such as alternating front-post and back-post stitches, or a back-loop-only crochet ribbing if you prefer a softer vertical ridge.
The important goal is to create a lower section that is visibly more structured than the crown and that can gently grip the head.
Use a Smaller Hook if Necessary
If your crown is worked with a larger hook, moving down slightly for the band can create a firmer edge.
Do not automatically make the band extremely tight. It still needs enough stretch to pass comfortably over the head.
How to Check the Ribbed Band Before Finishing
This is the point where you should try the beret on.
The band should sit comfortably around the head without pressing painfully against the forehead.
If the band is too loose, the hat may move around or slide backward.
If it is too tight, the hat can become uncomfortable even if the crown looks beautiful.
The best approach is to test the actual hat rather than relying only on a standard size chart.
How Much Negative Ease Should You Use?
Negative ease means the finished hat circumference is smaller than the actual head circumference so the crochet fabric stretches when worn.
Many crochet sizing guides use approximately 2.5–5 cm of negative ease as a general starting range, with the exact amount depending on the stitch and yarn. :contentReference[oaicite:8]{index=8}
For a stretchy ribbed band, you can generally work toward the smaller finished measurement without making the hat uncomfortably tight.
Always test the fabric’s actual stretch before committing to the final circumference.
Women’s Adult Size Guide
| Head Circumference | Suggested Finished Circumference | Approximate Fit |
|---|---|---|
| 52–54 cm | 49–51 cm | Small Adult |
| 54–56 cm | 51–53 cm | Small / Medium |
| 56–58 cm | 53–55 cm | Medium |
| 58–61 cm | 55–58 cm | Large Adult |
These are starting measurements rather than guarantees. Yarn elasticity, stitch texture, hook size, and personal tension can all change the final fit. Crochet sizing references similarly recommend measuring the intended wearer and adjusting for negative ease rather than treating an average size as universal. :contentReference[oaicite:9]{index=9}
How Deep Should the Beret Be?
Circumference is only half of the fitting equation.
You also need to consider the vertical depth from the center of the crown to the lower edge.
Adult crochet hats often fall around 20–23 cm in overall depth depending on style and fit, while a slouchier design can require additional depth. :contentReference[oaicite:10]{index=10}
Because this is a beret rather than a fitted beanie, the crown can intentionally have more fullness.
Step 3: Finishing the Beret

Once the crown and ribbed band are complete, the final stage is all about finishing and personality.
The sample uses decorative buttons and a small star detail on the side of the lower band. These details are not necessary for the hat to function, but they completely change its appearance.
Choosing the Buttons
The buttons can be used to create a romantic, playful, vintage, or modern look.
For a similar feminine appearance, combine different button colors and sizes rather than making every button identical.
Small cream, gold, pearl, wooden, or blush buttons can all work beautifully against raspberry crochet.
Adding the Star
A small metal star charm adds a subtle decorative accent.
If you prefer a completely crocheted accessory, replace the metal charm with a tiny crocheted star.
You can also replace the star with:
- A small flower
- A heart
- A bow
- A pearl
- A vintage button
- A small leaf
- An embroidered initial
How to Secure the Decorations Properly
Decorative pieces should be attached securely, especially if the beret will be worn frequently.
Use a matching yarn or strong sewing thread and make several secure passes through the button holes.
If the buttons are purely decorative and the hat is intended for an adult, they can be sewn firmly to the outer surface.
After attaching them, gently pull each decoration to make sure it is secure before wearing the hat.
Finishing the Yarn Ends
Do not simply cut the yarn ends after fastening off.
Thread each tail onto a yarn needle and weave it through several stitches on the inside of the hat.
Change direction at least once or twice so the end cannot easily pull loose.
Trim the remaining yarn close to the fabric only after it is secure.
Blocking the Finished Beret
Blocking can make a noticeable difference to a crochet hat.
It can help even out the stitches, smooth the crown, and establish the final silhouette.
For this beret, avoid aggressively stretching the ribbed band. The band needs to retain its ability to contract and grip the head.
Instead, focus on gently shaping the crown.
How to Shape the Beret Correctly
Place the finished beret on a suitable form or gently shape it by hand.
The crown should have enough fullness to create the characteristic beret silhouette, while the lower band should remain relatively close to the head.
Do not flatten the crown completely.
The beauty of this design comes from the contrast between the relaxed upper portion and the more structured lower edge.
Common Problems When Crocheting a Beret
The Crown Is Ruffling
If the crown starts forming waves or ruffles while you are increasing, you may be adding too many increases for your yarn and stitch combination.
Check your gauge and compare the crown diameter with your target measurement.
The Crown Looks Like a Bowl
If the crown curves upward too quickly, the increase rate may be too low or the fabric may be too tight.
Check your tension and consider whether you stopped increasing too early.
The Hat Is Too Loose
Measure the actual circumference of the finished band.
If it is almost the same size as the head, there may not be enough negative ease. A hat normally needs to be somewhat smaller than the head so it can stretch and grip. :contentReference[oaicite:11]{index=11}
The Hat Is Too Tight
If the band leaves uncomfortable pressure around the forehead, do not simply force it to stretch.
Check whether your gauge is tighter than expected or whether the ribbing needs more circumference.
The Beret Looks Too Much Like a Beanie
A traditional beanie follows the head more closely. A beret needs additional crown fullness and a broader upper silhouette.
Check the crown diameter before beginning the final band.
How to Make the Beret Smaller
If you are making this design for a smaller adult head, do not simply shorten the finished hat.
Reduce the target circumference first, then calculate the crown diameter from that measurement.
The easiest way to adapt a top-down hat is to stop the increase rounds earlier once the crown reaches the diameter required for the smaller size.
How to Make the Beret Larger
For a larger head, continue the increase structure for additional rounds until the crown reaches the required diameter.
Then continue the body and shaping while checking the circumference against the intended wearer.
Do not simply add random increases. Maintain the established increase rhythm so that the crown remains balanced.
How to Make a More Slouchy Beret
If you want a softer, more dramatic French-inspired silhouette, increase the amount of fabric between the widest crown section and the ribbed band.
This allows the crown to drape farther toward the side of the head.
Keep the band fitted so that the extra fabric stays controlled rather than turning the whole hat into a loose beanie.
How to Make a More Structured Beret
Use a slightly firmer yarn and a hook that produces dense, well-defined stitches.
Keep the crown tension consistent and avoid excessive blocking.
A structured ribbed band can also help the hat maintain its silhouette.
One-Color Version
Although the two-tone pink design is beautiful, the same construction can be made in one color.
A solid burgundy beret would look elegant and classic.
A cream version would create a soft winter accessory.
Black, navy, forest green, plum, camel, or chocolate brown would also work beautifully.
Three-Color Version
You can also add a third color without changing the basic construction.
For example:
- Deep raspberry crown
- Dusty pink textured rows
- Dark burgundy ribbed band
Keeping the darkest shade around the lower edge can visually define the shape of the beret.
Romantic Version for Women
For a softer feminine version, use dusty rose, cream, and blush.
Replace the star with a small crochet flower and use pearl-style buttons.
This version would pair especially well with coats, cardigans, dresses, and soft neutral winter clothing.
Vintage-Inspired Version
Choose burgundy, mustard, cream, and brown.
Add wooden or antique-style buttons and keep the crown texture slightly more pronounced.
This gives the beret a handmade vintage character without requiring complicated decorative stitches.
Modern Minimalist Version
Use only one color and one small decorative element.
A deep wine-colored beret with a single gold button can look much more understated while retaining the same handmade construction.
How to Wear a Crochet Beret
A beret can be positioned in several different ways.
Wear it slightly tilted to one side for a classic relaxed silhouette, or position it more centrally for a cleaner contemporary appearance.
The crown should have enough room to maintain its shape rather than being pulled tightly over the head.
Outfit Ideas for a Pink Crochet Beret
With a Neutral Coat
Pair the beret with a cream, beige, gray, or camel coat. The pink tones become the statement color without overwhelming the outfit.
With Denim
Jeans, a simple sweater, ankle boots, and the textured beret create an easy everyday look.
With a Knit Dress
A soft knit dress in cream, gray, or burgundy works beautifully with a handmade beret.
With a Scarf
Choose a scarf that repeats one of the colors from the hat rather than introducing several unrelated colors.
Why This Is a Good Handmade Gift
A crochet beret is a particularly personal handmade gift because the size and colors can be chosen specifically for the recipient.
You can make one for a mother, sister, daughter, friend, colleague, or anyone who enjoys handmade accessories.
Choosing the recipient’s favorite color makes the gift feel much more intentional.
Gift-Wrapping Idea
Fold the beret gently and place it inside a simple kraft gift box with tissue paper.
Add a small handmade tag describing the yarn color and date it was made.
If you made the beret especially for the recipient, a short handwritten note can make the gift even more memorable.
Care Instructions
The correct washing method depends on the yarn fiber, so always check the yarn label first.
In general, handmade crochet hats benefit from gentle handling.
- Avoid unnecessarily aggressive washing.
- Use the temperature recommended for your yarn.
- Do not wring the hat aggressively.
- Reshape gently after washing.
- Allow it to dry in the desired shape.
- Store it away from excessive moisture.
Important Tips Before Making the Final Hat
- Measure the head before starting.
- Make a gauge swatch.
- Calculate your target finished circumference.
- Use negative ease rather than making the hat exactly the same size as the head.
- Measure the crown diameter as you work.
- Do not continue increasing if the crown has already reached the required diameter.
- Try the beret on before completing the ribbed band.
- Keep the band snug but comfortable.
- Secure decorative buttons firmly.
- Weave in every yarn end carefully.
- Shape the crown gently during finishing.
Frequently Asked Questions
Is this beret suitable for women?
Yes. The construction is designed around adult head measurements and can be adjusted for small, medium, and large adult sizes by changing the crown diameter and finished band circumference.
What is the most important measurement?
Head circumference is the starting point, but crown diameter and hat depth are also important for creating a true beret shape.
Why does my beret not fit even though I followed the stitch count?
Stitch counts alone do not guarantee size. Your tension, yarn weight, hook size, and stitch height can all change the finished measurements. This is why gauge and measuring the actual project are important. :contentReference[oaicite:12]{index=12}
Can I use a different yarn?
Yes, but changing yarn weight will change the gauge and therefore the dimensions. Make a swatch first and adjust your hook or number of rounds accordingly.
Can I make the beret without buttons?
Absolutely. The buttons and star are decorative. The beret can be finished with a clean ribbed band for a simpler look.
Can I use only one color?
Yes. A single-color version will emphasize the stitch texture and create a more classic appearance.
Can I make it more slouchy?
Yes. Add more body depth between the widest crown section and the ribbed band while maintaining a fitted lower edge.
How do I stop the hat from slipping?
Check the finished circumference of the band and make sure there is appropriate negative ease. A well-sized ribbed band should stretch over the head and gently recover around it. :contentReference[oaicite:13]{index=13}
How do I know if the band is too tight?
Try the beret on before finishing. If the band creates uncomfortable pressure around the forehead or feels difficult to pull over the head, it needs adjustment.
Final Thoughts
This textured crochet beret for women is a beautiful project for anyone who wants to combine practical crochet with personal style.
The wide textured crown gives the hat its recognizable beret silhouette, while the snug ribbed band helps it sit securely on the head. The two-tone pink and raspberry palette adds depth, and the small buttons and star create the handmade personality that makes the design so special.
The most important lesson when making a wearable crochet hat is not to depend blindly on a stitch count. Measure the head, check your gauge, calculate the target circumference, and keep measuring the actual crochet piece as you work.
That approach makes the project much more adaptable. The same basic construction can be used for a smaller adult head, a larger adult head, a snug beret, or a more relaxed slouchy version.
Most importantly, take your time with the crown and the ribbed band. Those two sections determine the silhouette and comfort of the finished hat.
Once the structure is right, the fun part begins: choosing the colors, selecting the buttons, adding the star or another small decoration, and giving the finished beret your own personality.
Project Note
This tutorial is an adaptable crochet construction guide based on the pictured beret design. It is intentionally written around measurements, gauge, crown diameter, shaping, and fit rather than claiming to reproduce an unidentified original designer’s stitch-by-stitch pattern.
Always make a gauge swatch and measure the hat as you work, especially when changing yarn weight, hook size, or the intended head circumference.