Crochet Flower Coaster: A Colorful Handmade Floral Project
Bring a little more color and handmade charm to your coffee table with a beautiful crochet flower coaster. This floral design combines a bright center, delicate inner details, rounded petals, and a decorative outer border to create a coaster that looks more like a small piece of crochet art than an ordinary table accessory.
Flower-shaped crochet projects are especially enjoyable because they allow you to experiment with color while working on a relatively small project. You can make one in an afternoon, create an entire matching set, or use the same floral construction as inspiration for other crochet accessories.
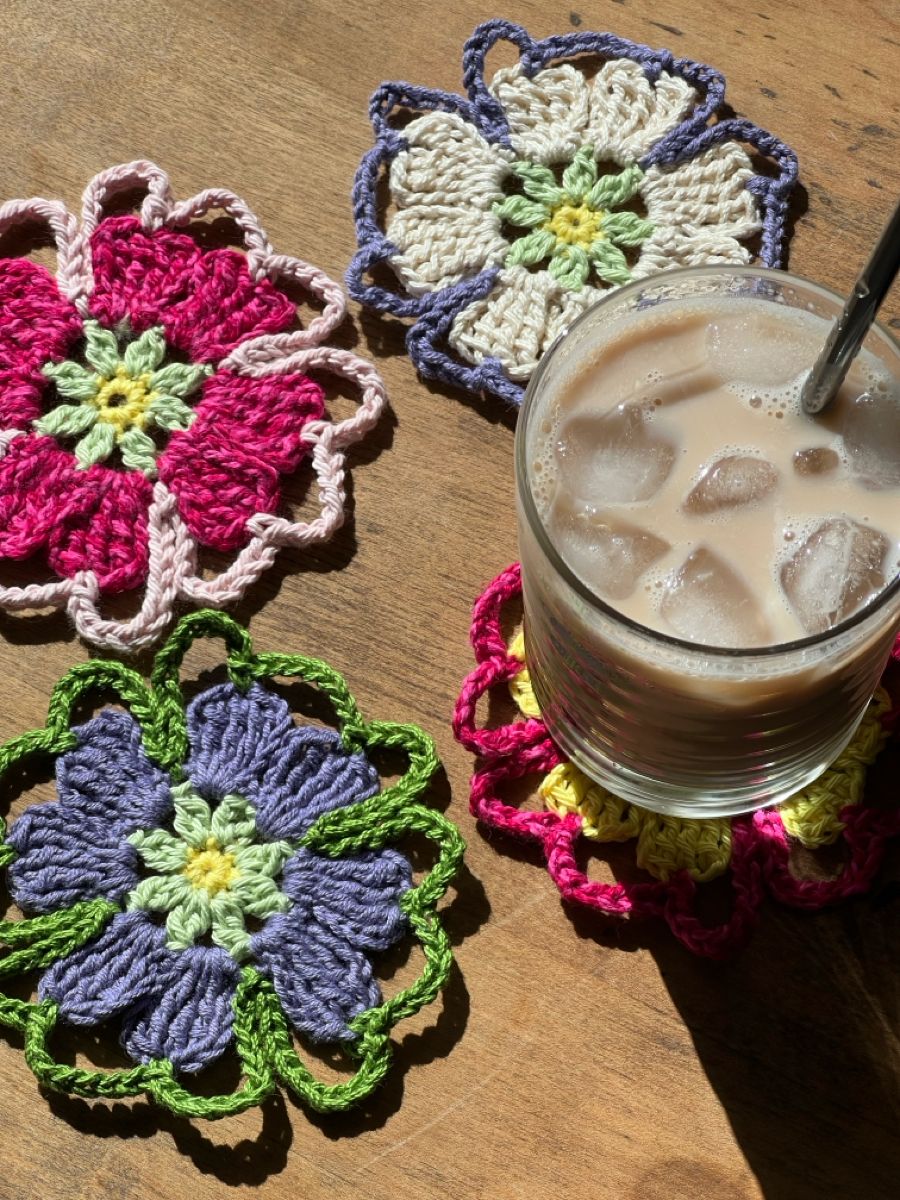
The design shown in this tutorial has several layers of color and texture. The center begins with a cheerful yellow detail surrounded by soft green petals. A larger layer of petals creates the main flower, while a contrasting chain-like outer border gives the finished piece its distinctive decorative silhouette.
Why Crochet Flower Coasters Are So Fun to Make
There is a reason small crochet accessories remain popular among makers. They give you the satisfaction of completing something relatively quickly while still leaving plenty of room for creativity.
A flower coaster is an especially good example. Instead of making a simple circular coaster, you can build a recognizable floral shape by changing colors and shaping the outer sections into petals and loops.
The finished result can be practical enough for everyday use while also functioning as a decorative accent. Place one underneath a mug, glass, small bowl, vase, or plant pot and the crochet piece immediately becomes part of the table setting.
This type of project is also excellent for experimenting with leftover yarn. Because each flower uses relatively small quantities of yarn, you can use colors that may not be sufficient for a larger project.
What Makes This Flower Design Special?
The most interesting part of this project is the way several simple visual elements work together.
- A small yellow flower center
- A layer of green inner petals
- A larger outer layer of colorful petals
- A contrasting decorative border
- A repeating rounded silhouette
- Multiple colors that can be customized
The result is much more dimensional than a flat single-color coaster. The center naturally draws the eye toward the middle, while the larger petals create the main body of the flower. The final outer loops extend beyond the petals and give the coaster its distinctive floral outline.
Project Overview
| Project type | Flower-shaped crochet coaster |
| Style | Colorful, floral, decorative |
| Construction | Center → inner petals → outer petals → decorative edging |
| Best use | Cups, mugs, glasses, small décor pieces |
| Skill focus | Working in rounds, color changes, shaping, edging |
| Customization | Colors, yarn weight, border, size and finishing |
The exact finished dimensions will depend on your yarn weight, hook size, stitch tension, and the number and size of the rounds you use. Other flower coaster patterns commonly range from roughly 10–15 cm, but there is no universal size for this style of project. :contentReference[oaicite:2]{index=2}
Materials You Can Use
One of the advantages of this type of project is that the supply list is very simple. You do not need a large amount of equipment to create a colorful flower coaster.
Yarn
Choose a yarn that gives you good stitch definition and enough structure for the coaster to lie reasonably flat. Cotton and cotton-blend yarns are particularly useful for practical table accessories because they tend to produce a firm fabric and are generally easy to care for.
For this colorful design, you can work with several small quantities of yarn rather than buying large amounts of every color.
Suggested Color Groups
You can divide the colors into four visual roles:
- Center color: yellow or another bright contrasting shade
- Inner petal color: soft green
- Main petal color: pink, cream, lavender, blue, or another favorite shade
- Outer border: a contrasting or coordinating color
This approach makes it easier to design your own color combinations before you start crocheting.
Crochet Hook
Use a hook appropriate for your chosen yarn. The exact hook size should be based on the yarn label and the density you want. For a coaster, a reasonably firm fabric is usually more practical than an extremely loose fabric.
Other Supplies
- Scissors
- Yarn needle
- Stitch marker if helpful
- Measuring tape
- Blocking mat or flat towel for shaping
Step 1: Create the Flower Center
The first stage is the heart of the flower. The center provides the foundation from which the surrounding petals will grow.
In the photographed process, the center uses a bright yellow shade with a green layer developing around it. This gives the finished flower a natural floral appearance while keeping the center visually distinct from the larger petals.
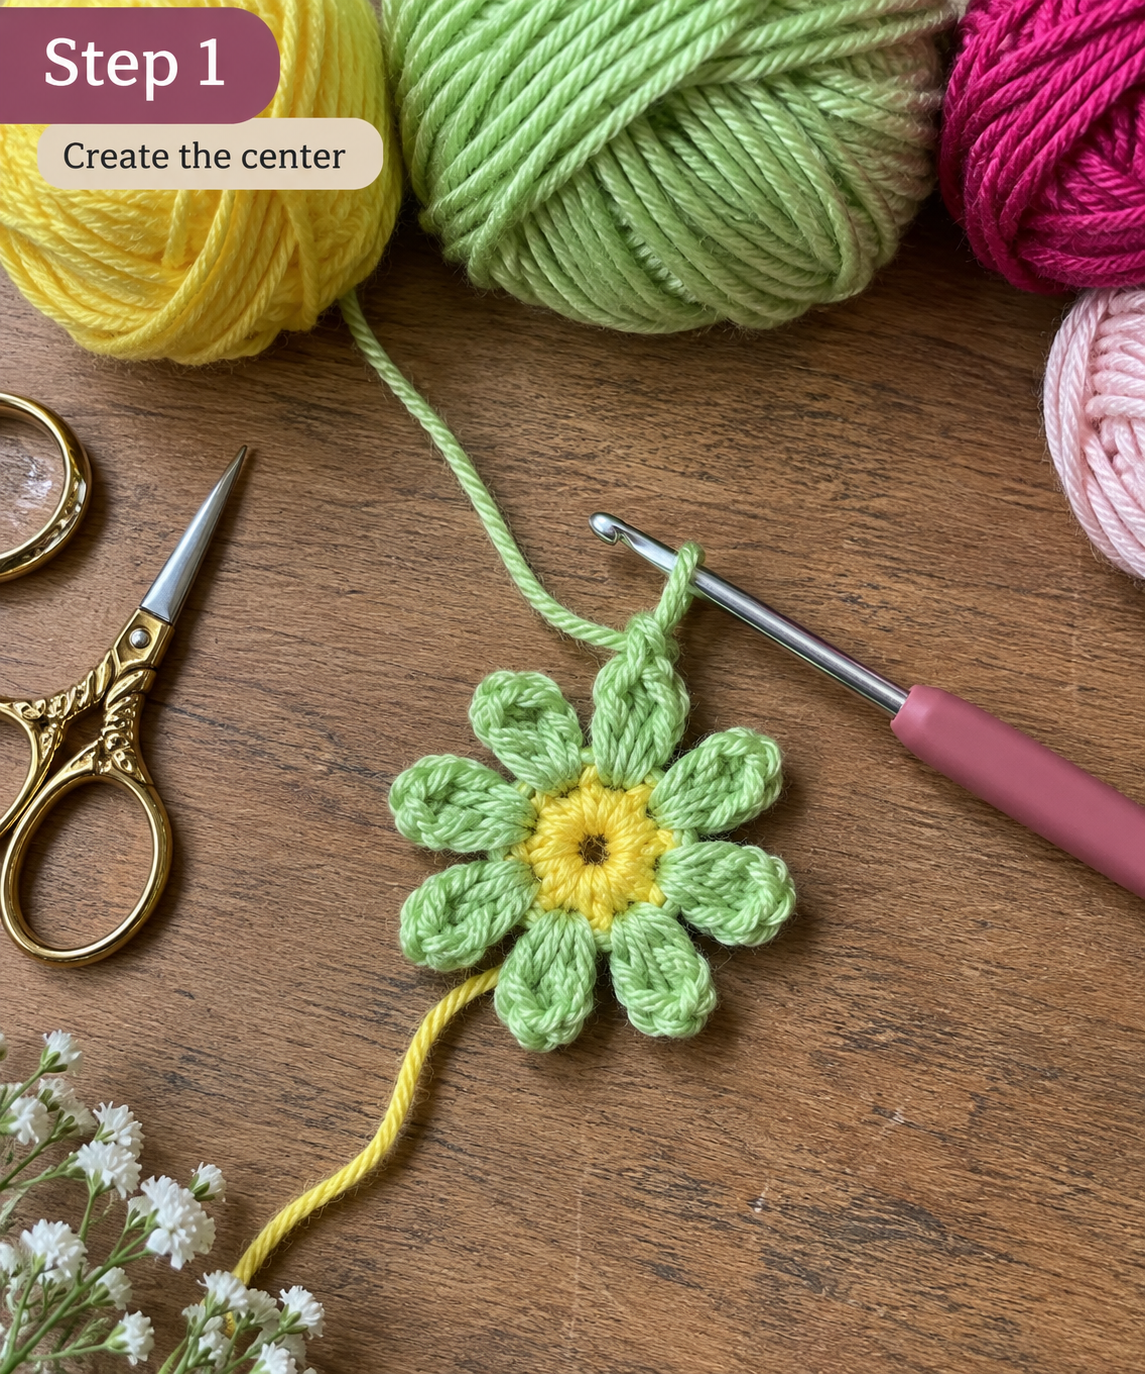
At this stage, it is useful to focus on keeping the center compact and even. A neat center makes the rest of the flower much easier to balance.
Why the Center Matters
The center is more than a decorative detail. It establishes the symmetry of the entire project. If the center is uneven or the surrounding stitches are distributed inconsistently, the petals may not appear evenly spaced later.
Take a moment to inspect your work before moving forward. Look at the center from above and check that the stitches are forming a reasonably balanced circle.
Step 2: Build the Inner Petals
Once the center is established, the next stage introduces the smaller green petals. These create a second visual layer between the yellow center and the larger outer petals.
The inner petals are particularly effective because they provide a strong contrast with the larger petal layer. The green color also makes the flower resemble a real blossom with a small cluster of leaves or inner petals around the center.
The important thing at this stage is consistency. Try to make each inner petal similar in height, width, and tension.
Keep the Petals Balanced
If one petal is significantly tighter than the others, the center can begin to look slightly distorted. Work slowly enough to maintain a similar tension throughout the round.
It can help to periodically lay the crochet piece flat on the table and rotate it while checking the spacing between the petals.
Step 3: Add the Main Flower Petals
This is where the project starts to look like the finished flower. A larger layer of petals is worked around the center, creating the main body of the coaster.
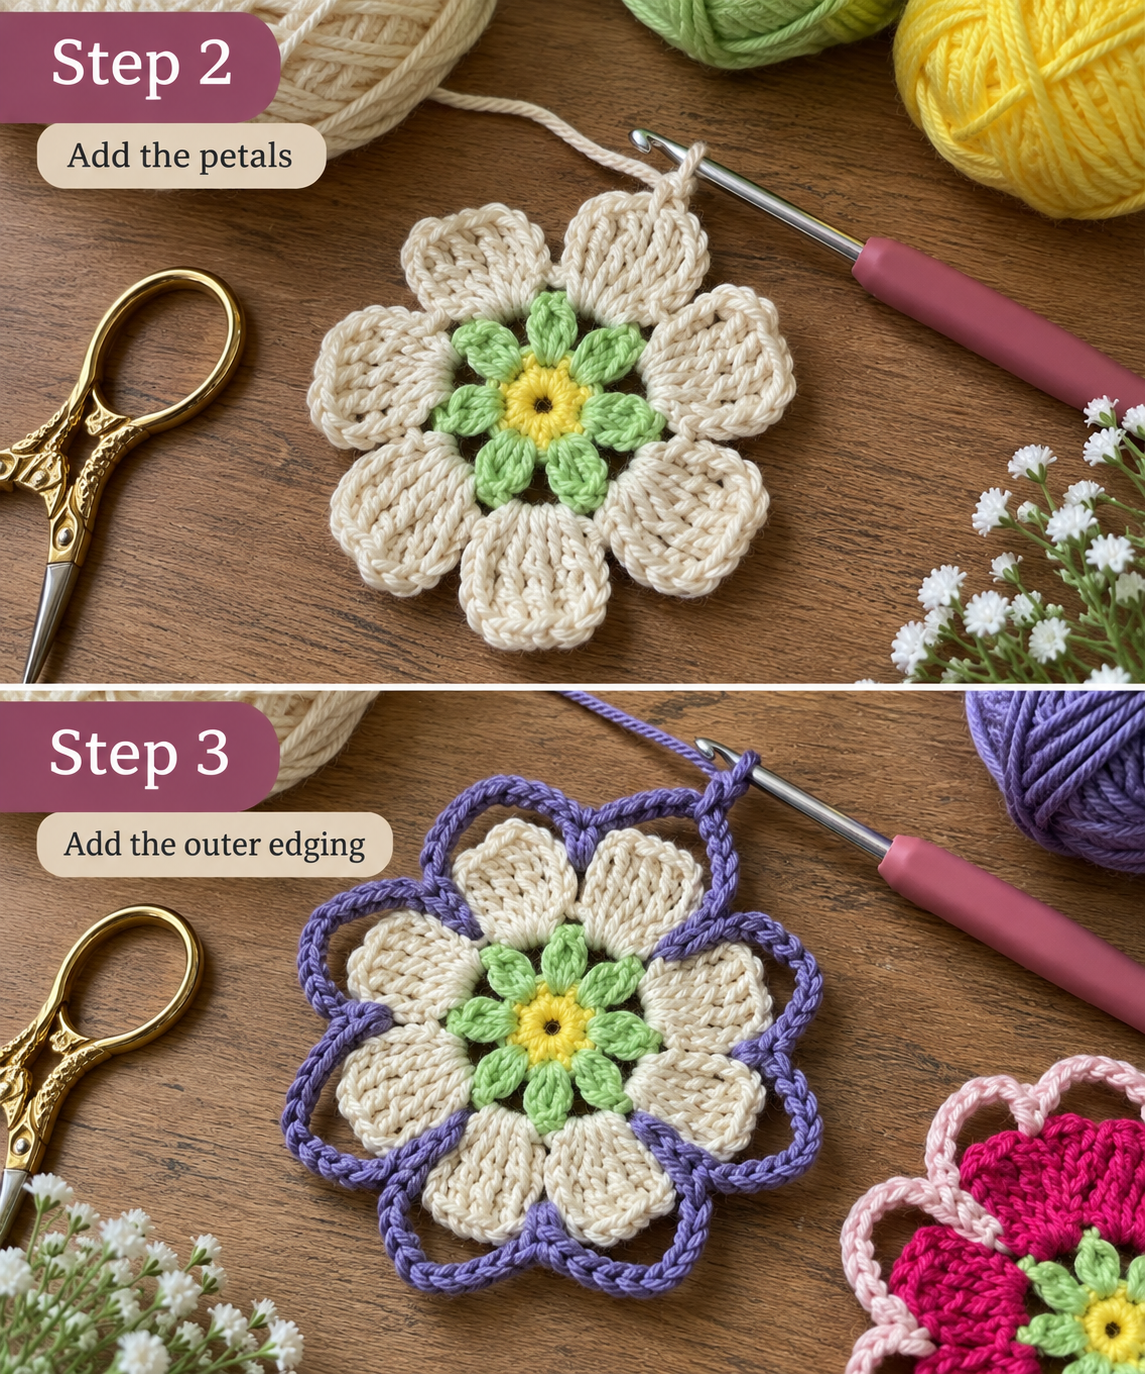
The larger petals create most of the surface area that will eventually support a cup or glass. This is also the stage where you can make a strong color statement.
The photographed version demonstrates how beautiful a soft cream or white petal layer can look against the green center. A different version could use pink, purple, blue, yellow, coral, or even several colors in alternating petals.
Creating Consistent Petals
When making repeated petals, it is tempting to work quickly because the movements become repetitive. However, consistency is more important than speed.
Try to maintain:
- The same number of loops in each petal
- Similar stitch height
- Similar tension
- Even spacing between petals
- A consistent direction around the flower
These small details are what make a handmade project look polished.
Step 4: Add the Decorative Outer Border
The outer border is one of the most distinctive parts of this design. Instead of simply finishing the edge of the petals with a straight round of stitches, the project uses larger loops that extend outward.
This creates a second silhouette around the flower. The inner petals remain clearly visible while the outer loops form a delicate lace-like frame.
This type of decorative edging is a great example of how a simple chain-based construction can dramatically change the appearance of a crochet piece.
Why Use a Contrasting Border?
A contrasting border makes the shape easier to see. If the petals and border were exactly the same color, the outer loops would blend into the petals.
Using a different shade creates separation and makes the decorative outline part of the overall design.
The photographed versions show how different border colors can completely change the mood of the same flower concept.
The Finished Flower
After the outer border is completed, the flower becomes a finished decorative piece that can immediately be used as a coaster or adapted for other projects.
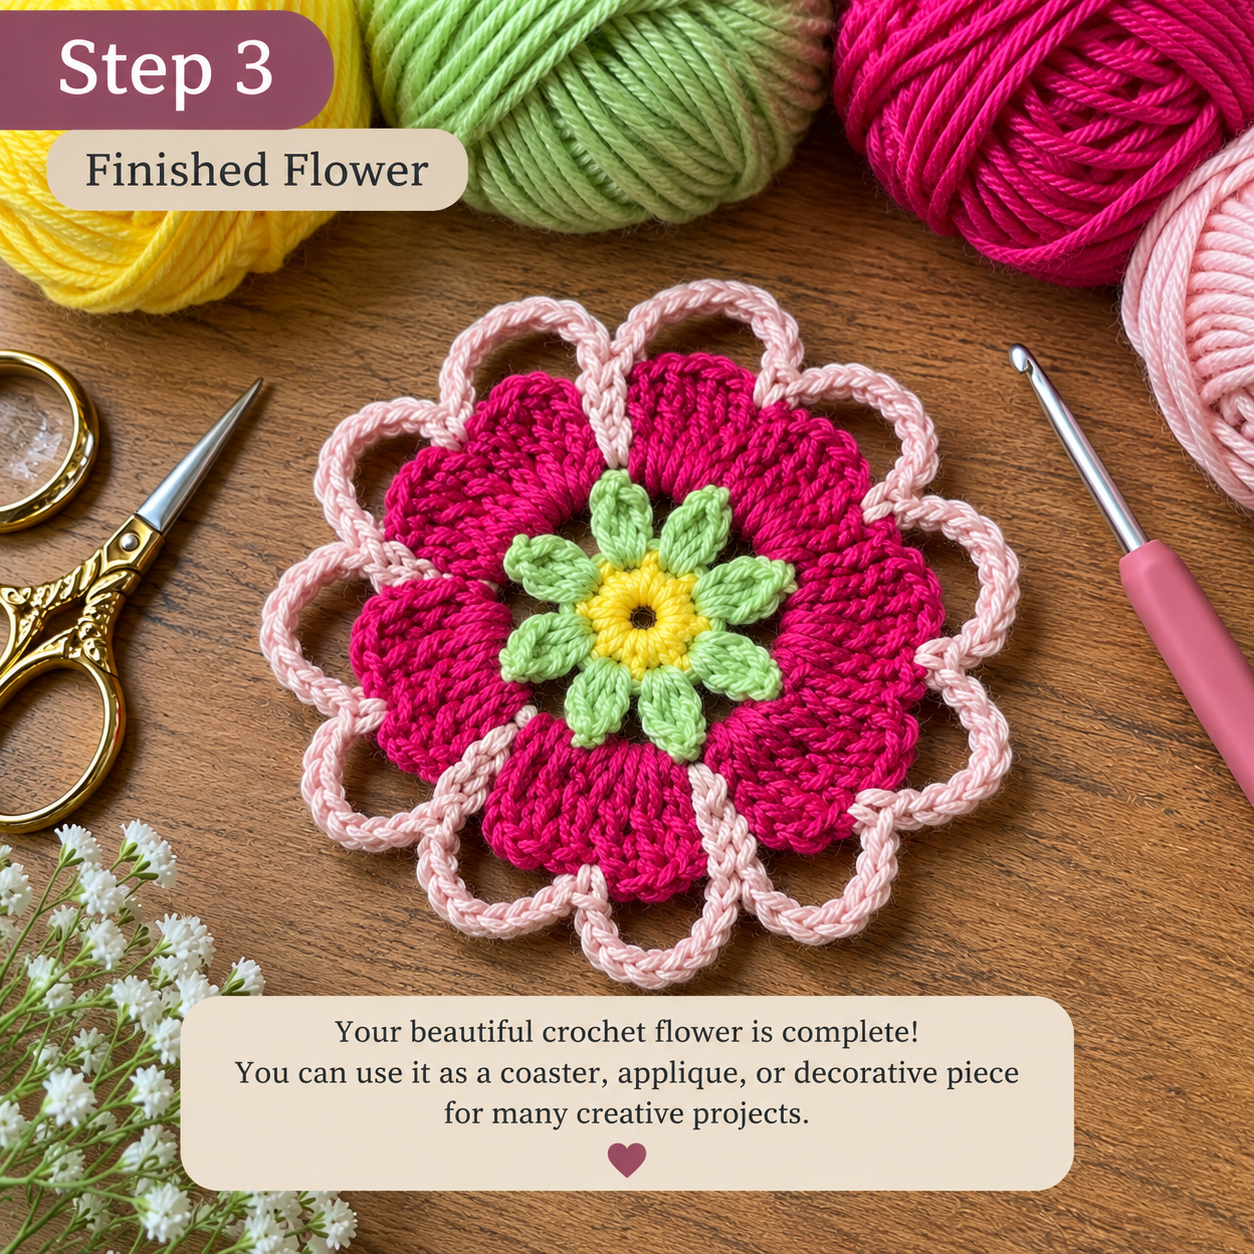
The finished piece has several layers of texture. The yellow center creates the focal point, the green inner petals add depth, the larger petals create the main floral surface, and the outer loops provide the final decorative frame.
How to Make the Flower Lie Flat
One of the most important considerations with any crochet coaster is keeping it reasonably flat. A coaster that curls or forms a bowl shape will not work particularly well under a glass.
Several factors can influence the final shape:
- Yarn thickness
- Hook size
- Stitch tension
- Number of increases
- Petal construction
- Outer edging tension
Do Not Pull Every Stitch Too Tightly
Very tight stitches can cause the fabric to become stiff and may encourage the project to curl. Try to maintain a controlled but relaxed tension.
Check the Shape Between Rounds
Place the project flat on your table occasionally. If you notice significant curling early in the project, it is much easier to identify the cause before completing the final border.
Use Blocking if Necessary
Blocking can help refine the final shape. For a small coaster, you do not necessarily need an elaborate blocking setup. A flat towel or blocking mat can be enough for gently shaping the petals and outer loops.
Light blocking is commonly recommended for flower coaster projects because it can help open the petals and encourage the finished piece to lie flat. :contentReference[oaicite:3]{index=3}
Choosing Cotton or Acrylic Yarn
The fiber you choose affects both appearance and practicality.
Cotton Yarn
Cotton is a natural choice for functional coasters. It tends to create a firm fabric and is useful when the coaster will regularly come into contact with drinks.
It also gives floral stitches a clean definition, which can make the individual petals easier to see.
Acrylic Yarn
Acrylic can also be used for decorative versions. It is widely available and comes in an enormous range of colors, making it useful for experimenting with bright floral palettes.
If the primary purpose is everyday drink protection, consider the care requirements and absorbency of your chosen fiber rather than selecting yarn based only on color.
Color Combinations to Try
One of the best parts of making flower coasters is choosing the colors. The same construction can produce completely different results with a new palette.
Classic Garden Flower
- Yellow center
- Soft green inner petals
- Cream outer petals
- Lavender border
Bright Pink Flower
- Yellow center
- Mint green inner petals
- Hot pink outer petals
- Soft pink border
Blue Garden Set
- Golden yellow center
- Light green inner details
- Dusty blue petals
- Dark green border
Soft Pastel Version
- Pale yellow center
- Mint green details
- Blush pink petals
- Lavender border
Autumn Version
- Mustard center
- Olive green details
- Rust or burnt orange petals
- Dark brown border
Make a Whole Set Instead of One
Although one flower coaster is useful, making a set can create a much stronger visual effect.
Try making four, six, or eight flowers using the same construction but different color combinations.
For example, a six-piece set could contain:
- Pink and cream
- Blue and white
- Purple and cream
- Yellow and green
- Coral and blush
- Lavender and mint
Because the construction remains the same, the set will still feel coordinated even though every flower has a slightly different personality.
Use One Color for a More Modern Look
If bright multicolor crochet is not your style, the same concept can be made in one or two shades.
A monochrome flower in cream, beige, charcoal, sage, or dusty rose can look much more minimalist.
You could also use one color for the center and petals and a slightly darker shade for the outer loops. This preserves the layered effect without creating a very colorful appearance.
Use the Flower as More Than a Coaster
The photographs show the flower being used underneath a glass, but the finished motif has many other potential uses.
Plant Pot Mat
Place a small plant pot on top of the flower to create a decorative handmade mat. If the pot can leak water, use a waterproof saucer underneath it so the crochet does not remain wet.
Table Decoration
Several flowers can be arranged together as a colorful centerpiece. This can work particularly well for spring or summer table settings.
Wall or Shelf Decoration
A flower motif does not necessarily need to remain a functional coaster. A larger version can be used as a decorative crochet accent on a shelf or wall.
Bag Decoration
The flower can also inspire an applique. Attach a finished flower to a tote bag, pouch, basket, or crochet project to add a colorful handmade detail.
Blanket or Cushion Accent
Small floral motifs can be incorporated into larger crochet projects. A flower like this could inspire a decorative element for a cushion, blanket, table runner, or home décor piece.
Turn the Flower Into a Handmade Gift
A set of flower coasters makes a simple handmade gift because it is both decorative and useful.
You can package four or six matching flowers with a simple ribbon and a handmade gift tag.
For a more personalized gift, choose colors based on the recipient’s home décor. Neutral colors work well for minimalist interiors, while bright combinations can make a cheerful gift for someone who loves colorful handmade pieces.
Why This Is a Good Stash-Busting Project
Large crochet projects often leave behind small quantities of yarn. These leftovers may not be enough for a sweater or blanket, but they can be perfect for flowers.
Because the project uses several small color sections, you can experiment with your stash without committing to large quantities.
This is also a good way to test unusual color combinations. Instead of imagining how two colors will look together, make a small flower and see the result immediately.
How to Keep the Petals Looking Even
Petal symmetry is one of the most important visual details in a flower coaster. The project does not have to be perfectly identical to a machine-made item, but consistent petal construction will make the finished flower look much more polished.
Try to keep the following consistent:
- Petal height
- Petal width
- Number of loops
- Spacing between petals
- Yarn tension
If one petal looks noticeably different, it is usually easier to fix it immediately than after the entire border has been completed.
Common Problems and How to Fix Them
The Flower Is Curling
If the flower is curling upward, check your tension and the number of stitches being worked around the center. The fabric may be too tight for the number of stitches being added.
The Flower Is Ruffling
If the outer section becomes excessively wavy, there may be too much fabric being added around the circumference. Check your stitch placement and spacing.
The Petals Are Different Sizes
Uneven tension is a common reason. Try slowing down and consciously matching the size of the previous petal.
The Outer Loops Look Uneven
Pay attention to chain tension. If one loop is pulled very tightly and the next is loose, the border will not have a consistent appearance.
The Center Looks Off-Center
Check your stitch distribution around the center. Small differences become more visible as additional rounds are added.
Blocking the Finished Flower
Blocking can make a noticeable difference with floral crochet. It is especially useful when you want the petals and outer loops to open clearly.
After finishing and weaving in the ends, gently shape the flower on a flat surface. Arrange each petal and loop into a balanced position.
The goal is not to stretch the yarn aggressively. Instead, you are simply encouraging the crochet fabric to settle into the shape you want.
Allow the piece to dry completely before moving it.
How to Choose the Right Border Color
The outer border has a surprisingly large effect on the final appearance.
A darker border creates a stronger outline. A lighter border gives the flower a softer appearance. A neighboring color on the color wheel creates harmony, while a contrasting color creates more visual energy.
For example, the combination of cream petals and purple edging gives a gentle garden-inspired appearance. Pink petals with pale pink edging feel softer and more romantic. Green edging around blue or purple petals can create a more botanical look.
Seasonal Color Ideas
Spring
Think soft green, pale pink, lavender, cream, and sunny yellow. These colors naturally complement the flower shape.
Summer
Try brighter pink, turquoise, coral, yellow, lime, or violet.
Autumn
Rust, mustard, olive, burgundy, cream, and warm brown can transform the same flower into a cozy autumn accessory.
Winter
Cream, deep green, burgundy, icy blue, and soft gray can create a more seasonal palette.
Can Beginners Make a Crochet Flower Coaster?
The answer depends on the specific stitch construction. Some flower coaster patterns are beginner-friendly, while others introduce more advanced shaping or layered techniques. Existing flower-coaster patterns range from very quick basic designs to projects that use several different stitches and techniques. :contentReference[oaicite:4]{index=4}
For this style of project, a crocheter should ideally be comfortable with:
- Basic chain stitches
- Slip stitches
- Working in rounds
- Changing colors
- Basic increases
- Working repeated stitches consistently
The decorative outer loops may require a little more concentration than a simple round coaster, but the small size makes it a manageable project for practicing new techniques.
Tips for a Cleaner Handmade Finish
1. Hide Yarn Ends Properly
Do not simply cut the yarn after fastening off. Use a yarn needle to weave the ends securely into the back of the project.
2. Keep Color Changes Neat
When changing colors, try to make the transition as clean as possible. Because the flower uses several contrasting colors, messy joins can be very visible.
3. Inspect the Back
Turn the flower over before calling it finished. The back should be reasonably tidy, with no long loose strands that could catch on objects.
4. Shape Before Photographing
If you are making flowers for gifts or for your own crochet shop, lightly shape the finished pieces before photographing them. A well-arranged flower will look much more polished in photographs.
Photography Ideas for Your Finished Crochet Flowers
A beautiful crochet project deserves good photography. You do not need expensive equipment to create attractive images.
A wooden table, natural daylight, a glass of coffee or tea, a small plant, and several finished flowers can create a warm lifestyle scene.
The original finished image used for this project demonstrates exactly why lifestyle photography works so well for crochet accessories: it shows the flower being used rather than simply photographed in isolation. :contentReference[oaicite:5]{index=5}
For your own photos, try:
- Natural window light
- A wooden or neutral background
- One or two everyday objects
- A coffee or tea glass
- A small plant
- Several flowers in complementary colors
Make a Matching Crochet Table Collection
Once you have made one flower coaster, you can continue the theme throughout your home.
For example, you could create:
- Flower coasters
- A matching table mat
- A larger floral centerpiece
- Small flower appliques
- A crochet plant mat
- Matching decorative motifs for baskets
Using the same colors throughout the collection will make the pieces feel like part of one coordinated handmade set.
Frequently Asked Questions
What is a crochet flower coaster?
It is a functional crochet piece shaped like a flower and designed to sit beneath a cup, mug, glass, or other small tabletop object.
What yarn is best for crochet coasters?
Cotton or cotton-blend yarn is a practical choice for everyday coasters because it can produce a firm fabric and is commonly used for washable home accessories. Acrylic can also be useful when the project is primarily decorative.
How many colors do I need?
That depends on your design. The photographed flower uses several distinct color sections, but you can simplify the project to two colors or create a much more colorful version.
Can I use leftover yarn?
Yes. Small quantities of yarn are one of the advantages of this type of project. Flowers are particularly useful for using small leftover amounts from previous projects.
Can I make the flower larger?
Yes, but the construction needs to be adjusted carefully. Adding rounds or changing the petal dimensions will affect the final shape. If you want a larger table mat, check the shape frequently as you work.
Why is my crochet flower not lying flat?
Possible causes include tight tension, insufficient increases, excessive stitches, or an outer edge that is too tight. Check the shape between rounds and consider light blocking after finishing.
Can I wash crochet flower coasters?
Care depends on the yarn you use. Always check the yarn manufacturer’s washing instructions. If the coaster is washable, allow it to dry completely and reshape it flat if necessary.
Can I use the flower for something besides a coaster?
Definitely. It can be used as a decorative mat, plant-pot accent, applique, bag decoration, home décor piece, or inspiration for a larger floral crochet project.
Final Thoughts
This crochet flower coaster is a wonderful example of how a small amount of yarn can become something colorful, practical, and genuinely decorative.
The construction begins with a simple center and gradually develops into a layered flower. The green inner details give the design depth, the larger petals create the main surface, and the contrasting outer loops transform the edge into a distinctive floral silhouette.
What makes this type of project especially enjoyable is the freedom to personalize it. You can change the colors, experiment with different yarns, make a matching set, adapt the size, or use the finished flower for something completely different.
If you enjoy quick crochet projects, colorful home accessories, handmade gifts, or floral motifs, this is exactly the kind of project worth keeping in your crochet inspiration collection.
Start with one flower, experiment with your favorite colors, and then build an entire collection. A few handmade flowers around a coffee table can completely change the feeling of a simple everyday space.
A Little Flower Can Add a Lot of Charm
Choose your favorite colors, keep your stitches even, shape the petals carefully, and enjoy turning a few strands of yarn into a beautiful handmade piece for your home.
Project note: The photographs in this article illustrate the featured crochet flower design and its construction stages. Exact dimensions, yarn amounts, hook size, and stitch counts can vary according to yarn weight, hook size, tension, and the desired finished size. For that reason, this article focuses on the design, construction process, techniques, finishing, customization, and practical uses rather than presenting unverified row-by-row stitch counts.