Crochet Halloween Masquerade Mask: A Gothic Black & Orange Design
If you love Halloween projects that are a little more dramatic than the usual pumpkins and ghosts, this crochet masquerade mask is a beautiful project to add to your handmade collection.
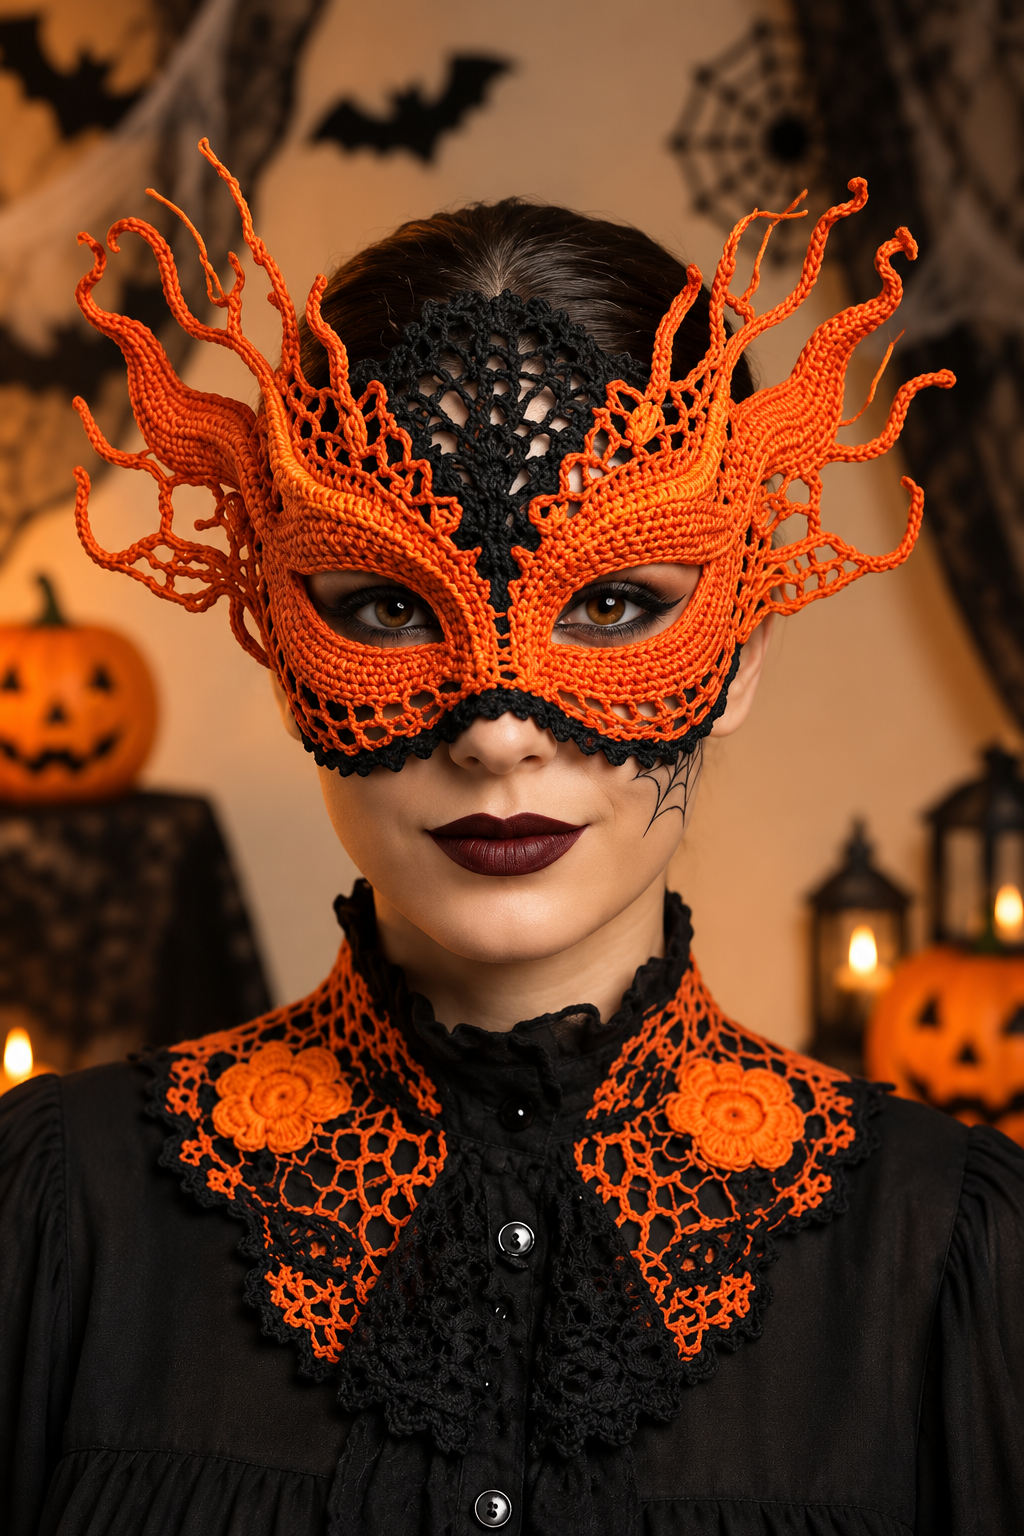
Designed around a striking black and orange color palette, this gothic-inspired crochet mask combines delicate lacework with stronger crochet sections around the eyes. The result is a dramatic accessory that can transform a simple Halloween outfit into something much more theatrical.
The mask features shaped eye openings, a black lace center, orange crochet framing, decorative openwork around the sides, and long flame-like extensions that rise above the mask. Small black details along the lower edge help balance the bright orange sections and give the finished piece a distinctly gothic appearance.
It is the kind of crochet project that can be used for Halloween parties, masquerade events, costume photography, themed gatherings, theatrical outfits, or simply as a creative seasonal accessory.
What Makes This Crochet Halloween Mask Special?
The most interesting feature of this design is the combination of structured crochet and open lace.
The area surrounding the eyes is relatively dense, which creates a defined frame and helps the eye openings stand out. Above and around that structure, the crochet becomes much more open, creating a lace-like effect.
The black center section provides a strong contrast against the orange yarn. This makes the central portion appear almost like a dark lace panel running from the forehead toward the bridge of the nose.
Then come the decorative extensions.
Instead of ending the mask with a simple rounded outline, this design uses curling, flame-like crochet elements that extend upward and outward. These unusual details are what give the mask its dramatic Halloween character.
Project Overview
- Project: Crochet Halloween masquerade mask
- Style: Gothic, theatrical, lace-inspired
- Main colors: Black and bright orange
- Construction: Shaped eye mask with decorative openwork
- Details: Lace sections, eye openings, scalloped edging, flame-like extensions
- Recommended skill level: Intermediate to advanced
- Best season: Halloween and autumn events
- Customization: Very high
Published crochet masquerade mask patterns range from relatively simple eye-mask constructions to advanced lace projects. Examples commonly use cotton thread and smaller hooks when a delicate lace appearance is desired, while other Halloween mask projects use thicker yarn for a more substantial fabric. :contentReference[oaicite:1]{index=1}
Materials You May Need
For a mask inspired by the pictured design, choose a yarn that can produce clear stitches while still allowing you to create delicate openwork details.
Black Yarn
Black is used for the central lace section and decorative edging. A strong, clearly defined black yarn makes the openwork easy to see and gives the mask its gothic character.
Orange Yarn
Bright orange creates the main visual impact. It frames the eyes, forms the outer structure, and is used for the dramatic flame-like extensions.
A highly contrasting orange and black combination works particularly well for Halloween because the two colors immediately create a seasonal visual identity.
Crochet Hook
The hook size should be selected according to the yarn you choose and the density you want.
For a delicate lace-style mask, finer yarn or crochet thread with a smaller hook can create a lightweight fabric. Published lace masquerade mask patterns commonly use fine cotton thread and hooks in the small range, while thicker Halloween mask designs may use larger hooks. :contentReference[oaicite:2]{index=2}
Additional Supplies
- Yarn needle
- Scissors
- Stitch markers
- Measuring tape
- Blocking pins
- Suitable blocking surface
- Optional fabric stiffener for structural support
- Optional ribbon or crochet ties
Choosing the Right Yarn
The yarn is one of the most important decisions for this project.
If you want a delicate, lace-like appearance similar to the pictured design, a fine cotton crochet thread or lightweight cotton yarn is a logical starting point.
If you prefer a bolder costume accessory, a slightly heavier yarn can produce stronger orange borders and more visible decorative extensions.
The important thing is to make a small test section before committing to the complete mask. The finished fabric should be flexible enough to sit comfortably against the face while maintaining enough structure to keep the eye openings and decorative shapes defined.
Step 1: Build the Main Mask Structure
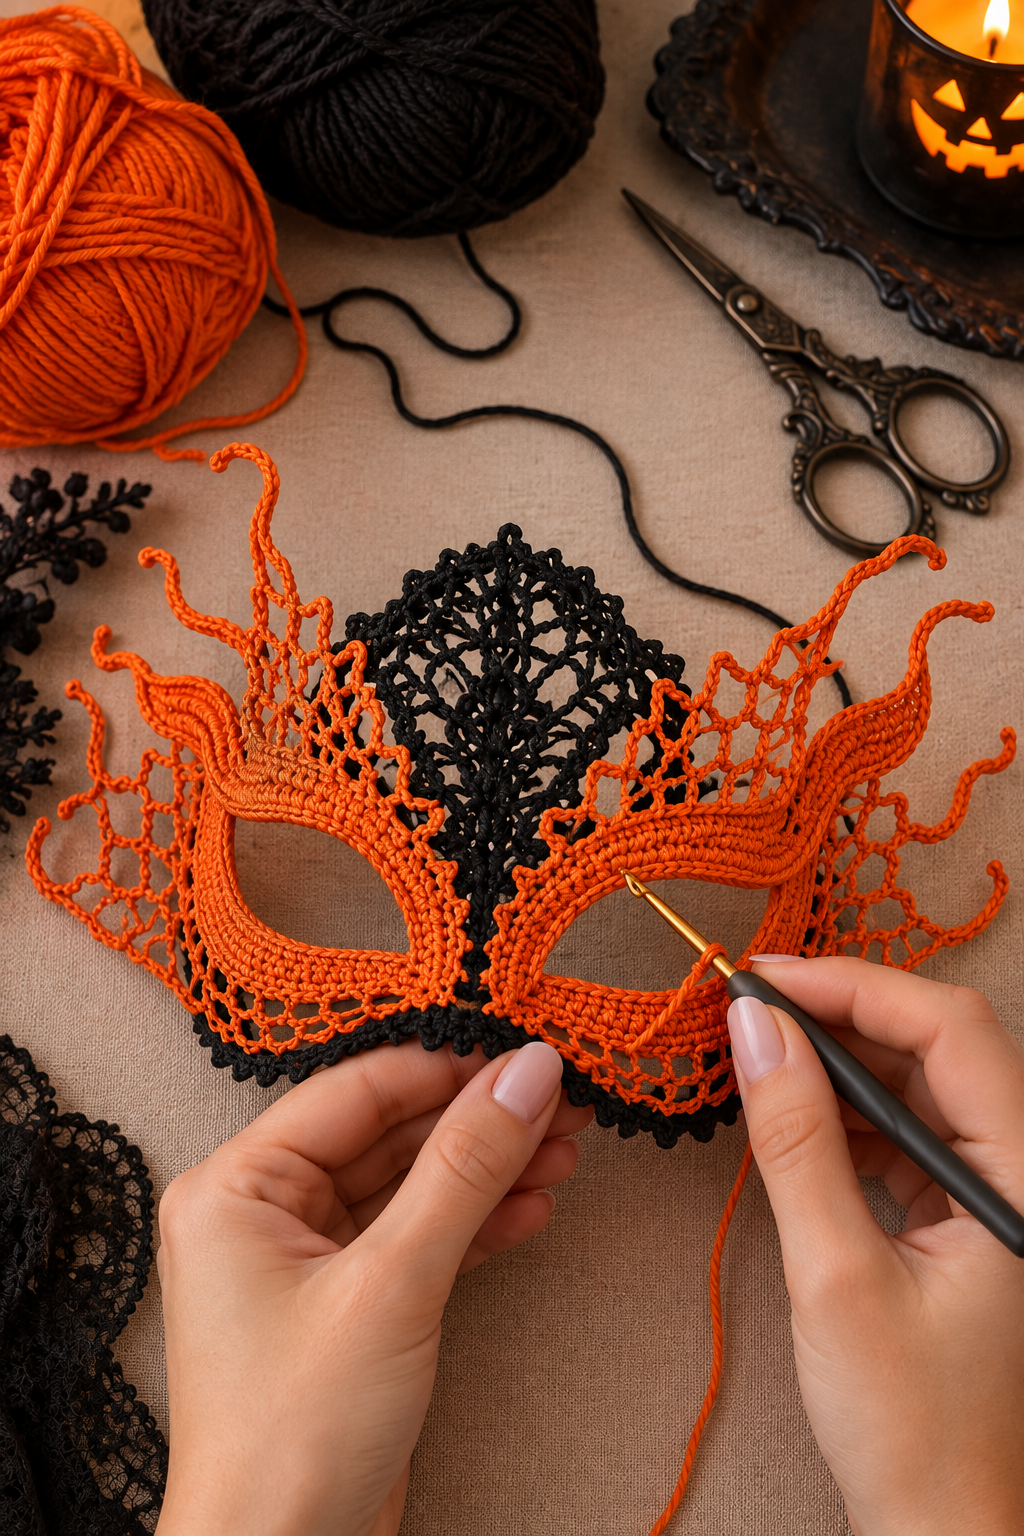
The first stage is to establish the main shape of the mask.
Because the mask needs to sit across the upper portion of the face, accurate shaping is more important than simply following a fixed number of stitches.
Start by creating the central structure and gradually work outward toward the two eye areas. The two sides should remain as symmetrical as possible because even a small difference can become noticeable once the mask is worn.
Shaping the Eye Openings
The eye openings are one of the most important parts of the project.
They should be large enough to provide a comfortable field of vision but surrounded by enough crochet fabric to maintain the decorative shape.
When working the opening, avoid making the inner edge too tight. A very tight edge can pull the surrounding stitches inward and distort the shape.
Instead, allow the crochet to follow the natural almond-like curve of the eye area.
Keep Both Sides Symmetrical
One useful technique is to complete one side first and then use it as a visual reference while creating the second side.
Count the major repeats and compare the curves before moving forward.
This is especially important for a mask with dramatic upper extensions because asymmetry can become more visible as the decoration grows.
Creating the Black Central Lace Section
The black center gives this design much of its gothic character.
Rather than filling the entire forehead area with solid stitches, an open lace structure creates a lighter appearance and allows the orange framing to remain the visual focus.
The lace can be created using combinations of chain spaces and taller crochet stitches arranged into a repeating openwork motif.
When working lace, consistent tension is extremely important. If some chain spaces are much larger than others, the motif can lose its symmetry.
Why Black Works So Well Here
Black provides a strong visual anchor between the orange sections.
It also allows the open spaces in the lace to remain visible against the skin or hair when the mask is worn.
For an especially dramatic Halloween effect, a deep black yarn with a subtle sheen can make the lace catch the light without requiring additional decoration.
Step 2: Add the Lace Details and Flame-Like Extensions
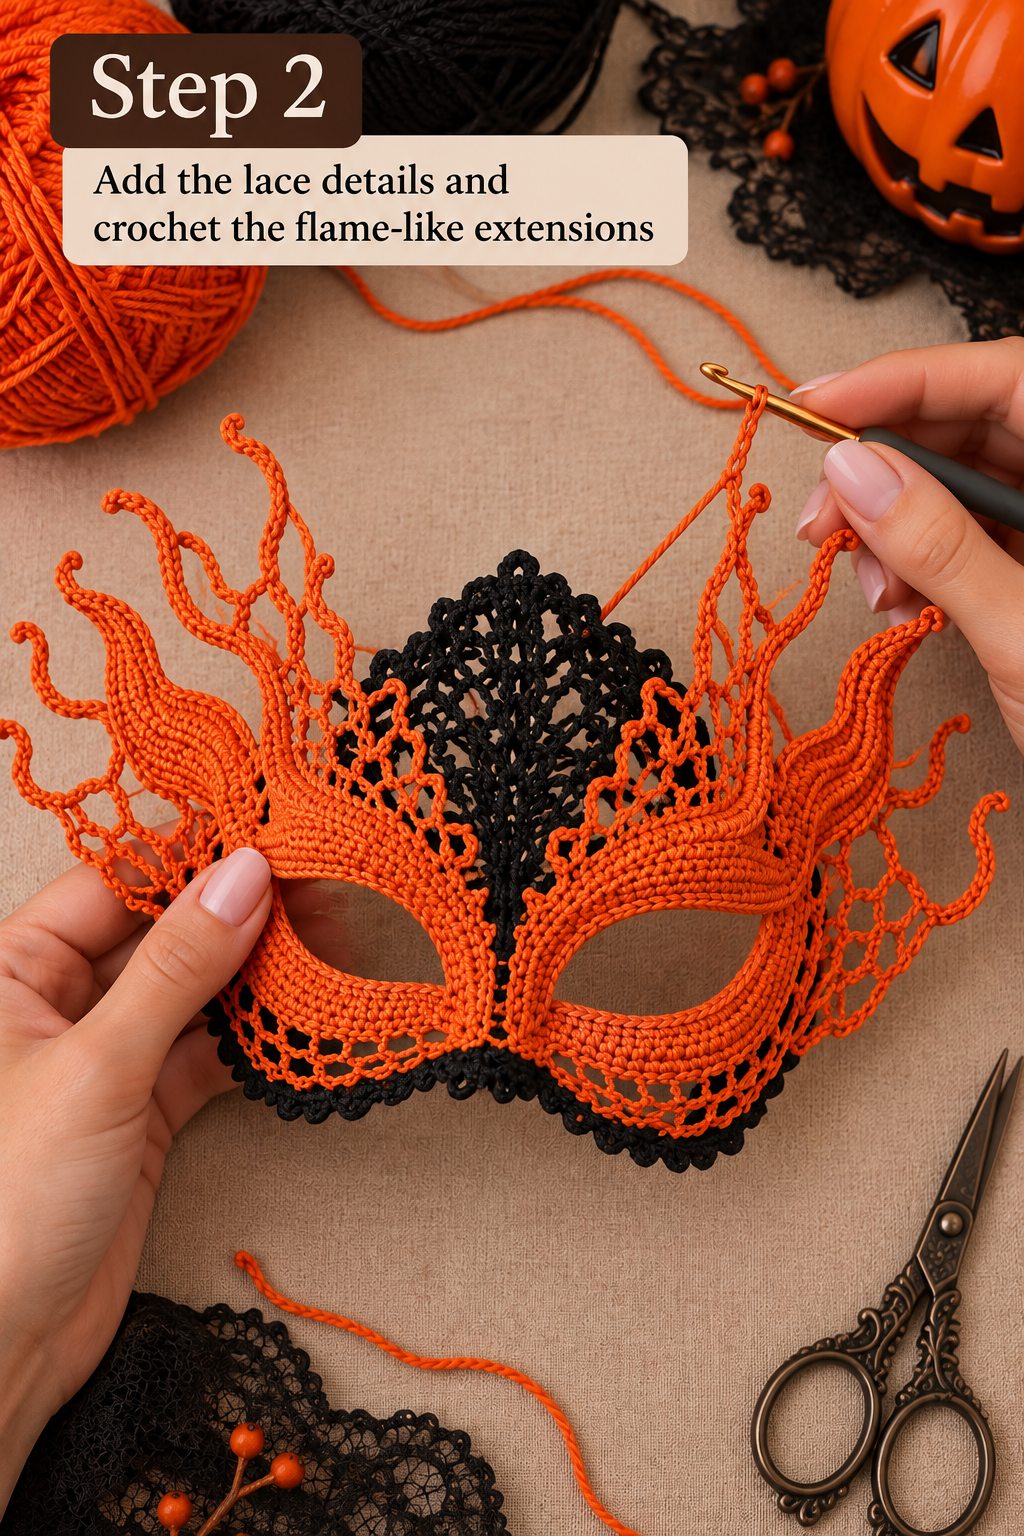
Once the main eye-mask structure is established, the design becomes much more decorative.
This is where the openwork begins to extend away from the face and the mask develops its distinctive Halloween silhouette.
Working the Open Lace Areas
Open lace can be added around the upper and side sections of the mask.
The goal is to create decorative spaces rather than simply making the mask larger. The open areas should feel intentional and balanced around the eye openings.
Keep checking the mask from the front as you work. A detail that looks attractive while lying flat on the table may look very different when the mask is curved around the face.
Creating the Flame-Like Extensions
The long orange extensions are one of the most recognizable details in the design.
These can be created as narrow crocheted chains, elongated lace structures, or shaped narrow crochet strips that are attached to the upper portion of the mask.
What makes them interesting is that they do not need to be perfectly straight.
Gentle curves, loops, spirals, and pointed shapes create the impression of flames or curling gothic branches.
For a more natural result, vary the lengths slightly while maintaining overall balance between the left and right sides.
Do Not Make Every Extension Identical
Perfectly identical extensions can sometimes make a handmade gothic design look too mechanical.
Small differences in length and curvature can create a more organic silhouette.
However, the two sides should still have similar visual weight. One side should not become dramatically larger or heavier than the other.
Building the Side Lace
The side sections can use open chain spaces to create a delicate web-like appearance.
This part of the design connects the stronger eye frame to the decorative outer extensions.
Work carefully around the outer edge so that the lace does not become excessively loose.
If the side lace stretches too much, the mask may lose its shape when worn.
Step 3: Finish the Extensions and Edges
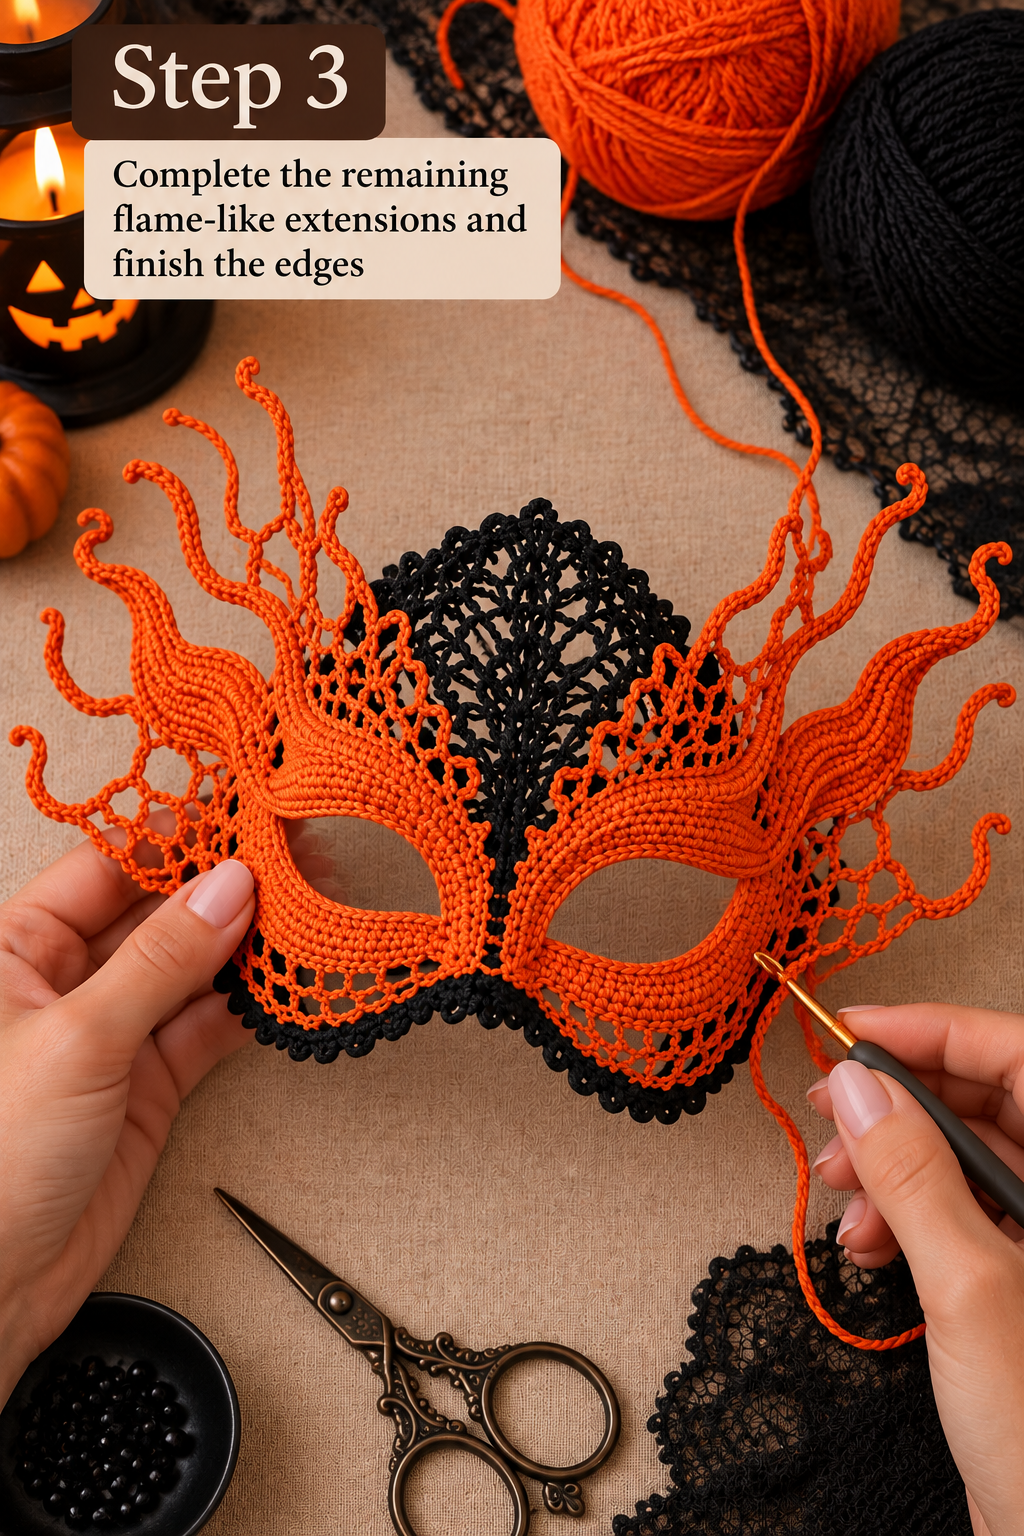
The third stage is about bringing all the decorative elements together.
Complete the remaining orange extensions, finish the outer lace, and inspect the entire mask for loose ends or uneven sections.
Finishing the Outer Edge
A decorative border can be worked around the lower and side edges of the mask.
The pictured design uses black along portions of the lower edge, creating a beautiful contrast against the orange body.
A scalloped, picot, shell, or simple lace edging can all work depending on the look you want.
The most important point is consistency. Try to maintain similar spacing throughout the border.
How to Attach the Flame-Like Decorations
If the extensions are made separately, they should be attached securely to the upper mask structure.
Use matching yarn and a yarn needle to stitch each piece into place from the back.
Whenever possible, pass the needle through several stitches rather than attaching the decoration to only one loop.
This distributes the tension and makes the attachment more durable.
Adding Ties to the Mask
A crochet masquerade mask needs a secure but comfortable way to stay in place.
One simple option is a long crochet chain attached to each side. Another is a narrow crochet cord or soft ribbon.
The ties should be long enough to adjust comfortably without putting excessive pressure around the head.
Published crochet masquerade mask designs commonly use side ties or ribbons as part of their finishing construction. :contentReference[oaicite:3]{index=3}
Make the Ties Comfortable
Avoid making the ties extremely thin and tight if the mask will be worn for several hours.
A slightly wider crochet cord can distribute pressure better than a single narrow strand.
Always test the mask while sitting and moving your head before deciding on the final tie length.
Blocking the Crochet Mask
Blocking can make a major difference when working with lace.
After the mask is completed, gently shape it so the eye openings, lace sections, and decorative edges sit correctly.
Some lace masquerade mask patterns specifically recommend blocking or shaping because it helps open the lace and gives the finished mask a cleaner silhouette. :contentReference[oaicite:4]{index=4}
Basic Blocking Approach
- Gently dampen the finished crochet piece according to the yarn’s care instructions.
- Place it on a suitable blocking surface.
- Shape the eye openings carefully.
- Arrange the lace motifs.
- Shape the flame-like extensions into the desired curves.
- Pin the important points gently.
- Allow the mask to dry completely.
Do not stretch the eye openings aggressively. The goal is to refine the shape rather than enlarge it excessively.
Can You Stiffen the Crochet Mask?
Yes, depending on the yarn and the final look you want, a suitable fabric stiffener can help the mask maintain a stronger shape.
This is particularly useful when the design includes large decorative lace extensions that need to stand away from the face.
Some published crochet masquerade mask tutorials use fabric stiffener to help the lace hold its shape. :contentReference[oaicite:5]{index=5}
However, stiffening is optional. If you want a softer mask that follows the contours of the face, keeping the crochet flexible may be preferable.
Choosing the Right Orange
The orange yarn is the star of this Halloween color palette.
A bright pumpkin orange gives the strongest traditional Halloween feeling, while darker burnt orange creates a more vintage gothic appearance.
Color Ideas
- Pumpkin orange + black: classic Halloween
- Burnt orange + black: darker and more vintage
- Neon orange + black: bold and modern
- Deep red-orange + black: dramatic gothic look
- Orange + charcoal: slightly softer contrast
Adding Decorative Flowers
The original pictured styling also includes small orange flowers on the collar area of the outfit.
These flowers are not necessary for the mask itself, but they demonstrate how beautifully the same crochet language can be extended into a complete Halloween costume.
You could create matching crochet flowers and attach them to:
- A collar
- A choker
- A black dress
- A handbag
- A headband
- A Halloween cape
Using the same orange yarn across several accessories creates a coordinated handmade costume without requiring every piece to be identical.
How to Make a Matching Gothic Crochet Set
If you want to turn this mask into a complete handmade Halloween look, several simple accessories can be created using the same black and orange palette.
Matching Crochet Choker
A narrow lace choker can repeat the openwork motif used in the mask.
Crochet Wrist Cuffs
Small black lace cuffs with orange edging can echo the colors around the eyes.
Decorative Collar
A larger lace collar can create a dramatic Victorian-inspired silhouette when worn with a simple black dress.
Hair Accessories
Small orange crochet flowers, black lace bows, or miniature flame-like motifs can be used as hair decorations.
Is This Crochet Mask Beginner Friendly?
This particular design is better suited to an intermediate or advanced crocheter.
The basic idea of making a crochet mask is not necessarily difficult, but the pictured design combines several techniques and requires careful shaping.
You should feel comfortable with:
- Working chain stitches
- Single crochet
- Double crochet
- Taller crochet stitches
- Working lace patterns
- Increasing and decreasing
- Shaping openings
- Joining crochet pieces
- Weaving in ends
- Blocking
The most challenging part is not any single stitch. It is maintaining symmetry and controlling the shape of the lace and decorative extensions.
Common Problems When Making a Crochet Mask
The Eye Openings Are Uneven
This is one of the most common problems with shaped crochet masks.
Measure the openings while the mask is flat and compare both sides before adding the final decorative border.
If one side is visibly larger, correct it before continuing.
The Mask Is Too Flexible
If the finished mask collapses instead of holding its intended silhouette, consider using a more stable yarn or a suitable stiffening method.
Blocking can also improve the shape.
The Lace Is Too Loose
If the lace sections stretch dramatically, your tension may be too loose for the yarn and stitch pattern.
Try a smaller hook or slightly firmer tension on a test section.
The Flame Extensions Keep Falling Forward
This can happen when the extensions are too long or too soft.
Shortening them slightly, using a firmer yarn, or gently blocking/stiffening the decorative pieces can help.
The Mask Feels Uncomfortable
The mask should never press hard against the eyes or create uncomfortable pressure around the nose.
Adjust the side ties and reshape the eye openings if necessary.
Important Wearing and Safety Tips
Because this is a wearable accessory, comfort and visibility should come before decoration.
- Make sure the eye openings provide adequate visibility.
- Do not allow yarn ends to hang into the eyes.
- Secure all decorative pieces firmly.
- Do not use sharp embellishments near the eyes.
- Make sure the mask does not obstruct breathing.
- Test the fit before wearing it for a long event.
- Do not wear the mask while driving or performing activities that require unrestricted vision.
If the mask is intended for a child, additional care should be taken with loose decorations, beads, cords, and visibility.
How to Photograph Your Finished Mask
A dramatic crochet mask deserves a good photograph.
Because black yarn can lose detail in dark photographs, use soft directional lighting that allows the lace texture to remain visible.
Orange yarn photographs beautifully against neutral backgrounds, especially warm beige, cream, brown, or muted autumn colors.
For a Halloween atmosphere, add pumpkins, candles, dried branches, black lace, or autumn decorations in the background without covering the mask itself.
Best Photography Angles
- Front-facing portrait showing the complete mask
- Close-up of the lace center
- Side angle showing the flame-like extensions
- Flat-lay showing the entire crochet shape
- Close-up of the eye opening and edging
Why Handmade Halloween Accessories Are So Fun
Halloween is one of the best seasons for creative crochet because there are very few rules.
You can combine traditional motifs with fashion accessories, experiment with unusual colors, and create pieces that would be difficult to find in an ordinary store.
A crochet masquerade mask is especially interesting because it can be both a costume accessory and a piece of wearable fiber art.
The open lace, dramatic silhouette, and contrasting colors allow you to create something that feels much more personal than a mass-produced Halloween accessory.
Ideas for Customizing This Mask
Make It All Black
An entirely black version would create a much more mysterious Victorian or gothic appearance.
Add Purple
Black, orange, and deep purple create a rich Halloween palette.
Add Metallic Yarn
A small amount of metallic gold or copper yarn could highlight the outer lace without overpowering the crochet texture.
Add Small Flowers
Miniature orange flowers can be added near the temples or along the upper edge.
Make the Extensions Longer
For a theatrical costume, longer curling extensions can create a dramatic silhouette.
Make It Simpler
If you prefer an everyday masquerade accessory, remove some of the larger extensions and keep only the lace eye frame.
How to Store the Finished Mask
Do not throw a lace crochet mask into a drawer where it can become crushed.
Instead, store it flat in a clean box or gently shape it around a suitable form.
Keep the decorative extensions arranged carefully so they do not become permanently bent in an unwanted direction.
If the mask becomes slightly distorted, gentle reshaping and blocking can often restore its original appearance.
Can This Design Be Used Beyond Halloween?
Absolutely.
Although the black-and-orange version has a strong Halloween identity, the underlying crochet construction can be adapted into other styles.
Try ivory and gold for a masquerade ball, black and silver for a gothic event, white for a theatrical costume, or jewel tones for a carnival-inspired accessory.
The same lace concept can also be used for photography, stage costumes, themed parties, Renaissance-inspired outfits, and cosplay.
Final Tips for a Beautiful Crochet Masquerade Mask
- Measure the face first. A mask should fit the wearer rather than forcing the wearer to adapt to the mask.
- Keep the eye openings symmetrical. This is one of the most important visual details.
- Use consistent tension. Lace looks much cleaner when the chain spaces are even.
- Choose contrasting colors. Black and orange make the details immediately visible.
- Do not rush the decorative extensions. Their shape creates much of the character of the design.
- Secure every loose end. Loose yarn can quickly ruin an otherwise polished project.
- Block the finished mask. Proper shaping can make the lace look much more professional.
- Test the fit before Halloween night. Comfort and visibility are more important than decoration.
Final Thoughts
This black and orange crochet Halloween masquerade mask is the kind of project that turns crochet into wearable art.
The strong orange eye frame immediately catches attention, while the black lace center creates depth and contrast. The openwork around the sides keeps the design delicate, and the curling flame-like extensions give the mask its unmistakable Halloween personality.
What makes the project especially interesting is that you do not need to reproduce every detail exactly. The basic concept can be adapted to your own face measurements, preferred yarn, favorite colors, and desired level of decoration.
For a more dramatic costume, make the extensions larger and more elaborate. For a simpler accessory, reduce the lace details and keep the eye frame clean. You can also experiment with different edging stitches, decorative flowers, beads, ribbons, or contrasting yarn.
The most important part is to work carefully around the eyes, maintain good symmetry, and shape the finished lace before wearing it.
Project Note
This article is an original, adaptable crochet project guide inspired by the pictured black-and-orange Halloween masquerade mask. The exact original designer and stitch-by-stitch source for the photographed design could not be reliably verified. For that reason, this guide intentionally does not present invented row counts or claim to reproduce an original copyrighted pattern. Instead, it explains the visible construction, design elements, materials, shaping considerations, finishing techniques, and customization ideas so crocheters can create a similar handmade style.
Save This Halloween Crochet Idea
If you love gothic crochet, Halloween crafts, and handmade costume accessories, save this masquerade mask idea for your next spooky-season project.
With black yarn, bright orange accents, delicate lacework, and a little creativity, you can turn a simple crochet accessory into a dramatic statement piece that is completely your own.