Crochet Lace Bridal High Heel Booties with Pearls and Satin Bows
There is something timeless about combining delicate lace, pearls, satin ribbon, and elegant high heels. This beautiful crochet-inspired bridal footwear design brings all of those details together in one romantic handmade project.
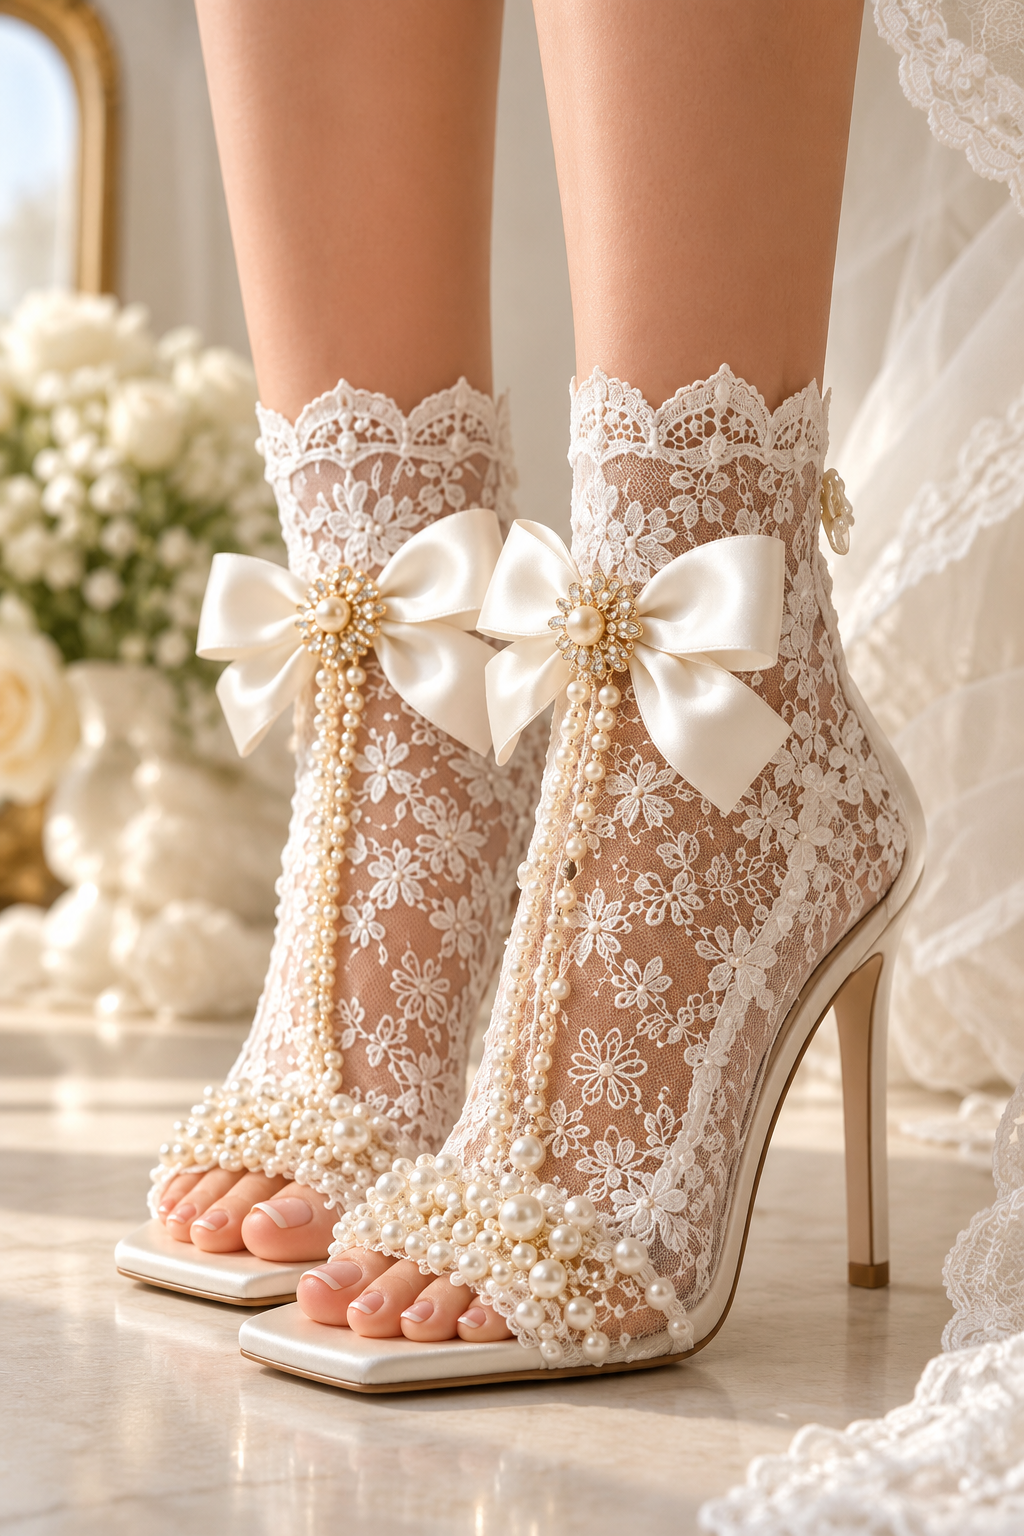
The finished pair features a delicate ivory lace upper that rises around the ankle, a sophisticated high-heel silhouette, a soft satin bow, cascading pearl details, and floral lace motifs throughout the design. The result is feminine, elegant, and especially suited to bridal styling, wedding photography, special occasions, and romantic fashion.
This project is best understood as a decorative footwear transformation rather than a conventional crochet shoe made entirely from yarn. The existing high-heel base provides the structure, while the crochet or crochet-style lace creates the decorative ankle and foot covering. Additional elements such as satin ribbon, pearls, floral appliqués, and closures are then added during the finishing stage.
What Makes These Bridal Crochet Heels Special?
The beauty of this design comes from the combination of several delicate materials rather than from one crochet technique alone.
The ivory lace creates a soft, semi-sheer layer over the foot and ankle. The floral motifs give the surface a romantic handmade appearance, while the pearl details add dimension and a subtle bridal sparkle.
The large satin bow creates the strongest visual focal point around the ankle. Its smooth surface contrasts beautifully with the textured lace underneath it.
Finally, the high heel keeps the overall silhouette elegant and fashion-focused rather than making the project look like a traditional crochet slipper or bootie.
Understanding the Construction
Before beginning a project like this, it helps to divide the finished design into separate components.
- The shoe base: a suitable high-heeled sandal or open-toe shoe provides the structural foundation.
- The lace upper: a delicate crochet or lace panel covers the foot and rises toward the ankle.
- The ankle section: the lace continues upward and is shaped to sit comfortably around the lower leg.
- The satin bow: a wide ivory ribbon creates the main decorative focal point.
- The pearl embellishments: pearl strands and individual pearls decorate the front and bow area.
- The floral details: small lace or crochet flowers reinforce the romantic bridal theme.
- The closure: a discreet fastening keeps the upper fitted around the ankle.
This modular approach is particularly useful because it allows each component to be prepared separately and then assembled after the fit has been tested.
Materials for the Project
The exact amount of material will depend on the shoe size, ankle circumference, desired height of the lace upper, and how heavily the design is decorated.
For an adaptable project inspired by the pictured design, consider the following materials:
- Fine ivory crochet thread or delicate crochet lace
- A suitable crochet hook if you are making the lace component yourself
- An existing pair of ivory, white, or nude high heels
- Ivory satin ribbon
- Faux pearl beads in several sizes
- Small pearl strands or pearl chain
- Decorative pearl or rhinestone brooches
- Small floral lace or crochet appliqués
- Strong sewing thread
- Fine sewing needle
- Tapestry needle for weaving crochet ends
- Small scissors
- Optional snaps or another discreet closure
A comparable bridal crochet lace cuff pattern uses fine crochet thread together with satin ribbon, pearl beads, snaps, sewing materials, and separate floral decoration, which supports this type of modular construction. :contentReference[oaicite:1]{index=1}
Choosing the Lace or Crochet Thread
The ankle section needs to remain relatively lightweight. A very bulky yarn would make the finished shoe look heavy and could make the upper uncomfortable.
Fine crochet thread is particularly suitable when you want a delicate lace appearance with clearly defined floral motifs.
The pictured design has a refined, almost vintage lace appearance, so a smooth ivory thread or fine lace material is more appropriate than thick textured yarn.
If you are crocheting the lace yourself, make a small sample first. The sample should be flexible enough to follow the curves of the foot while still holding its shape.
Step 1: Create the Floral Lace Ankle Panel
The first stage is the most important foundation of the project: creating the lace panel that will eventually surround the ankle and extend downward over the foot.
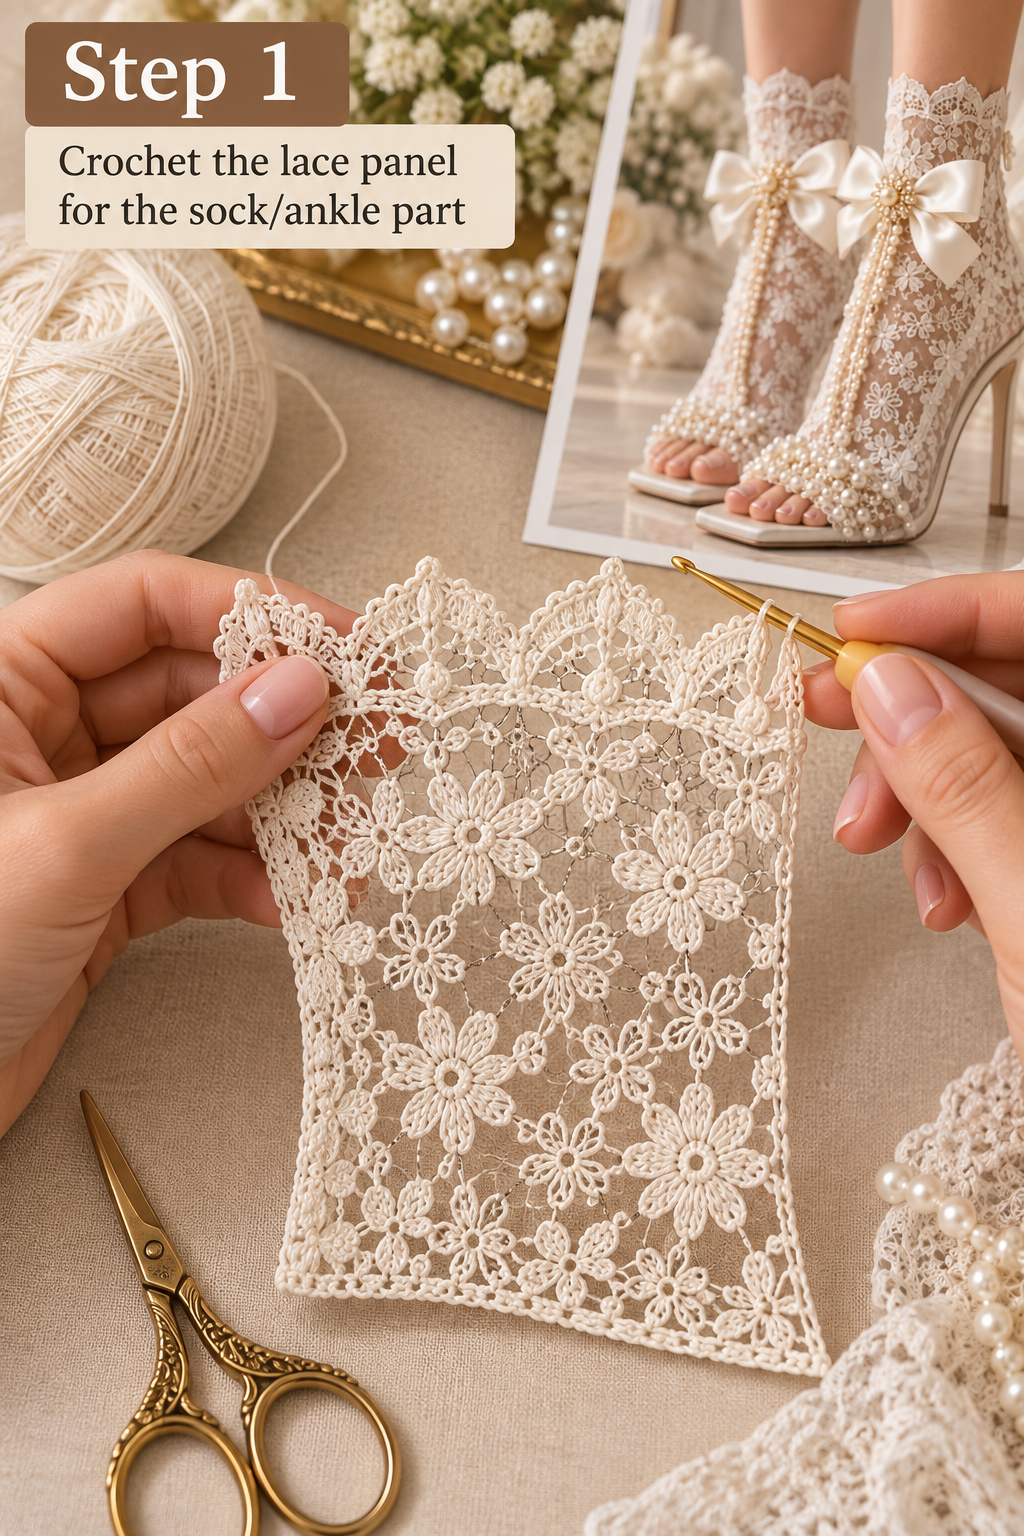
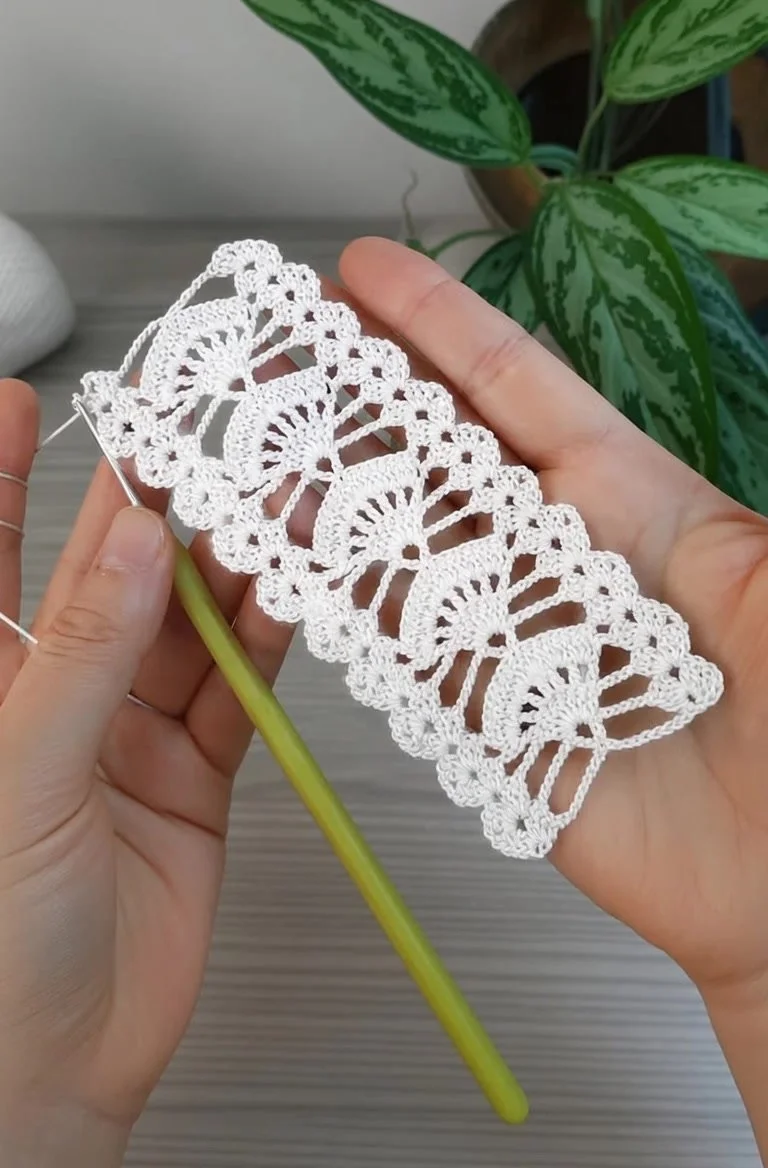
The sample shown here uses a floral openwork appearance with a decorative scalloped edge. This gives the top of the finished bootie a soft ornamental border instead of a plain straight edge.
Work With the Finished Shoe in Mind
One of the biggest mistakes with footwear projects is creating a beautiful flat piece without considering how it will behave on a curved shoe.
Before making the final panel, measure the approximate area you want to cover. Check the ankle circumference and the distance from the ankle toward the front of the foot.
The panel should have enough flexibility to wrap around the shoe without pulling tightly across the ankle.
Create a Small Gauge Sample
If you are crocheting the lace from scratch, make a small sample before committing to the full panel.
Check how transparent the fabric is, how much it stretches, and whether the floral motifs remain clearly visible.
A very loose sample may look beautiful but become distorted when fitted around the shoe. A very tight sample may not follow the curves comfortably.
Shape the Upper Edge
The upper edge of the pictured design has a decorative scalloped appearance.
This kind of edge is particularly effective for bridal footwear because it softens the transition between the lace and the skin while creating a finished decorative border.
You can adapt the edge with scallops, small arches, picots, or another delicate lace finish.
Measuring the Ankle Section
Measure around the ankle where the top edge of the lace will sit.
Do not rely only on the measurement of the shoe itself. The ankle circumference belongs to the wearer, and the finished lace panel needs to accommodate the actual body measurement.
If the design includes a closure at the back or side, leave enough overlap for that closure.
For a fitted bridal accessory, a discreet fastening is often easier to adjust than trying to make the lace panel perfectly closed from the beginning.
Creating the Floral Lace Pattern
The floral appearance can be created with crochet motifs worked into the fabric or with separate floral lace pieces attached to an openwork base.
The pictured design has small flowers distributed throughout the lace rather than a single oversized motif.
This creates a continuous botanical texture while keeping the material visually light.
If you are creating the fabric yourself, focus on consistent tension and repeat spacing. The flowers should remain recognizable and the open spaces should be relatively even.
Test the Panel on the Shoe
Once the main lace panel is ready, place it gently over the shoe before attaching any pearls or ribbon.
This is the moment to check the fit.
- Does the lace follow the ankle naturally?
- Does it sit smoothly over the foot?
- Does the top edge remain comfortable?
- Does the lower section interfere with the toes?
- Is there enough room for the decorative bow?
- Can the ankle section be opened and closed easily?
Make any necessary adjustments before moving to the decorative stage.
Step 2: Add the Satin Bow and Pearl Decoration
Once the lace structure fits correctly, the project moves into the decorative phase.
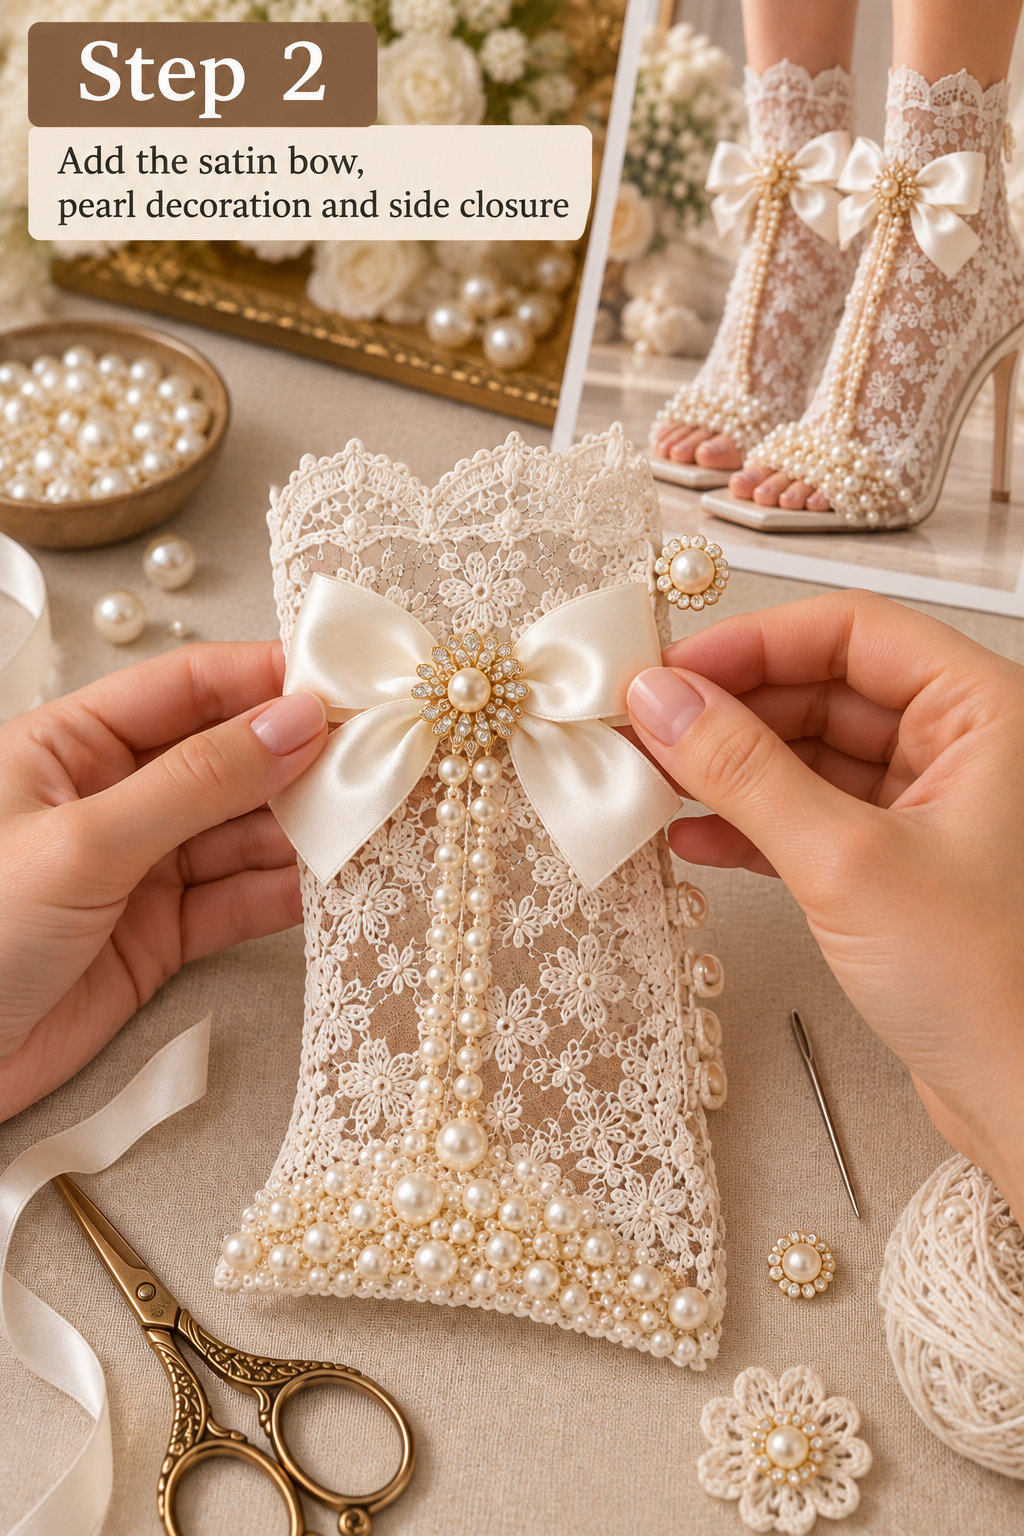
The bow is one of the most recognizable details of this design.
Choosing the Ribbon
Use a smooth ivory or off-white satin ribbon that complements the lace.
The width of the ribbon can be adjusted according to the size of the shoe. A wider ribbon creates a dramatic statement bow, while a narrower ribbon produces a more delicate effect.
For the pictured style, a relatively substantial bow works well because it creates contrast against the fine lace.
Forming the Bow
Create the two main loops and tails of the bow separately if necessary, then secure the center firmly.
Before permanently attaching the bow to the shoe, place it over the lace and check its position from several angles.
The bow should be centered visually without interfering with the foot or ankle movement.
Add a Decorative Centerpiece
The center of the bow can be finished with a pearl, rhinestone brooch, floral embellishment, or small decorative button.
The pictured design uses a pearl-centered jeweled detail that connects the bow to the rest of the bridal decoration.
This small centerpiece is important because it hides the ribbon’s center gathering and gives the bow a more polished appearance.
Adding the Pearl Strands
Pearls are used heavily in the lower front section of the pictured design, creating a cascading effect that visually connects the bow to the toe area.
Instead of covering every part of the lace with pearls, arrange them selectively.
Different pearl sizes can create a more natural dimensional effect. Larger pearls can be used as focal points, while smaller pearls fill the spaces between them.
When attaching multiple strands, try to maintain a clean flow rather than placing each strand randomly.
Keep the Pearl Decoration Lightweight
Although pearls are beautiful, a large quantity of embellishments can add unexpected weight.
For footwear, secure each section carefully and avoid creating a heavy cluster in a place where it could become uncomfortable.
The goal is to create visual richness without making the lace upper unnecessarily heavy.
Decorating the Toe Area
The toe area is one of the strongest decorative points in the finished design.
The pearls create a soft border along the front edge while the floral lace remains visible underneath.
If you are adapting the design, you can create a more subtle version by using only a small pearl border.
For a more dramatic bridal look, combine pearls of different sizes and add small crystal or rhinestone accents.
Adding Floral Lace Motifs
Small flowers are distributed across the lace panel and help create the romantic garden-like texture visible in the finished footwear.
You can use pre-made lace appliqués or crochet flowers, depending on the construction method you prefer.
If making crochet flowers, keep them relatively flat so they do not catch on clothing or interfere with the movement of the foot.
Small floral motifs are especially useful around the ankle because they add detail without creating excessive bulk.
Step 3: Attach the Pearl Strands and Finish the Edges
The final stage is about securing the embellishments and making sure every edge looks polished.

At this point, the overall design should already resemble the finished pair, but careful finishing is what makes the difference between a handmade project that looks unfinished and one that looks professionally assembled.
Secure Every Pearl Strand
Check the attachment point of every pearl strand.
Do not rely on a single weak thread connection for a long decorative strand. Reinforce the upper attachment point and make sure the thread is properly secured.
Trim excess thread only after confirming that the knot or stitching is stable.
Finish the Lace Edges
Inspect the top edge, side edges, and lower edge of the lace.
Any loose crochet ends should be woven into the lace securely.
If using separate lace appliqués, check that their edges are fully attached and do not lift away from the shoe.
Check the Bow
The satin bow should remain centered and secure.
Gently move the loops and tails to make sure the bow keeps its intended shape.
If necessary, add a few discreet stitches behind the bow so that it stays in position without making the attachment visible from the front.
Creating a Secure Closure
A fitted lace ankle section needs a reliable way to open and close.
A discreet snap, small hook-and-eye closure, button-and-loop system, or another suitable fastening can be considered depending on the construction.
The closure should be positioned where it is easy to access but does not create a visible interruption in the lace design.
For a bridal accessory, a concealed closure is usually visually cleaner than a large exposed fastening.
How to Keep the Lace Looking Elegant
The most important visual principle is balance.
The lace is already detailed, so the pearls and ribbon should complement it rather than completely hide it.
Allow sections of the floral lace to remain visible.
This creates contrast between the delicate openwork and the solid satin and pearl decorations.
Choosing Between Crochet Thread and Ready-Made Lace
There are two practical ways to recreate the overall appearance of the pictured design.
Option One: Crochet the Lace Yourself
This approach gives you complete control over the flower shapes, border, size, and overall texture.
It is the best choice if your goal is to make the project genuinely crochet-based.
However, it requires more time and careful tension control.
Option Two: Use Decorative Lace
You can also use a ready-made floral lace fabric or lace trim as the upper and focus your handmade work on the embellishment and assembly.
This can be useful when creating a fashion accessory rather than a completely crocheted shoe.
The finished appearance can still fit beautifully within a crochet-inspired bridal collection, especially when crochet flowers or other handmade details are incorporated.
How to Make a More Crochet-Focused Version
If you want the project to contain more crochet, replace the ready-made floral lace with a crocheted openwork panel.
Use fine thread and a floral or geometric lace stitch.
Create the ankle panel separately and shape it to fit the shoe.
Then crochet small flowers and attach them selectively around the bow and pearl areas.
This produces a stronger handmade identity while maintaining the elegant bridal appearance.
Choosing the Right Shoe Base
The shoe underneath the lace is extremely important.
A stable base is preferable because the crochet and decorative elements should not be responsible for providing the entire structure of the footwear.
Choose a shoe that already fits properly before adding any decorative material.
The crochet or lace should enhance the shoe rather than compensate for a poor fit.
Comfort Should Come Before Decoration
Bridal footwear can be worn for several hours, so comfort matters even when the project is primarily decorative.
Before permanently attaching the lace, test the shoe on the foot.
Check whether any part of the lace rubs against the ankle or toes.
Also check the location of the pearls. A decorative pearl cluster that looks beautiful in a photograph may become uncomfortable if it presses against the foot while walking.
Testing the Finished Design
Once everything is attached, wear the shoes indoors for a short test.
Stand, walk slowly, sit down, and move the ankles naturally.
Watch for any components that shift.
- Check the lace upper.
- Check the ankle closure.
- Check the bow.
- Check the pearl strands.
- Check the floral appliqués.
- Check the toe decoration.
- Check that nothing catches against the opposite shoe.
If anything moves excessively, reinforce it before wearing the shoes for a longer period.
Wedding Styling Ideas
These lace-covered heels can work particularly well with romantic bridal styling.
Classic Ivory Bridal Look
Pair ivory lace with ivory satin ribbon and traditional white pearls.
This keeps the design elegant and timeless.
Champagne Bridal Look
Use warm ivory lace with champagne-colored ribbon and slightly golden pearl accents.
This works especially well with warm-toned wedding dresses and gold jewelry.
Vintage Wedding Look
Add more floral lace, pearl strands, and a slightly larger bow to create an old-fashioned romantic appearance.
Garden Wedding Look
Small pale green leaves and subtle floral appliqués can be added to the lace while keeping the main palette neutral.
Color Variations
Although the pictured pair is primarily ivory and pearl, the same construction can be adapted to different palettes.
- Blush: ivory lace, blush ribbon, champagne pearls
- Champagne: warm ivory lace, champagne satin, gold accents
- Something Blue: ivory lace, pale blue ribbon, white pearls
- Romantic Pink: ivory lace, dusty rose bow, cream pearls
- Classic White: pure white lace, white satin, white pearls
How to Keep the Pearl Decoration Elegant
When working with pearls, more is not always better.
The pictured design uses pearls heavily around the lower front section, but the ankle area remains more open so the floral lace can still be seen.
This creates a useful visual hierarchy:
- The satin bow catches attention first.
- The pearl centerpiece adds sparkle.
- The cascading pearl strands guide the eye downward.
- The floral lace provides the detailed background texture.
- The high heel completes the elegant silhouette.
Common Problems and Solutions
The Lace Is Too Loose
If the lace shifts excessively, check the fit of the ankle section and add a more secure closure.
The lace should follow the shape of the shoe without hanging loosely.
The Lace Is Too Tight
Do not force the panel into position. A tight panel may distort the floral motifs and become uncomfortable.
Adjust the dimensions before attaching the decoration.
The Bow Keeps Moving
Secure the bow at several discreet points behind the center rather than relying only on the pearl centerpiece.
The Pearl Strands Swing Too Much
Use small discreet attachment points along the strand or reduce the length of the hanging sections.
The Design Looks Too Heavy
Remove some of the larger embellishments and allow more of the lace to remain visible.
Care and Storage
Because this project combines lace, crochet thread, satin ribbon, pearls, and a structured shoe base, careful storage is important.
Keep the shoes away from excessive moisture and avoid crushing the lace or bow.
If the footwear needs cleaning, clean small areas carefully rather than treating the entire shoe as washable crochet.
Always consider the material of the original shoe before applying water or cleaning products.
After wearing the shoes, allow them to air out naturally before placing them into storage.
Store them in a box or dust bag where the pearl strands and bow will not be compressed.
Photography Tips for This Type of Crochet Project
Detailed handmade footwear photographs particularly well when the background remains simple.
Use soft natural light and photograph the shoe from several angles.
A close-up image can show the floral lace and pearls, while a full-body photograph can demonstrate how the high heel looks when worn.
For a crochet blog, it is also useful to photograph the individual stages separately. The lace panel, bow assembly, and pearl finishing process can each become useful visual references for readers.
Why This Project Works So Well for Bridal Crochet
Crochet and lace naturally lend themselves to romantic handmade designs.
Fine crochet thread can create intricate openwork, while pearls and satin introduce a more polished fashion finish.
The combination also allows makers to personalize the footwear without needing to redesign the entire shoe.
A simple pair of heels can become a highly individual handmade accessory simply by adding a removable or carefully fitted decorative lace component.
Project Checklist
Before considering the project complete, use this checklist:
- ✔ The shoe base fits correctly.
- ✔ The lace panel follows the shape of the shoe.
- ✔ The ankle section is comfortable.
- ✔ The upper edge is neatly finished.
- ✔ The closure is secure.
- ✔ The satin bow is firmly attached.
- ✔ The pearl centerpiece is secure.
- ✔ The pearl strands are reinforced.
- ✔ Floral appliqués are firmly attached.
- ✔ Loose crochet and sewing threads are hidden.
- ✔ The decorations do not interfere with walking.
- ✔ The finished pair has a balanced appearance.
Frequently Asked Questions
Are these completely crocheted shoes?
The pictured design is best approached as a decorated high-heel footwear project rather than a completely crocheted shoe. The existing heel and sole provide the structural foundation, while the lace or crochet component creates the decorative upper.
Can I crochet the lace myself?
Yes. Fine crochet thread can be used to create an openwork floral panel that is then fitted to the shoe. A separate lace panel also makes the project easier to adjust before the final decoration is added.
Can I use ready-made lace instead?
Yes. Ready-made floral lace can be used when the goal is to recreate the visual style rather than make every component by hand.
Can I use real pearls?
You can, but faux pearls are generally lighter and more practical for decorative footwear. If real pearls are used, make sure the additional weight does not make the shoe uncomfortable.
Can I change the bow color?
Absolutely. Ivory is ideal for the pictured bridal style, but blush, champagne, pale blue, or even dusty rose can create a different look.
Can I make this design removable?
Yes. If you want to protect the original shoes, consider designing the lace and decoration as a removable ankle accessory rather than permanently attaching everything to the shoe.
Is this suitable for everyday walking?
A heavily decorated lace and pearl design should be tested carefully before extended wear. The attachment points, comfort, shoe stability, and security of every embellishment should be checked first.
Final Thoughts
These crochet lace bridal high heel booties are a beautiful example of how handmade fiber details can transform classic footwear into something completely personal.
The combination of floral lace, ivory thread, satin ribbon, pearls, and elegant heels creates a romantic design that feels especially appropriate for weddings and special occasions.
The project becomes much easier when it is divided into three clear stages: first create and fit the lace panel, then add the satin bow and major pearl decoration, and finally secure the pearl strands and finish every edge.
The most important lesson is to treat the shoe as a structured fashion base and the crochet lace as a carefully fitted decorative layer. This makes it easier to control the shape, comfort, and final appearance.
Once the basic construction is understood, the design can be customized in countless ways. Change the ribbon color, use different floral motifs, experiment with pearl sizes, or create a simpler version with only a small bow and delicate lace.
The result can be a truly unique handmade bridal accessory that combines the softness of crochet with the elegance of classic wedding fashion.