Crochet Paper Towel Holder: A Beautiful Floral Wall Organizer
A paper towel holder does not have to be a plain plastic or metal accessory. With a little crochet work, simple wooden dowels, and a few handmade floral details, an everyday kitchen essential can become a beautiful piece of handmade home decor.
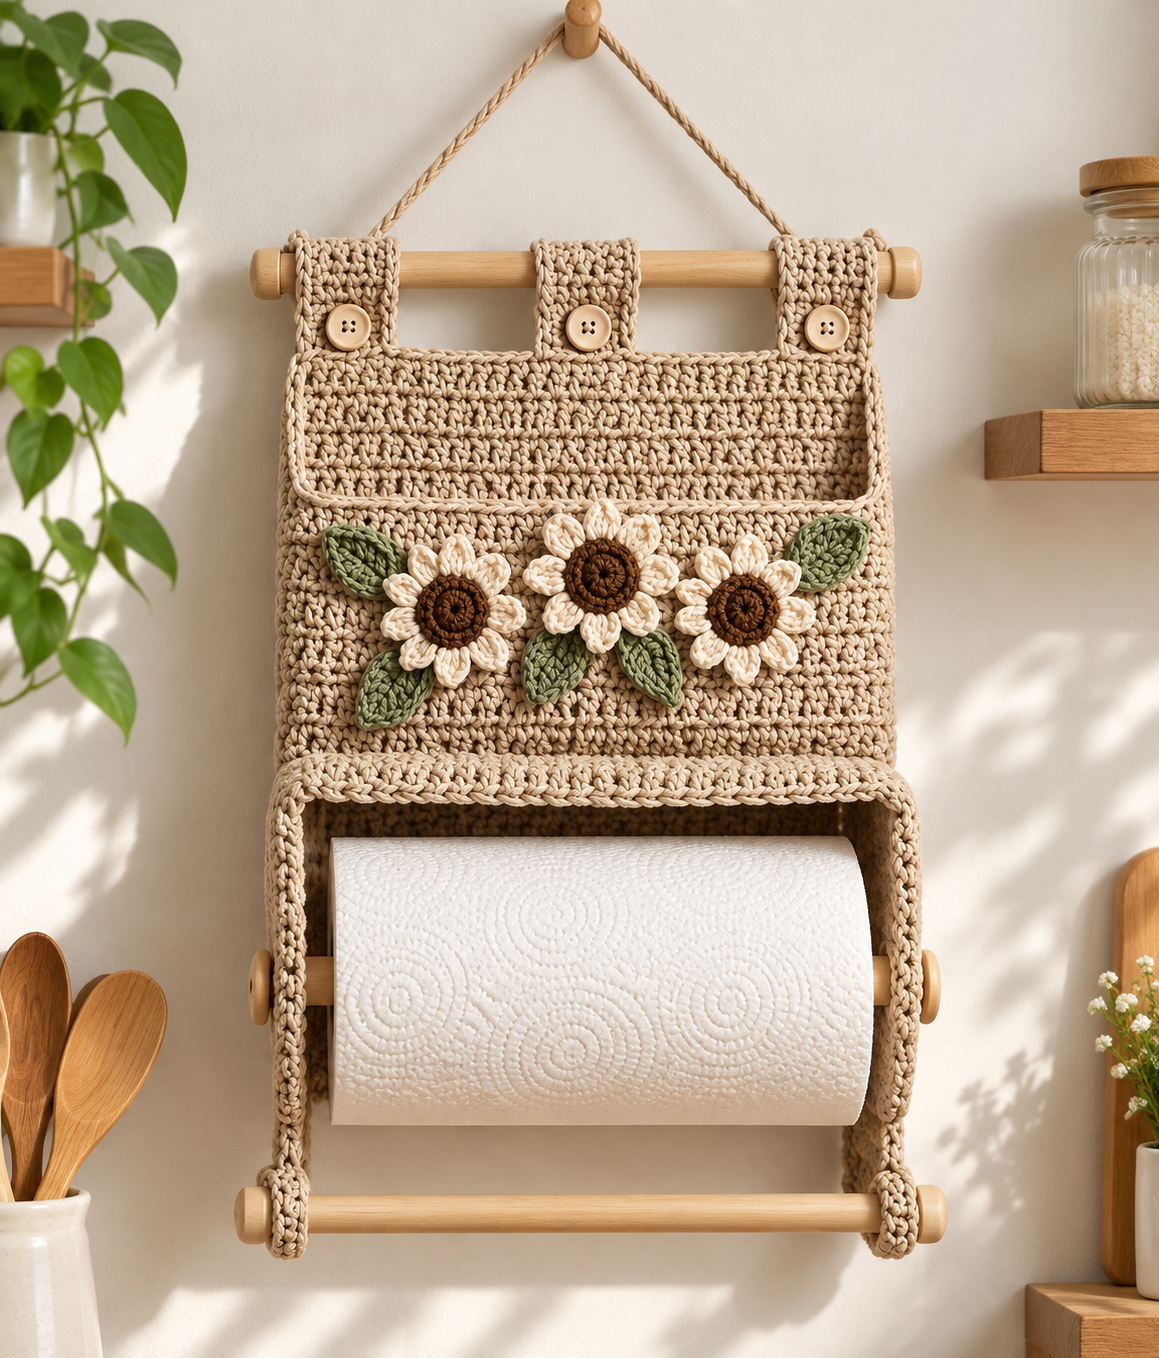
This crochet paper towel holder combines practical storage with a warm cottage-style aesthetic. The design features a textured beige crochet body, natural wooden dowels, buttoned hanging tabs, a braided hanging cord, and a row of handmade sunflower-style flowers with green leaves.
The result is a wall-mounted organizer that keeps a paper towel roll easy to reach while adding a soft handmade touch to the kitchen.
What Makes This Crochet Paper Towel Holder Special?
The appeal of this project comes from the combination of function and decoration.
The main crochet body provides the visual structure of the organizer, while the wooden dowels give the piece a firm framework. The upper dowel supports the hanging tabs and helps distribute the weight across the width of the holder. The lower section creates a simple cradle for the paper towel roll.
The floral decoration gives the project its personality. Three cream flowers with dark brown centers are arranged across the front, accompanied by green leaves. The neutral palette makes the holder easy to combine with natural wood, cream walls, white countertops, plants, and other farmhouse or cottage-style kitchen accessories.
Similar crochet wall organizers commonly use structured cotton crochet panels together with wooden dowels and hanging cords because these materials help the organizer maintain its shape while carrying lightweight household items.
Understanding the Construction
The finished holder can be understood as several simple components that work together:
- Main crochet panel: the large rectangular foundation of the organizer.
- Upper hanging tabs: three reinforced crochet tabs that wrap around the upper wooden dowel.
- Front decorative section: the area where the flowers and leaves are attached.
- Lower side supports: two vertical crochet sections that support the bottom wooden dowel.
- Paper-roll dowel: the wooden rod that passes through the paper towel roll.
- Hanging cord: a strong cord that suspends the entire organizer from the wall.
- Floral motifs: crocheted flowers and leaves that provide the decorative finish.
Thinking about the project in these sections makes it much easier to construct and customize.
Materials You May Need
The exact amount of yarn depends on the dimensions you choose and the density of your stitches. Instead of relying on a fixed quantity, select materials according to the size and intended use of your organizer.
Main Materials
- Medium-weight cotton yarn in beige, tan, or natural cream
- Green yarn for leaves
- Cream or ivory yarn for flower petals
- Brown yarn for flower centers
- A crochet hook appropriate for your selected yarn
- Two wooden dowels or smooth wooden rods
- Three or more wooden buttons
- Strong cotton cord for hanging
- Tapestry needle
- Scissors
- Stitch markers if needed
- Strong sewing thread for reinforcement
Cotton is particularly useful for this kind of home organizer because it generally produces a firm fabric with relatively clear stitch definition. Existing crochet wall-organizer patterns commonly use cotton yarn and wooden dowels for the same reason.
Choosing the Right Yarn
The main panel should not be excessively soft or stretchy.
A very loose crochet fabric may sag once the wooden dowels and paper roll are attached. A moderately firm fabric gives the finished holder a cleaner shape and helps the upper tabs stay aligned.
A natural beige or oatmeal shade works particularly well for this design because it creates a warm neutral background for the flowers.
If you prefer a modern kitchen look, you can replace beige with cream, white, light gray, sage green, or muted taupe.
Step 1: Crochet the Main Rectangular Panel
The first stage is to create the main rectangular crochet panel.
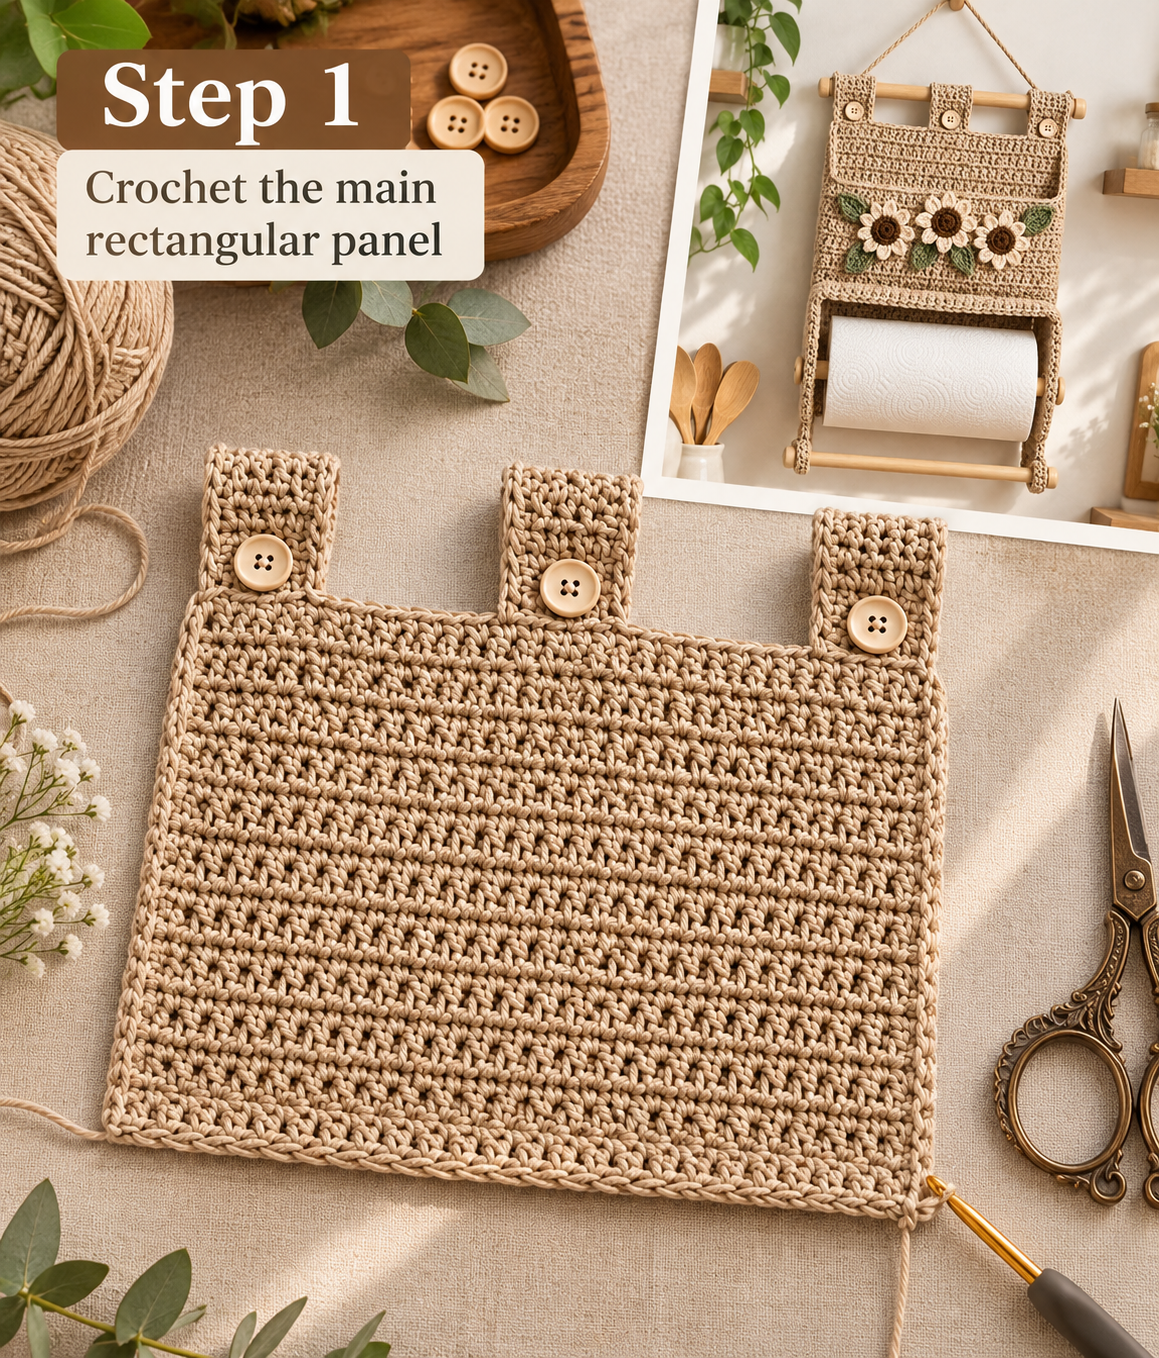
The panel forms the foundation of the entire project, so it is important to keep its edges straight and its tension consistent.
Start With the Width
Decide how wide you want the finished holder to be based on the paper towel roll and the space available on your wall.
The wooden dowel should extend slightly beyond the crochet body so that the hanging structure has enough room on both sides.
Rather than copying a fixed stitch count, measure the actual dowel you intend to use and build the crochet panel around it.
Build a Firm Fabric
Choose a stitch that creates a relatively dense and stable fabric.
The pictured design has a textured appearance rather than a highly open lace structure. This is appropriate because the holder needs to retain its shape.
Keep your tension consistent from the first row to the last. If one section becomes noticeably wider or narrower, the wooden dowels may not sit straight later.
Keep the Corners Square
Pay particular attention to the corners of the rectangular panel.
A clean square corner makes the final assembly much easier and gives the finished organizer a professional appearance.
If your edges are beginning to slope, check your stitch count and tension before continuing.
Creating the Upper Hanging Tabs
The finished design uses three crochet tabs across the top.
These tabs wrap around the upper wooden dowel and are secured with wooden buttons.
The three-tab arrangement is useful because it distributes the weight across the width of the organizer instead of concentrating all of the tension at one point.
Position the Tabs Evenly
Place one tab toward the left side, one near the center, and one toward the right side.
The spacing does not need to be mathematically identical to the pictured design. What matters is that the tabs create balanced support and allow the dowel to remain horizontal.
Reinforce the Tabs
The upper tabs are load-bearing parts of the project, so they should be made from a firm crochet fabric.
If your yarn is particularly soft, consider reinforcing the attachment area with additional stitching.
The button also helps keep each tab closed around the dowel and adds a decorative wooden accent.
Choosing the Wooden Buttons
Natural wooden buttons complement the beige crochet beautifully.
They also reinforce the handmade, rustic character of the organizer.
Choose buttons that are large enough to be easy to handle but not so large that they overpower the crochet texture.
Before sewing them permanently, check that the button fits comfortably through the intended loop.
Step 2: Build the Front Section and Add the Floral Decoration
After the main panel is established, the next stage is to create the front section and decorate it.
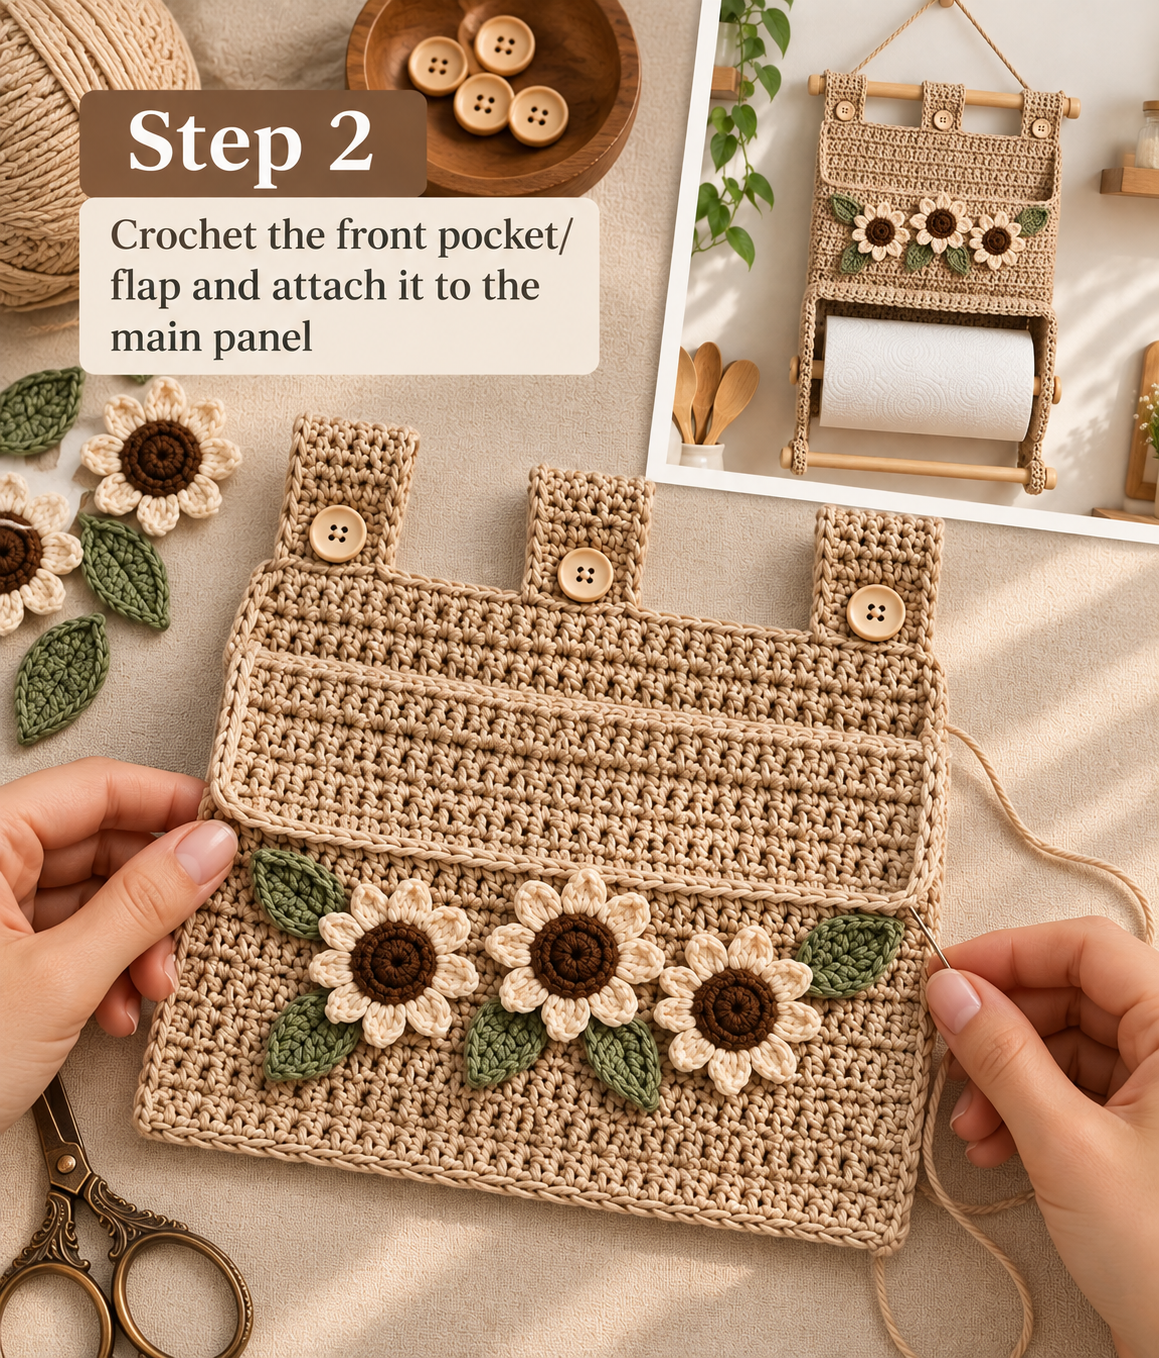
This stage gives the organizer most of its visual character.
Creating the Front Pocket or Folded Section
The front section creates the lower opening where the paper towel roll will sit.
The exact construction can be adapted according to the size of the paper towel roll you plan to use.
The most important point is to leave enough clearance for the roll to rotate freely.
Do not make the opening so tight that the paper towel rubs heavily against the crochet fabric.
Measure the Paper Towel Roll
Before permanently attaching the lower section, place your actual paper towel roll against the crochet structure.
Check both its width and diameter.
Different paper towel rolls can vary considerably in size, so building the holder around the roll you actually intend to use is more reliable than following a generic measurement.
Create a Clean Lower Edge
The lower edge of the crochet section should be neat and reinforced.
A clean border helps prevent stretching and gives the holder a more finished appearance.
It also provides a stronger area around the lower wooden rod.
Making the Crochet Flowers
The flowers are the main decorative feature of the pictured design.
Three cream flowers are arranged horizontally across the front, each with a dark brown center.
You can create the flowers separately and attach them after the main panel is finished.
This method gives you much more freedom to experiment with their placement.
Flower Color
The cream petals create a soft contrast against the beige background.
The dark brown centers make the flowers immediately recognizable and add warmth to the palette.
If you want a brighter version, replace cream with white or yellow.
If you want a more modern version, try dusty rose, muted mustard, or terracotta flowers.
Adding the Green Leaves
The green leaves are important because they visually connect the three flowers.
Without leaves, the flowers may look like separate decorations placed randomly across the panel.
With leaves positioned between and around them, the front becomes a small botanical composition.
Try placing the leaves at different angles rather than making every leaf point in exactly the same direction.
Attaching the Flowers Securely
Because the organizer will be handled while replacing paper towel rolls, the flowers should be securely attached.
Do not rely on a single stitch through the center of a large flower.
Use several discreet attachment points where necessary, especially around the outer portion of larger motifs.
Keep the stitches hidden from the front whenever possible.
Planning the Floral Arrangement
Before sewing the flowers permanently, place all three flowers and the leaves on the organizer.
Move them around until the arrangement looks balanced.
A simple arrangement can be:
- Place the largest or central flower first.
- Add one flower to each side.
- Position leaves between the flowers.
- Add additional leaves above or below the flowers where the composition needs balance.
Take a photograph of the arrangement before attaching anything. This gives you a reference if the pieces move during sewing.
Step 3: Assemble the Wooden Rods and Hanging System
The final stage turns the crochet panels into a functional wall-mounted paper towel holder.
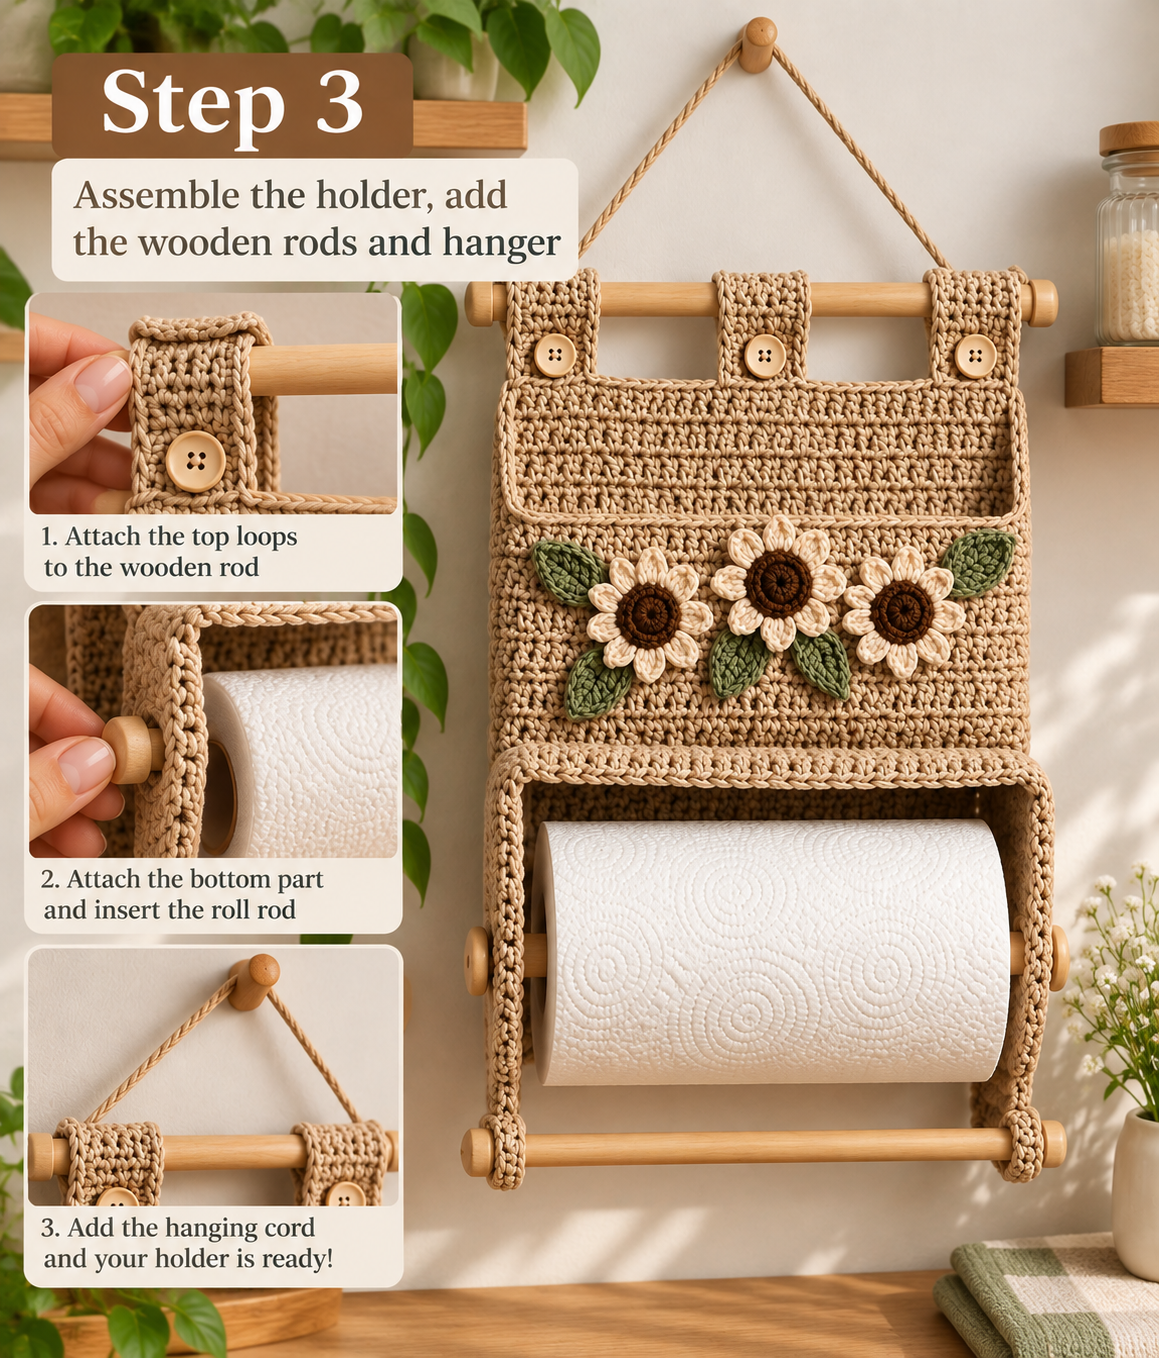
Installing the Upper Wooden Dowel
Slide the upper wooden dowel through the three crochet tabs.
Check that each tab sits flat and that the dowel remains horizontal.
The wooden rod should extend slightly beyond the crochet body.
Make sure the edges of the dowel are smooth. Rough wood can catch on the yarn and gradually damage the crochet.
Adding the Lower Paper-Roll Rod
The lower wooden rod is designed to pass through the center of the paper towel roll.
This creates a simple rotating support.
A wooden dowel through the center of the roll is a common way to create a functional paper towel holder because the roll can rotate around the rod while the support remains in place.
Before finalizing the side supports, test the actual roll on the rod.
Make sure the paper can pull forward without catching on the crochet.
Securing the Lower Side Supports
The two long side sections hold the lower rod in place.
They should be symmetrical enough that the rod remains horizontal.
If one side is significantly longer than the other, the roll may sit at an angle.
Use strong stitching at the points where the crochet meets the wooden rod.
Creating the Hanging Cord
The top hanging cord supports the entire organizer from the wall.
A strong cotton cord or tightly braided yarn is a better choice than a very stretchy yarn.
Similar crochet organizers use a hanging cord connected to a wooden dowel to distribute the weight and keep the organizer stable on the wall.
Keep Both Sides Equal
Attach one end of the cord to the left side of the upper dowel and the other end to the right side.
Adjust the center hanging point until the organizer hangs straight.
Do not permanently knot everything until you have tested the position on the wall.
Testing the Organizer Before Hanging It
Before installing the finished project, place a paper towel roll inside and hold the organizer against the wall.
Check whether:
- The upper dowel remains horizontal.
- The lower rod stays securely in place.
- The paper towel roll rotates freely.
- The crochet does not stretch excessively.
- The floral decoration remains centered.
- The hanging cord supports the weight evenly.
This simple test can reveal problems before the organizer is permanently installed.
How to Make the Organizer More Durable
Although the organizer is primarily decorative, it is still a functional household item.
There are several ways to increase its durability.
Use Firm Cotton Yarn
A structured cotton yarn can help the organizer hold its shape.
Reinforce High-Stress Areas
Pay special attention to the upper tabs, lower side supports, and points where the hanging cord is attached.
Secure Your Yarn Ends
Do not leave long loose ends hidden loosely inside the organizer. Weave them in securely and trim only after they are stable.
Use Smooth Wooden Dowels
Sand or inspect the dowels before inserting them into the crochet.
Small splinters can snag the yarn.
Making the Holder Fit Different Paper Towel Rolls
One advantage of making your own holder is that you can customize the opening.
If your preferred paper towel roll is particularly wide, increase the overall width of the organizer.
If the roll has a large diameter, give the lower section enough depth so that the roll can rotate freely.
Always test the roll before finishing the side attachments.
Kitchen Styling Ideas
This crochet paper towel holder works especially well with natural kitchen decor.
Farmhouse Kitchen
Combine beige crochet with natural wood, white ceramics, green plants, and neutral fabrics.
Cottage Kitchen
Add floral curtains, ceramic containers, wooden shelves, and small handmade accessories.
Modern Neutral Kitchen
Use cream, taupe, light gray, and natural wood while keeping the floral decoration simple.
Country Kitchen
Try mustard, sage green, terracotta, cream, and brown for a warmer palette.
Alternative Flower Designs
The sunflower-style flowers shown in the finished design are only one possibility.
You can replace them with:
- Simple five-petal flowers
- Daisies
- Small roses
- Sunflowers
- Wildflowers
- Layered crochet flowers
The important thing is to keep the flowers relatively flat so that they do not interfere with the paper towel roll.
Alternative Color Combinations
The neutral base makes this project extremely easy to customize.
Classic Natural
Beige, cream, dark brown, and olive green.
Soft Spring
Cream, blush pink, sage green, and soft yellow.
Bright Cottagecore
White, mustard yellow, terracotta, forest green, and dusty blue.
Minimalist
All cream with natural wooden buttons and no colorful flowers.
Can You Use It for More Than Paper Towels?
Yes.
The basic structure can be adapted for other lightweight household uses.
For example, the lower opening could hold a small hand towel, fabric roll, wrapping paper, craft material, or another lightweight household item.
The organizer can also be adapted into a decorative wall pocket if you remove the paper-roll function and create a deeper storage compartment.
Crochet wall organizers are commonly adapted for craft supplies, bathroom items, nursery accessories, mail, and other small household objects.
How to Keep the Organizer Clean
Because the holder is designed for the kitchen, it can eventually collect dust or small amounts of cooking residue.
Always check the care instructions for the yarn you choose.
If the yarn is washable, gentle hand washing may be appropriate.
Do not automatically machine wash the entire organizer with its wooden rods attached.
Remove the wooden components when possible and allow the crochet to dry completely before reassembling it.
Storage and Maintenance
If you are not using the organizer for a long period, remove the paper towel roll and store the crochet piece in a dry place.
Avoid folding it tightly for long periods because this can create permanent creases in the crochet fabric.
Keep the wooden rods dry and inspect the attachment points occasionally.
Common Problems and Solutions
The Organizer Sags in the Middle
If the main panel bends excessively, the fabric may be too soft or the upper support may need reinforcement.
Try using a firmer yarn or reinforcing the upper edge.
The Upper Dowel Tilts
Check the position and length of the three hanging tabs.
They should distribute the weight evenly.
The Paper Roll Does Not Spin Easily
Check whether the lower opening is pressing against the roll.
The wooden rod should pass freely through the center of the roll.
The Flowers Look Uneven
Remove them temporarily and rearrange them before sewing.
It is much easier to correct the composition before everything is permanently attached.
The Wooden Rod Pulls on the Crochet
Reinforce the areas where the rod contacts the crochet and check that the dowel is smooth.
Safety and Installation Tips
Choose a wall location that is convenient for reaching the paper towel but does not interfere with cooking equipment, heat sources, or other kitchen activities.
Use an appropriate wall anchor or mounting method for the wall material and the total weight of the organizer plus the paper towel roll.
Do not rely on a weak adhesive hook if the finished organizer is heavier than the hook’s rated capacity.
The hanging cord and upper crochet tabs should also be inspected periodically.
Why This Is a Great Handmade Gift
A handmade paper towel holder can make a thoughtful housewarming gift because it combines decoration with everyday usefulness.
It can also be customized to match the recipient’s kitchen colors.
For someone who loves farmhouse or cottage-style decor, the combination of natural wood, beige crochet, and flowers makes the project especially appealing.
You can even make a matching set with crochet potholders, dishcloths, kitchen towels, utensil holders, or small wall baskets.
Project Checklist
Before considering your crochet paper towel holder complete, check each part:
- ✔ Main rectangular crochet panel is straight.
- ✔ Upper tabs are evenly positioned.
- ✔ Wooden buttons are securely attached.
- ✔ Front section is firmly connected.
- ✔ Flowers are securely sewn on.
- ✔ Leaves are firmly attached.
- ✔ Lower side supports are even.
- ✔ Lower wooden rod fits correctly.
- ✔ Paper towel roll rotates freely.
- ✔ Hanging cord is strong and balanced.
- ✔ Loose yarn ends are woven in.
- ✔ Wooden dowels are smooth.
- ✔ The finished organizer hangs level.
Frequently Asked Questions
Can beginners make this crochet paper towel holder?
Yes, if you are comfortable making rectangular crochet panels, sewing crochet pieces together, attaching buttons, and working simple decorative motifs. The project becomes easier when each component is completed separately.
What yarn is best for a crochet paper towel holder?
A firm cotton yarn is a practical choice because it can create a stable fabric and works well for home-decor projects. The exact yarn weight can be adjusted according to the desired texture and size.
Do I need two wooden dowels?
For the pictured construction, two wooden rods are useful: one supports the upper hanging structure and one passes through the paper towel roll. The exact arrangement can be modified depending on your preferred construction.
Can I make the holder wider?
Yes. Measure your paper towel roll and the wall space first, then adjust the width of the crochet panel and wooden dowels accordingly.
Can I remove the flowers?
Absolutely. The floral decoration is optional from a structural perspective. You can create a minimalist version with only the textured beige crochet and wooden buttons.
Can I use different flowers?
Yes. Daisies, roses, small wildflowers, sunflowers, or simple five-petal motifs can all work. Keep the decorative motifs relatively flat so they do not interfere with the paper roll.
Can the organizer hold other things?
Yes. With appropriate modifications, the same basic idea can be adapted for lightweight towels, craft supplies, mail, bathroom accessories, or other household items.
Final Thoughts
This crochet paper towel holder is a wonderful example of how a simple household object can become a beautiful handmade piece of home decor.
The neutral crochet body provides a warm foundation, while the natural wooden dowels add structure and contrast. The three floral motifs transform the front of the organizer into a small botanical display, and the wooden buttons complete the rustic handmade aesthetic.
The construction is also practical because the project can be divided into manageable stages: first create the main rectangular crochet panel, then build and decorate the front section, and finally install the wooden rods and hanging system.
Most importantly, the project can be customized to fit your actual kitchen and paper towel roll. You can change the width, colors, flowers, buttons, yarn, and hanging length while keeping the same basic concept.
Whether you choose a warm farmhouse palette, a soft cottagecore combination, or a minimalist neutral design, this handmade organizer can turn an everyday kitchen necessity into something useful, decorative, and uniquely yours.