Crochet Decor Piece in Peacock Colors for an Elegant Home
Crochet Decor Piece in Peacock Colors for Elegant Home
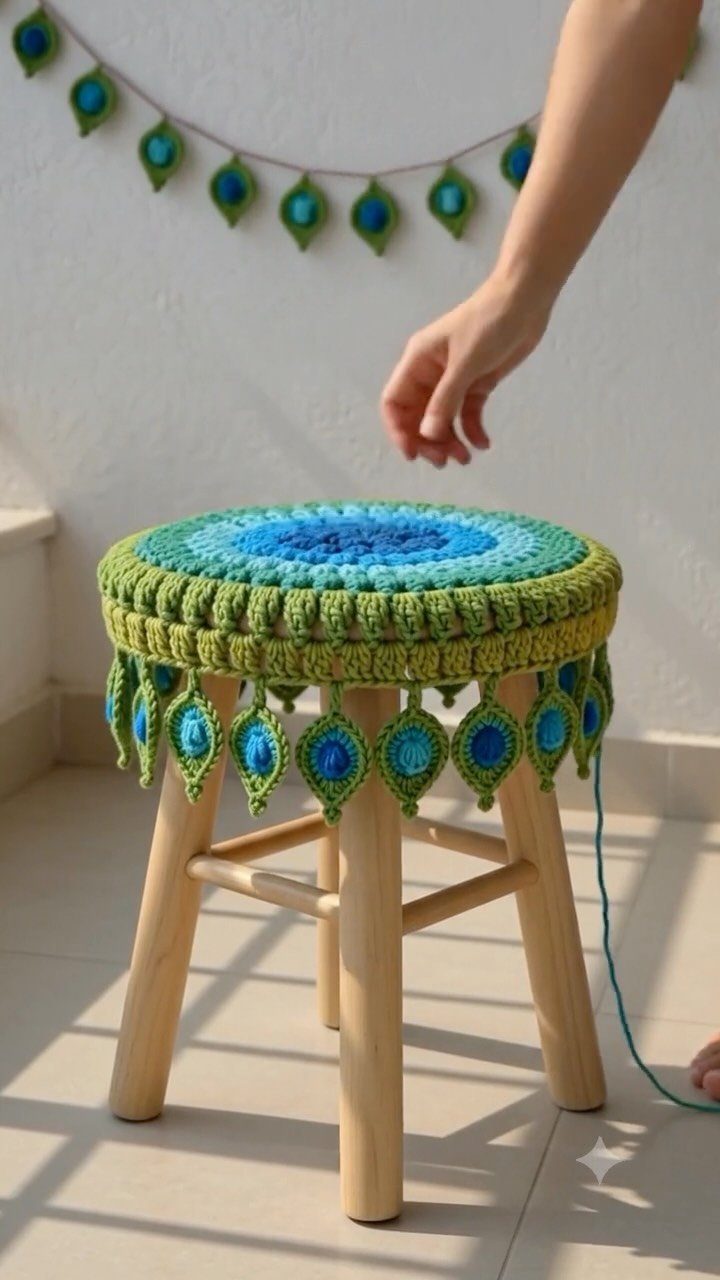
In this tutorial, you will learn how to create a crochet decor piece that embodies the elegance of peacock colors. Through this step-by-step guide, you’ll master the techniques needed to craft intricate peacock feather motifs, create a solid background panel, and assemble your project into a stunning home decoration. Get ready to enhance your living space while showcasing your crochet skills!
Project Plan
This project consists of three main components that will be meticulously crocheted and then assembled:
- Peacock Feather Motif: The key element of this project, which showcases beautiful detailing reminiscent of peacock feathers.
- Background Panel: A solid-color panel onto which the motifs will be sewn, providing a striking contrast against the vibrant peacock colors.
- Assembly: The final step involves securely attaching the motifs to the background and adding any finishing touches.
Each of these components will be crocheted separately before being joined together to create a cohesive decor piece.
Materials and Tool Selection
Required Materials
-
Yarn: A blend of acrylic and cotton is recommended for durability and ease of care. Choose deep blues, emerald greens, and hints of gold.
-
Crochet Hook: A size G (4.0 mm) hook is typically suitable for worsted weight yarn, but always check your specific yarn label for recommendations.
-
Tapestry Needle: Essential for weaving in ends and sewing pieces together.
-
Scissors: For cutting yarn.
-
Stitch Markers: Helpful for keeping track of rounds or rows.
Yarn and Hook Considerations
The type of yarn you choose will significantly affect the drape and feel of your finished piece. Acrylic yarn offers softness and ease of care, while cotton provides a more structured finish. Before starting, make a practice swatch to ensure you achieve the correct gauge, as this is critical for the pieces to fit together properly.
Making and Assessing a Sample
To make a sample, crochet a square measuring 4 inches by 4 inches. Count your stitches and rows to check if they align with your desired gauge. Adjust your hook size if needed to achieve the intended dimensions.
Terminology and Techniques
Key Abbreviations
- ch: chain
- sc: single crochet
- dc: double crochet
- sl st: slip stitch
- st(s): stitch(es)
Essential Techniques
Chain Stitch (ch)
- Insert the hook into the loop on your hook.
- Yarn over (yo) and pull through the loop.
- You will have 1 loop on your hook after the action is completed.
- Complete the stitch by pulling through, leaving one loop on the hook.
Single Crochet (sc)
- Insert the hook into the stitch.
- Yarn over and pull through; you will have two loops on your hook.
- Yarn over again and pull through both loops.
- The finished stitch should appear compact.
Double Crochet (dc)
- Yarn over and insert the hook into the stitch.
- Yarn over again and pull through; you will have three loops on your hook.
- Yarn over and pull through the first two loops, then yarn over again and pull through the remaining two loops.
- The finished stitch should tower above a single crochet.
Turning Chains
When finishing a row, remember to adjust the height of your stitches by adding the appropriate number of turning chains. For double crochet, use a count of 3; for single crochet, use just 1.
Measurements and Preparation
Before starting your project, measure your sample swatch to ensure you are on track. For fitted designs or dimensional pieces, blocking may be necessary. Make sure your gauge matches your intended final size to avoid adjustments later on.
Gauge Swatch Measurement
To check your gauge:
- Measure your finished swatch.
- Calculate stitches per inch and rows per inch.
- Note any discrepancies and adjust your hook size accordingly.
Detailed Working Method
Stage 1: Crochet the Peacock Feather Motif
a. Create the Foundation:
Begin with a magic ring, then chain 3. Work 12 double crochets (dc) into the ring.
b. Join Round:
Slip stitch into the top of the beginning chain 3 to close the round, resulting in a total of 12 stitches.
c. Next Round:
Chain 3, then work 2 dc in each stitch around for a total of 24 stitches. Join with a slip stitch to the top of the chain 3.
d. Prepare for Detail:
Create the feather shape by alternating dcs and other stitches to form curves and points.
e. Stitch Placement Notes:
Ensure to work into the actual stitches rather than the spaces. Verify the stitch count before completing the round.
Stopping Condition:
Complete this round with a precise count of 24 stitches. A visual checkpoint is the defined feather shape formed.
Stage 2: Create the Background Panel
a. Foundation:
Start with a long chain. For a medium-sized panel, chain 30.
b. First Row:
Work 1 single crochet (sc) in each chain. Turn your work.
c. Following Rows:
Continue with rows of sc until you’ve reached your desired height, typically around 20 rows.
Stopping Condition:
Ensure the panel is flat and the height is even across all rows.
Stage 3: Assemble the Crochet Pieces
a. Placement of Motifs:
Lay out your peacock motifs on your background panel before securing them.
b. Sewing on the Motifs:
Using your tapestry needle, sew down each motif. Make small stitches around the edges to hold them firmly in place.
c. Weaving in Ends:
Ensure all loose ends are woven in securely to maintain the integrity of your work.
Assembly and Finishing
Checking Alignment:
As you position and sew motifs, continually check their alignment for a pleasing appearance.
Sewing Path:
Use a whip stitch or mattress stitch for hidden seams and a cleaner finish.
Final Touches:
Once all motifs are attached, consider adding a decorative border in a contrasting color for further visual interest.
Troubleshooting
| Symptom | Likely Cause | Practical Correction |
|——————————-|—————————|————————————-|
| Stitches are too tight | Small hook or tight tension| Try a larger hook or loosen tension |
| Uneven edges | Incorrect stitch count | Count stitches and adjust as needed |
| Motifs aren’t laying flat | Too much tension | Loosen stitches, or block the panel |
Variations, Care, and FAQ
Variations
Consider experimenting with different color schemes for a seasonal effect, or use variegated yarn for added depth. Adding embellishments like beads may enhance the beauty of the peacock motif.
Care Instructions
Hand wash your finished piece in cold water and lay it flat to dry to maintain its shape and colors.
Frequently Asked Questions
How do I attach a hook if I run out of yarn?
You can join a new ball of yarn by twisting it with the old yarn and continuing your project seamlessly.
What if I don’t like the colors I’ve chosen?
It’s perfectly fine to alter colors as long as you haven’t started the final assembly.
How do I ensure my stitches are uniform?
Focus on maintaining consistent tension throughout your work and practice basic stitches regularly.
Can I use a different stitch for the motifs?
Definitely! Feel free to incorporate alternative crochet techniques that suit your style.
Completion Checklist
- [ ] Create and assess a sample.
- [ ] Complete all crochet components.
- [ ] Assemble and finish the piece.
- [ ] Weave in ends and block the final piece if necessary.
By following this guide, you will have crafted a distinctive crochet creation that reflects the elegance of peacock feathers and adds beauty to your home decor. Happy crocheting!