Crochet Floral High Heel Sandals: A Beautiful Handmade Shoe Design
Some crochet projects are made to be practical, while others are created simply to make a beautiful statement. These crochet floral high heel sandals combine both ideas into one eye-catching handmade design.
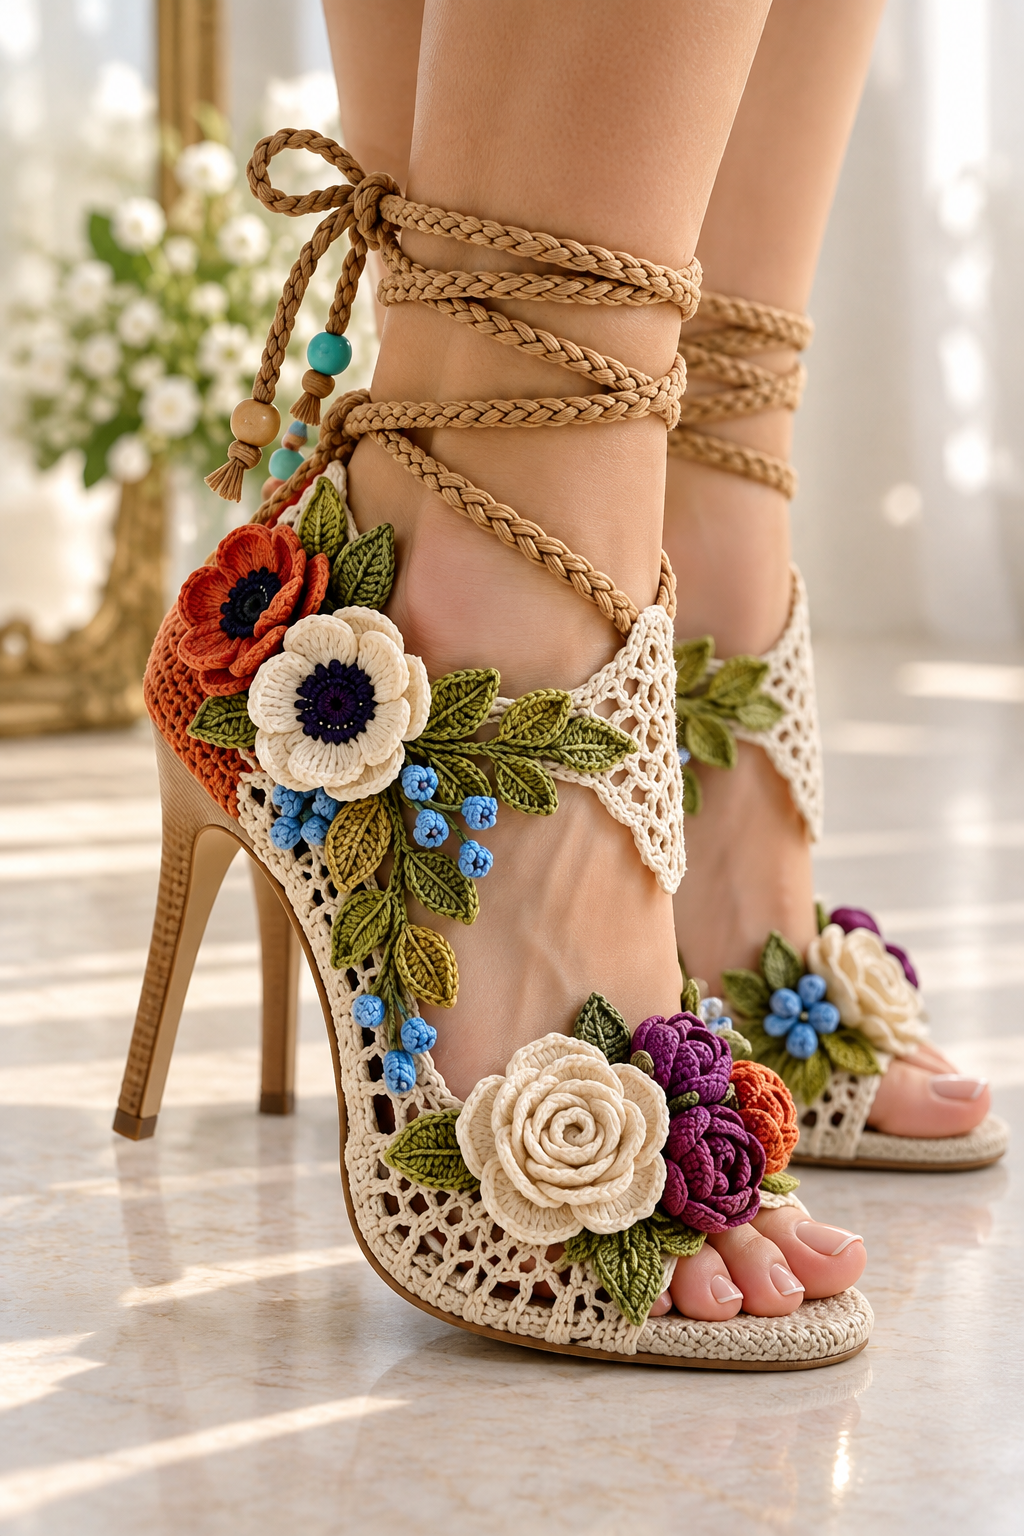
The finished pair features a delicate cream crochet upper, a classic high-heel silhouette, long braided ankle ties, and a colorful arrangement of handmade flowers, leaves, and small berry-like details. The combination gives the sandals a romantic garden-inspired look that feels especially beautiful for summer outfits, special occasions, creative photography, weddings, parties, and handmade fashion collections.
What makes this project particularly interesting is the way several different crochet elements come together. Instead of treating the entire shoe as one complicated crochet piece, the design can be approached as a combination of a lightweight lace upper, decorative floral motifs, leaves and small accents, and separate ankle ties that are fitted to the shoe.
This guide explains the construction and creative process behind a pair inspired by the pictured design. Because the exact original designer and stitch-by-stitch pattern for this particular pair could not be verified, the instructions below are intentionally written as an adaptable project guide rather than an unverified claim that these are the original pattern instructions.
What Makes These Crochet High Heel Sandals Special?
The first thing that stands out is the contrast between the neutral cream crochet base and the bright botanical decorations. The cream upper keeps the shoe elegant and light, while the orange, purple, blue, green, and white crochet details create the feeling of a small handmade garden growing across the shoe.
The design also uses several textures at once. The openwork crochet creates an airy lace-like appearance, while the flowers have a more dimensional construction. The leaves add pointed shapes and visual movement, and the small blue berry details fill the spaces between the larger motifs.
The result is much more than a simple crocheted sandal. It is a decorative footwear project where color placement and composition are just as important as crochet technique.
Understanding the Construction
A useful way to understand this type of project is to divide the finished shoe into several components:
- The shoe base: a suitable high-heel sandal or shoe provides the structure, sole, heel, and footbed.
- The cream crochet upper: a lightweight openwork section is shaped and fitted over the upper part of the shoe.
- Floral motifs: handmade crochet flowers provide the main decorative focal points.
- Leaves: green crochet leaves are arranged around the flowers to create a botanical composition.
- Small berry details: small blue crochet elements add color and fill the spaces between larger motifs.
- Ankle ties: long braided cords wrap around the ankle and complete the decorative look.
Breaking the project into these sections makes it much easier to manage. You do not need to think about creating the entire shoe at once. Each component can be made, tested, positioned, and adjusted before the final assembly.
Materials You May Need
The exact yarn quantity will depend on the shoe size, the amount of crochet coverage, and how heavily you decorate the upper. For that reason, it is better to think in terms of materials rather than fixed quantities.
Main Materials
- Cream or ivory crochet yarn for the lace upper
- Green yarn for leaves
- Several colors for flowers
- Blue yarn for small berry-like accents
- Tan or natural-colored yarn for the braided ankle ties
- A suitable pair of high-heeled sandals or a shoe base
- Appropriate crochet hooks for the selected yarns
- Tapestry needle
- Sharp scissors
- Stitch markers if needed
- Strong sewing thread for attaching decorative elements
If the sandals are intended for actual wear, choose materials that can tolerate handling and friction. A very delicate yarn may look beautiful in photographs but may not be appropriate for an item that will be walked in regularly.
Choosing the Crochet Yarn
The cream upper benefits from a yarn that can create a defined but flexible openwork fabric. Cotton or cotton-blend yarn can be a useful choice because it generally gives clear stitch definition and can hold its shape well.
For the flowers and leaves, a similar yarn weight can help keep the entire project visually balanced. However, you can intentionally use slightly different yarn thicknesses if you want certain flowers to stand higher from the surface.
The most important consideration is not simply the color. The yarn needs to produce a fabric that is comfortable enough for the intended use and strong enough to maintain its shape after fitting.
Step 1: Crochet the Cream Lace Upper
The first stage is to create the cream openwork section that forms the visual foundation of the sandal.
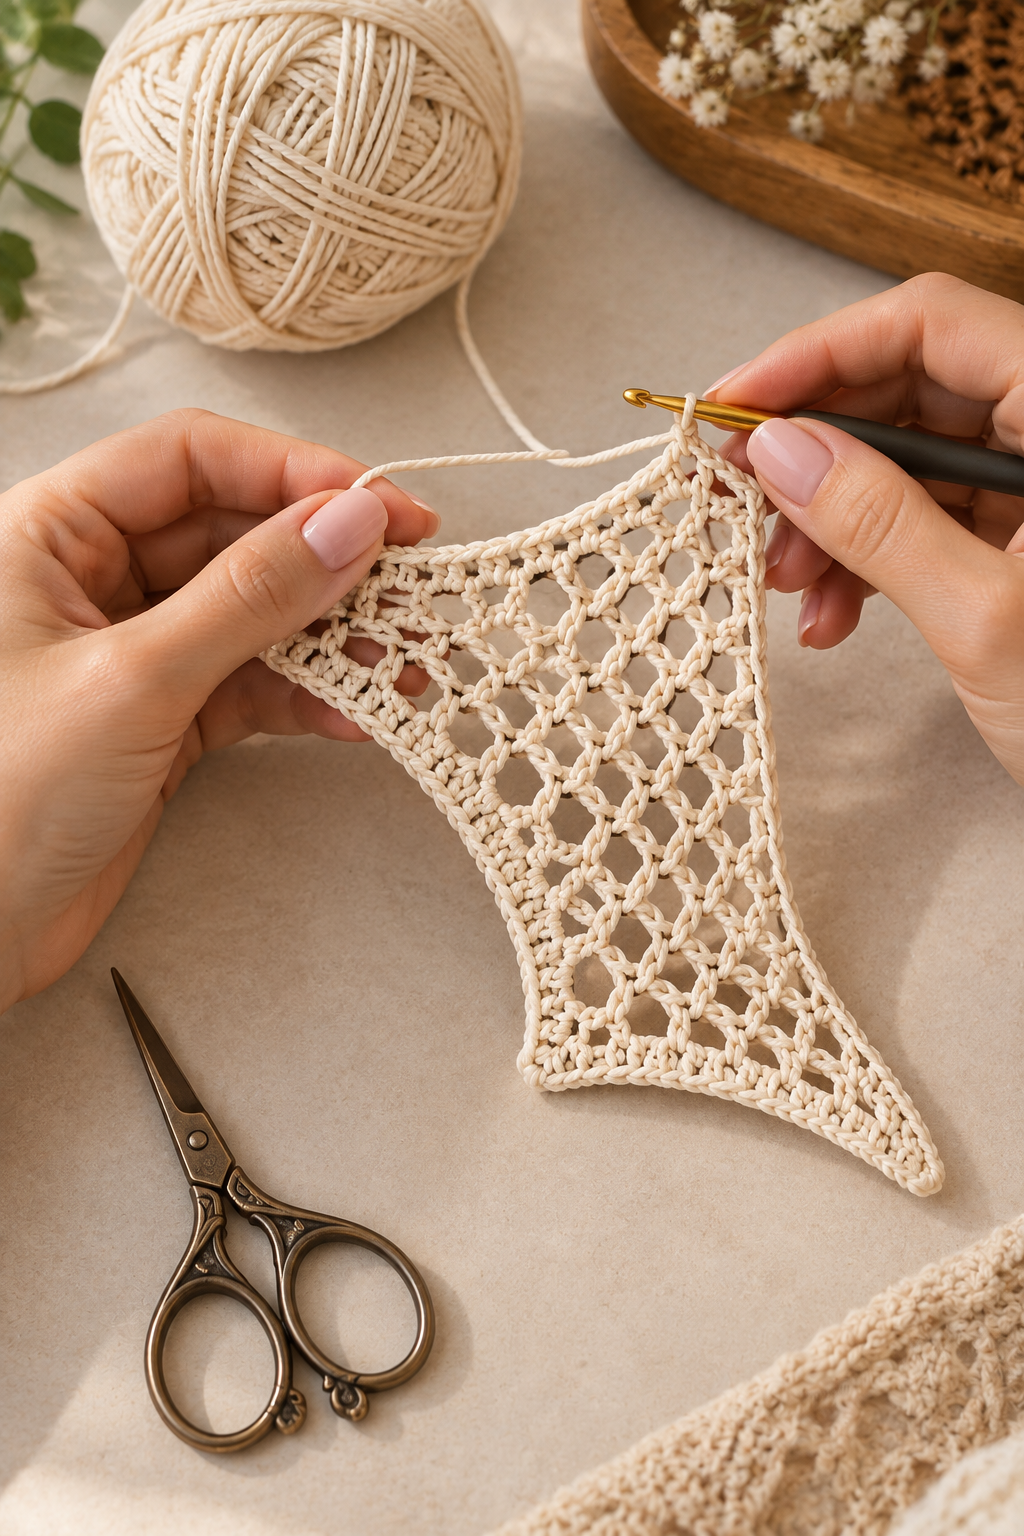
In the pictured design, the upper has a lightweight lace appearance rather than a solid crochet fabric. This allows the shoe underneath to remain part of the overall design while giving the sandal its handmade crochet identity.
Why the Lace Structure Matters
A dense fabric can become visually heavy on a high-heel shoe. The open spaces in a lace construction create a much lighter appearance and allow the decorative flowers to remain the main focus.
When working the upper, keep the tension consistent. If the stitches become very loose in one area and tight in another, the finished panel may not sit smoothly against the shoe.
Fit the Crochet Piece Before Final Attachment
Do not permanently attach the crochet section immediately after finishing it.
Place it over the shoe and gently shape it around the front and sides. Check where the fabric naturally wants to sit and whether it follows the curves of the shoe without pulling.
This fitting stage is important because every shoe has a slightly different shape. A crochet panel that looks perfect when lying flat may need small adjustments once it is placed over a curved shoe.
Step 2: Build the Floral Decoration
Once the cream upper has been fitted, the decorative elements can be prepared.
The flowers are the visual centerpiece of this project. The pictured design uses several colors and flower shapes rather than repeating one identical motif across the entire shoe.
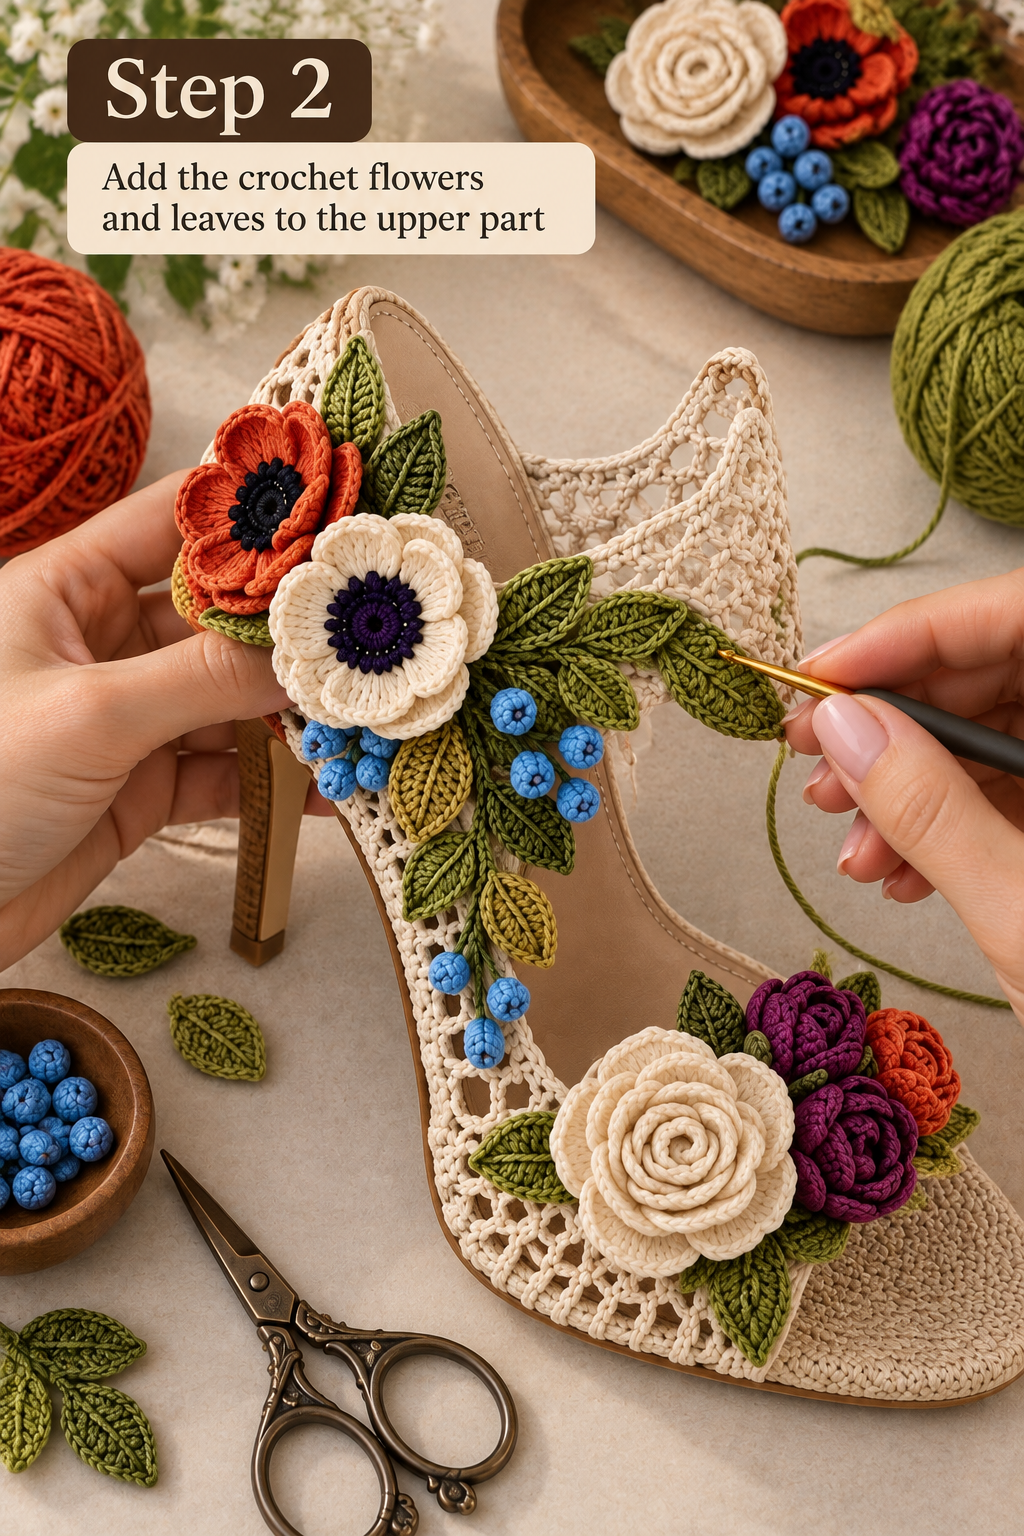
Make the Flowers Separately
For a design like this, making the flowers separately gives you much more control over the final composition.
You can create several flowers in advance and experiment with their arrangement before sewing anything permanently into place.
Try making flowers in different sizes. Larger flowers can act as the main focal points, while smaller flowers can be used to connect separate areas of the design.
Add the Green Leaves
The leaves are just as important as the flowers.
Without the green elements, the colorful flowers can look like isolated decorations. Adding leaves around and between them creates a more natural botanical effect.
Arrange some leaves pointing upward, some toward the side, and others following the natural direction of the shoe. Avoid placing every leaf at exactly the same angle.
Add Small Berry-Like Details
The small blue elements shown in the design are especially useful for filling visual gaps.
Instead of adding another large flower to every empty space, small rounded crochet details can create a lighter transition between the flowers and leaves.
This is also a good opportunity to introduce a contrasting color without overwhelming the main floral arrangement.
How to Arrange the Flowers
Before permanently attaching the motifs, place the finished flowers and leaves on the shoe while everything is still loose.
Start with the largest flowers.
Then add medium flowers around them.
Next, place the leaves in the spaces between the flowers.
Finally, add the small blue berry-like details wherever the composition needs a little more color or texture.
Take a photograph of the arrangement before sewing. This gives you a reference if any pieces move while you are attaching them.
Do Not Make Both Shoes Too Different
A handmade floral design does not need to be perfectly symmetrical, but the two sandals should still feel like a pair.
You can change the exact position of individual leaves or flowers while keeping the overall color distribution similar.
For example, if one shoe has a large cream flower near the front and purple flowers toward the side, the second shoe can use a slightly different arrangement while keeping the same general balance.
This creates a handmade appearance without making the pair look mismatched.
Attaching the Decorative Motifs
When you are satisfied with the arrangement, attach the motifs securely.
For larger flowers, use several discreet attachment points rather than securing only the center. This helps prevent the outer petals from lifting too much during handling.
Leaves can be attached through the center or along selected points of the leaf, depending on how much movement you want.
Small berry-like pieces should also be secured carefully because small loose components can catch on clothing or other objects.
Step 3: Add the Braided Ankle Ties
The final major component is the long braided ankle tie.
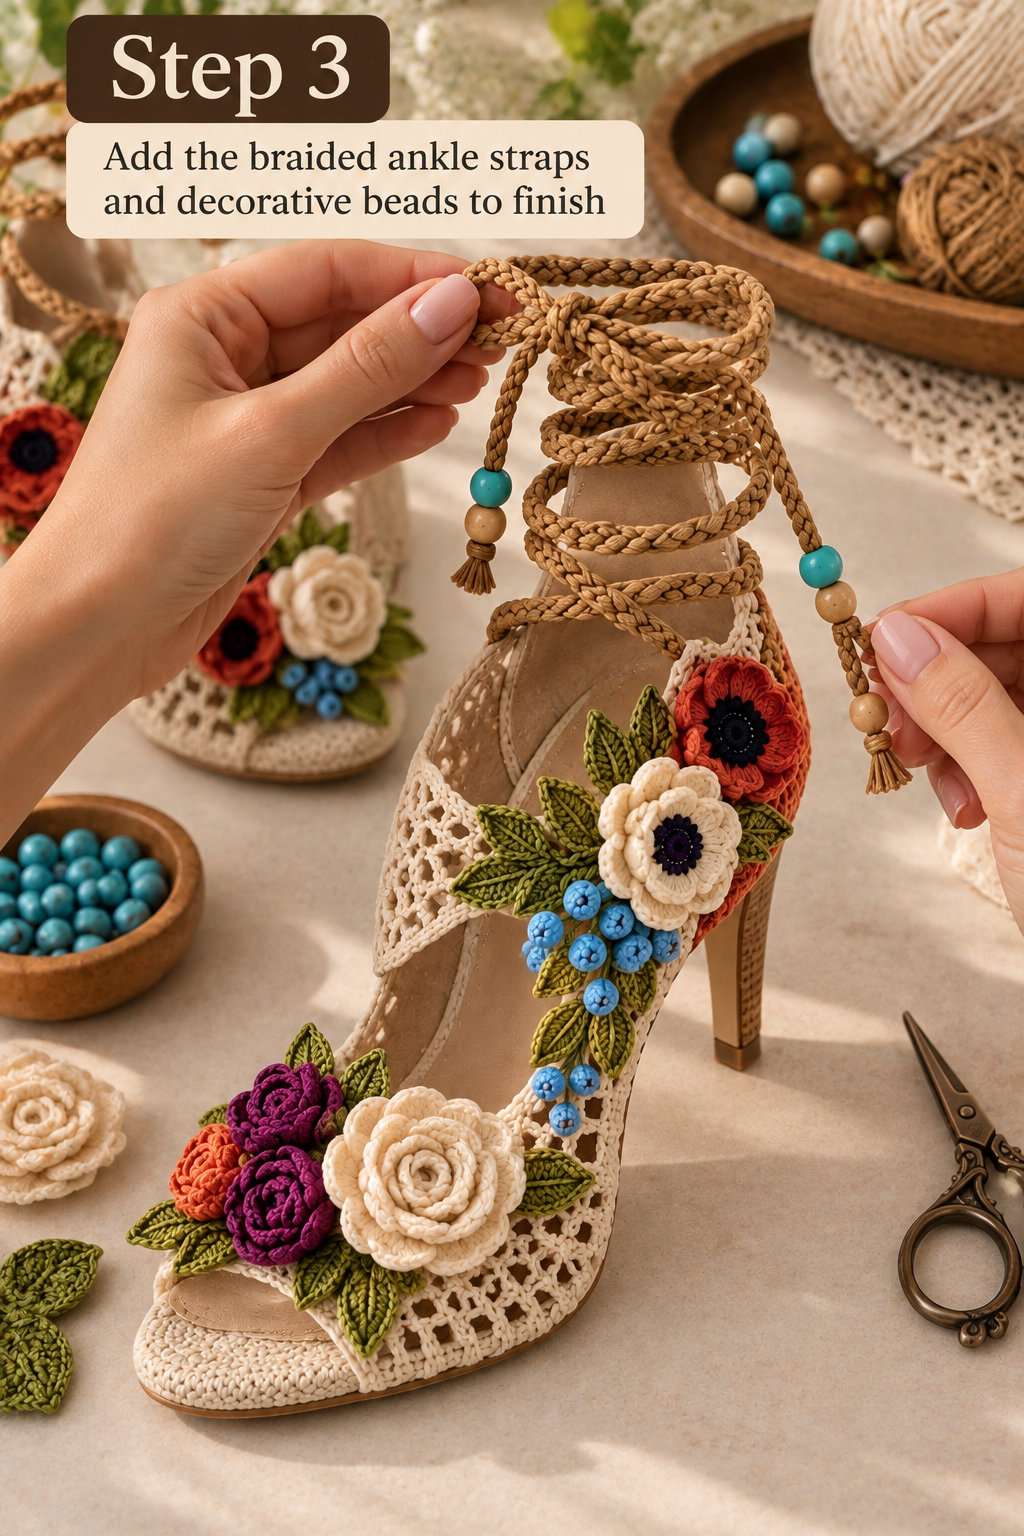
The warm tan color works particularly well with the cream crochet because it adds a subtle natural contrast without competing with the flowers.
Creating the Braided Cord
The tie can be made from several strands of yarn that are braided together. The number of strands and the final thickness can be adjusted according to the desired appearance.
Make the cord long enough to wrap comfortably around the ankle and still leave enough length for tying.
Before cutting the cord, test it on the actual shoe and measure the complete wrapping distance.
Adding Decorative Ends
The pictured style uses decorative details near the ends of the ankle ties. Small wooden, neutral, or colorful beads can be incorporated if they are securely attached.
Another option is to finish the cord with a small crochet tassel. This creates a softer handmade appearance and works especially well with a bohemian or garden-inspired theme.
Fitting the Ankle Ties
Place the finished tie around the ankle area and check how it sits when the foot is inside the shoe.
The tie should be decorative and secure without being excessively tight.
Make sure the cord does not create uncomfortable pressure points. If the sandal is intended for real walking, test the fit while standing rather than checking it only while the shoe is lying flat.
How to Secure the Crochet Upper to the Shoe
This is one of the most important parts of the project.
The crochet upper should not simply be placed loosely over the shoe if the finished piece is intended to be worn. It needs to be securely attached to the appropriate parts of the shoe structure using a method compatible with the shoe base.
Depending on the shoe construction, attachment may involve strong sewing thread, carefully positioned stitching, or another suitable footwear-assembly method.
Do not place stitches where they could interfere with the foot, buckle, heel mechanism, or other structural parts of the shoe.
Keeping the Lace Upper Neat
After attachment, inspect the entire edge of the cream crochet panel.
Look for areas that pull away from the shoe, loose yarn ends, uneven tension, or sections that fold unnecessarily.
A clean edge can make a major difference in the appearance of handmade footwear. Even a beautiful crochet motif can look unfinished if the underlying lace panel is loose or uneven.
Color Palette Ideas
The original pictured combination uses a soft cream base with rich botanical colors.
You can create a similar atmosphere with:
- Cream or ivory for the main upper
- Deep purple for dramatic flowers
- Warm orange for brighter floral accents
- Soft white or cream for larger flowers
- Olive or moss green for leaves
- Bright blue for small berry details
- Tan or natural brown for ankle ties
If you prefer a more understated version, use cream flowers with sage-green leaves and only one accent color.
For a wedding-inspired design, replace the bright flowers with ivory, blush, champagne, and pale green.
For a summer version, turquoise, coral, yellow, pink, and green can create a much brighter look.
How to Make the Design Look More Elegant
The secret is balance.
Too many flowers of the same size can make the shoe look crowded. Too few decorative elements can make the crochet upper appear unfinished.
A good approach is to create a visual hierarchy:
- Choose one or two large focal flowers.
- Add medium flowers around the focal areas.
- Use leaves to connect the flowers.
- Use small berry-like details to fill selected gaps.
- Leave some of the cream lace visible.
That last point is particularly important. The cream openwork is part of the beauty of the design, so it should not be completely hidden underneath decoration.
Keeping the Crochet Details Secure
Because footwear experiences movement, decorative pieces should be attached more securely than they would be on a wall decoration or decorative bag.
Check every flower, leaf, berry, and cord connection before wearing the sandals.
Pay particular attention to areas that can rub against another shoe or come into contact with clothing.
If a decorative element moves excessively during a test fitting, reinforce it before using the sandals outside.
Testing the Finished Sandals
Before considering the project complete, place the sandals on your feet and stand normally.
Check the following:
- Does the crochet upper stay in position?
- Does any section feel too tight?
- Do the flowers interfere with the foot?
- Are the ankle ties comfortable?
- Do the decorative elements remain secure?
- Does the crochet rub against the skin?
- Can you move your foot comfortably?
- Does anything loosen when the foot moves?
If the sandals are intended only for photography or display, the construction requirements can be different. If they are intended for repeated walking, durability and secure attachment should take priority over decorative appearance.
Care Tips for Crochet Footwear
Crochet footwear with multiple decorative motifs should be handled carefully.
Avoid throwing the sandals into a washing machine unless every material and the shoe base are specifically suitable for machine washing.
Instead, gently clean small areas when necessary and allow the crochet components to dry completely before storing them.
Store the sandals in a dry place where the flowers will not be crushed.
If the shoe is being stored for a long period, lightly stuff the toe area with clean tissue paper to help preserve its shape.
Common Problems and How to Fix Them
The Crochet Upper Does Not Sit Flat
This usually means the crochet fabric and the shape of the shoe do not match perfectly.
Reposition the panel before permanently attaching it. If necessary, adjust the edge or reshape the crochet slightly so it follows the shoe more naturally.
The Flowers Look Too Crowded
Remove a few smaller motifs and spread the remaining flowers apart.
The cream lace should still be visible between decorative areas.
The Flowers Keep Moving
Reinforce their attachment points. Larger flowers may need more than one secure point to prevent excessive movement.
The Ankle Tie Is Too Short
Measure the actual ankle wrapping distance before making the final cord. Remember to include additional length for tying and adjusting the bow.
The Crochet Looks Too Heavy
Use a lighter yarn or a more open lace structure for the upper. You can also reduce the number of large motifs while keeping smaller leaves and accents.
Ideas for Customizing the Sandals
Once you understand the basic construction, there are many ways to create a different version of the same concept.
Romantic Garden Version
Use ivory, blush pink, dusty rose, sage green, and soft lavender flowers. Keep the ankle ties in natural beige.
Colorful Summer Version
Use coral, turquoise, yellow, purple, and blue flowers over a white or cream lace base.
Minimal Version
Keep the crochet upper cream and use only a few small white flowers with green leaves.
Bohemian Version
Use earthy orange, mustard, olive, burgundy, cream, and natural brown cords. Add small wooden beads to the ankle ties.
Bridal Version
Use ivory lace, white flowers, pale champagne accents, and very subtle greenery. Pearls can replace colorful berry details for a more formal appearance.
Why Handmade Crochet Shoes Are Such Interesting Projects
Crochet footwear sits at the intersection of fiber art and fashion.
Unlike a scarf or blanket, a shoe has to interact with the shape and movement of the human body. That means the maker has to think about fit, structure, flexibility, comfort, attachment, and durability at the same time.
The floral high heel design shown here takes that idea in a decorative direction. The shoe becomes a canvas for crochet flowers, leaves, lace, and color.
It is also a great example of how relatively small crochet motifs can completely transform an existing fashion piece.
Project Checklist
Before calling your sandals finished, go through this checklist:
- ✔ Cream crochet upper is fitted correctly
- ✔ Crochet edges are neat and secure
- ✔ Flowers are firmly attached
- ✔ Leaves are positioned naturally
- ✔ Small decorative accents are secured
- ✔ Ankle ties are long enough
- ✔ Braided cords are firmly attached
- ✔ Loose yarn ends are woven in
- ✔ The shoe remains comfortable during fitting
- ✔ Decorative elements do not interfere with walking
Frequently Asked Questions
Can I make these crochet floral sandals on an existing pair of heels?
Yes. This type of project can be approached as a decorative crochet transformation of a suitable shoe base. The crochet upper and decorative motifs can be designed around the existing shape, provided they can be securely attached without interfering with the shoe’s structure.
Do I need to crochet the entire shoe?
No. For the pictured style, an existing high-heel shoe or sandal can serve as the structural base while the crochet work creates the decorative upper and floral elements.
Can I change the flowers?
Absolutely. The flowers are one of the easiest parts to customize. You can change their size, color, number, and arrangement while keeping the cream lace foundation.
Can I use different colors?
Yes. The same construction can work with almost any coordinated color palette. The important thing is to maintain enough contrast between the base, flowers, leaves, and small accent motifs.
How do I make the sandals fit my shoe?
The best method is to measure and test the crochet components directly against the actual shoe before making permanent attachments. Shoe shapes vary considerably, so adapting the upper to the specific base is more reliable than depending on a generic measurement.
Are these suitable for everyday walking?
A decorative crochet upper does not automatically make a shoe suitable for everyday use. If you intend to wear the finished sandals for walking, test the attachment points, comfort, stability, and durability carefully before extended use.
Final Thoughts
These crochet floral high heel sandals are a beautiful example of how crochet can move beyond traditional accessories and become part of a fashion statement.
The combination of cream lace, colorful flowers, green leaves, small berry-like accents, and braided ankle ties creates a handmade design with a distinctly botanical personality.
The project becomes much easier to understand when separated into stages: first create and fit the cream crochet upper, then prepare and arrange the floral decorations, and finally finish the shoe with the braided ankle ties.
The most important part is not following an unverified stitch count. It is understanding the construction and adapting each component to the actual shoe you are working with.
That approach gives you room to experiment with colors, flower shapes, yarn weights, and decoration while keeping the elegant character of the original pictured design.
Whether you create a colorful garden-inspired pair, a soft bridal version, or a simpler cream-and-green design, this is the kind of crochet project that can turn an ordinary shoe base into something completely personal and handmade.